
Orders & Redemptions
Redemption with Approval
The redemption Approval feature helps you to avoid suspicious redemptions and frauds. It is clear that during the digital era, fraud frequently happens. Hence why this feature is needed to keep your loyalty program safe! By using this feature, business owners can set a limit of criteria that deem transactions safe or suspicious.
- Customer Redeem their Point(s)
- Open Dashboard
- Go to the “Order & Redemptions” Segment
- Go to the “Waiting for Approval” segment
- Redemption transactions that exceed the pre-determined limit criteria will be shown here. You can either reject if it looks suspicious or confirm if you deem it’s fine. The limit criteria that you can set are:
- The total amount of redemption in one transaction
- The total quantity of redemption items in one day
6. Then you can check the confirmed redemption transactions in the “Completed” segment.

Feature Orders and Redemptions
The Orders & Redemptions is further divided into several sub-menus: “All”, “Unpaid”, “New Order”, “Need to be Sent”, “On Delivery”, “Completed”, “Canceled”, and “Fulfilled by TADA”. The order data can be filtered according to the start and end dates, order ID, SKU, and order references. More advanced filters can be implemented, such as filtering by recipient name, recipient phone number, item name, store, and delivery address. The order data based on the applied filter will be displayed as a table below the “Order Data Filter” section. These data can be downloaded by the merchant for further usage. Check your orders and redemptions process by following these steps, also provided you a video of our expert explaining this, please find it below:
- Open our powerful dashboard
- Go to the “Orders & Redemptions” menu
- Here you can find all of your orders and redemptions details; filter specific dates, order classification, customer data who ordered, and every single information you need regarding orders and redemptions
For better understanding and example, please check the video of our expert below explaining this orders & redemptions dashboard menu with real implementation :
https://www.youtube.com/watch?v=TERQiSUd8-I
Previously, when customers redeem pulsa or e-wallets, our system did not display the recipient's phone number. The same goes when customers redeem e-Vouchers, our system did not display the voucher link. Now we will display the recipient number when the customer redeems pulsa or e-wallet and displays the voucher link when redeeming the e-Vouchers on the order & redemption menu.


How to Process Physical Items Order via Dashboard
Got physical items order that needs to be delivered and wondering how you can process them?
First, let’s cover the shipping options that we have here in Tada! We divide our shipping options into basically 2 categories: orders that will be automatically picked up when ready, and orders that you (the brand) will need to send.
If you choose to have the orders automatically picked up, customers will choose which courier they want to use from the available options (JNE, Gosend, Grab, J&T, etc).
But if you choose to send the orders yourselves, you can choose to send them using your own internal courier, or you can send them using a third-party courier of your choosing.
Okay! Now that we have covered the shipping method options, let’s talk about how to process them. The first one is how to process orders using your own internal courier or your choice of third-party courier:
- Go to our Dashboard and click on the Orders&Redemptions menu
- Check on the New Order tab and click Confirm on the orders that you want to process
- After that, the order will move to the Need to be Sent tab
- Once the order is ready and you have shipped the package, click Process and input the courier name and the tracking number
- Now your order will move to On Delivery tab
- Once your order has been delivered to your customer, our Dashboard will detect the tracking number and the order will automatically move to the Completed tab. But if there should be any problem, worry not! You can still manually change the status to completed by clicking “complete” on the order while it’s still On Delivery tab
 Now if we are processing orders using the shipping method of the customer’s choosing, it’s even easier!
- Follow the same steps until the order is under the Need to be Sent tab
- Click Request Pick Up and the courier of your customer’s choosing will come and pick up the package
- The order will move to On Delivery tab
- Now you just have to wait until the order has been delivered and the order status will automatically change to Completed. So easy!
 So now the order status will automatically be completed for both shipping method that uses third-party courier. No more manual work of tracking the order and completing the order status!👋🏻
Store Filter Implementation
Monitoring Order and Redemption is now even easier! You can pick a specific store in the filter to check your order or redemption data as easily as one click. This filter could make monitoring activities much simpler, you can check the details for orders from shops & virtual franchises.
It is as easy as the following steps:
1. Open Dashboard
2. Go to the “Orders & Redemptions” Menu
 3. Click “Advanced Filter” to apply more specific filter
 4. Choose the range of date
 5. Choose the specific store from the “Store” filter
 6. Click “apply filter”
 7. Check the order details and take action Confirm/Reject!

Print Shipping Invoice On Tada Dashboard
Shipping Label is improved to be more user-friendly and the improved design makes the information clear and easy to read. We are introducing our new easy-to-read shipping order.
(Image: Old → New) Barcode Implemented.
It is as easy as the following steps:
1. Open dashboard.usetada.com
2. Go to the “Order & Redemptions” Segment, then click Print shipping
 3. New re-design print shipping will be there with Barcode Implemented

Order Status Notification via WhatsApp for Members
Previously, we were only able to notify customers of their order status via email. However, we understand most customers don’t check their email as much as they check their WhatsApp. So we’ve added options to send the order notification via WhatsApp and the best part is, you can customize the message while using your own sender ID! Here’s how:
Decide what sender id you want to use
Using Tada’s sender id might be the easiest. However, if you want to increase brand awareness, you can use your own brand’s name as the WhatsApp sender! And don’t worry, we will help you every step of the way in registering your own sender id. First step: check out this page
Choose when you want to send the notification
We can send out notifications multiple times for one order:
- Order on delivery
- Order created
- Order completed
- Order failed/canceled
You can choose which order status will send out the notifications, or you can enable it for all 4!
Create the notification message template
Once you have decided on when the notification will be sent out, you can customize the message template for each order status. To make it easy for you, we also have numerous tags that can be used in the message template. Contact our Client Success team for more info on this.
And you’re done! See how it looks like
Inform all of the above to your Client Success team and let us do the rest! See how the notifications will look like:

All About Component Fees in Redemption, Shop, and VF
When your members place an order or redeem their hard-earned points – whether by selling points, using them for QRIS transactions, or exchanging their points with some items – additional component fees like tax and processing fees might come into play. But here's the exciting part: did you know you have the power to decide who bears these fees – you or your customers? It was no piece of cake, but we made it happen! Our mission is simple – to empower you with full control over your brand's strategy when it comes to fee absorption. Fancy charging tax to customers while your company covers the processing fee? Easy peasy! Or maybe you have a different combo in mind – no worries, we've got you covered! Embrace the flexibility and leave the rest to us, because your brand, your rules!
Now you know you don't have to bear all the additional component fees yourselves! But hang on, we know you don't want customers hitting the cancel button over fee confusion 🙅🏻♀️ That's why we've got a nifty trick up our sleeves 🤭 Say hello to our "grouping fee" feature! Now you can request to group all the applied fees into one component and give it a name of your choice – talk about streamlined simplicity! Let the "service fee" or "platform fee" handle all the calculations for you, from handling fees to admin fees, processing fees, and convenience fees – you name it, we've got it! With this game-changing feature, fee management has never been easier. So go ahead, take control and delight your customers with seamless transactions!
Here are all the component fees you might encounter:
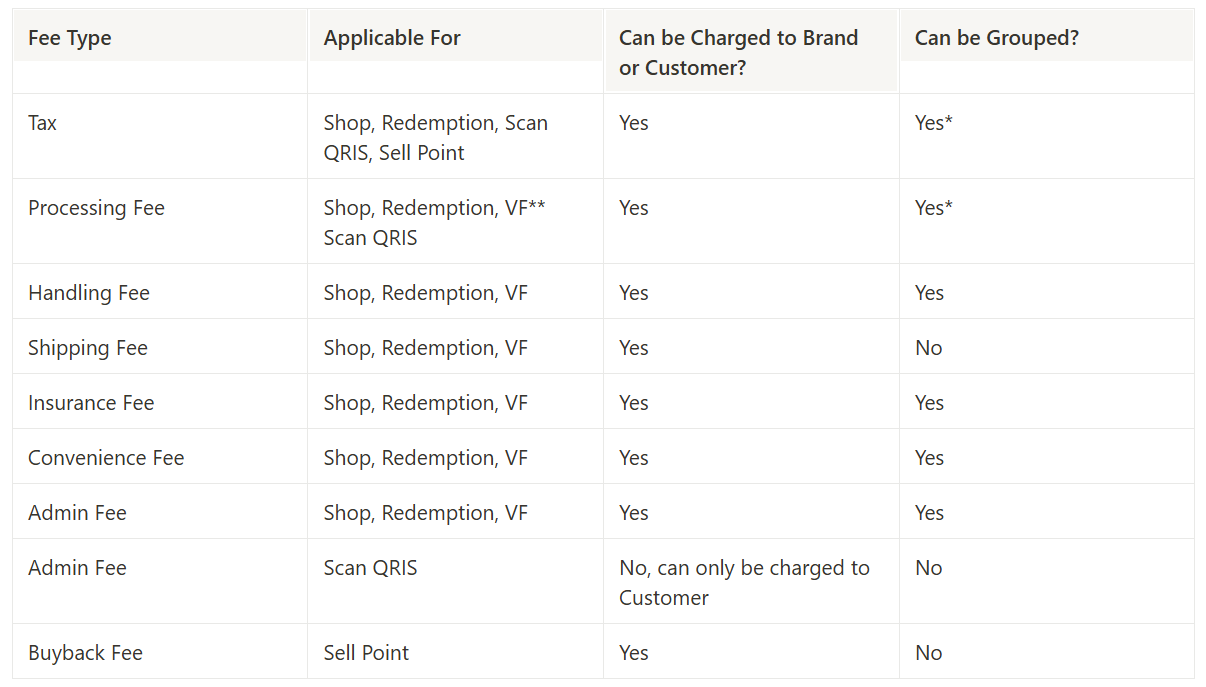 *Grouping fee is not available in Sell Point and Scan QRIS
** Processing fee in Shop, Redemption, and VF only applicable if the item is using Tada’s catalog
Customer display if the tax and processing fee is set to be absorbed by customer

Customer display with and without grouping fee
