
Campaign
The Campaign menu helps brands deliver information, promotions, and content to members through various communication channels, including Push Notifications, SMS, Email, WhatsApp, and perks within the Tada application. This feature is designed to increase engagement between brands and members through more targeted and personalized campaign distribution.
This menu consists of four sub-menus:
- Create campaign: Used to create new campaigns.
- Campaign history: Used to view previously created campaigns.
- Campaign position: Used to manage the display position of campaigns within the Tada App.
- Email sender settings: Used to configure the sender name for email campaigns.
How to Create a Banner
The Banner feature is used to display promotional content or information banners within the member application.
Steps to Create a Banner
1. Open the “Campaign” menu, then select “Banner”.
 2. On the Campaign Banner List page, click “Create Banner Campaign”.
 3. The system will redirect you to the Banner Campaign Setup page. On this page, complete the following fields:
a. Campaign name: Enter the name of the banner campaign.
b. Select program: Choose the program where the banner will be displayed.
c. Upload image: Upload the banner image with a resolution of 720 × 360 px.
4. Add redirect link: Enable this toggle to redirect users to a specific page or privilege. If this toggle is enabled, users must choose whether the banner will redirect to a URL or a privilege.
- To redirect to a URL, select “URL” in the “Image Link” field, then enter the destination URL.
- To redirect to a privilege, select “Privilege Detail” in the “Image Link” field, then choose the privilege that users will be directed to.

 5. Add more banner: This option allows users to add multiple images within a single banner campaign. Click “Add More Banner” if you want to use more than one image. Each image can have its own Image Link configuration.
 6. Campaign status: Determines whether the banner is active or inactive. Enable the toggle to set the banner status to Active. Disable the toggle to set the banner status to Inactive.
 7. After completing all required settings, click “Save”.
How to Edit a Banner
1. Open the “Campaign” menu, then select “Banner”.
 2. On the Campaign Banner List page, click the desired Banner Name.
 3. Update the banner settings as needed.
4. After making the necessary changes, click “Save”.

How to Disable a Banner
1. Open the “Campaign” menu, then select “Banner”.
 2. On the Campaign Banner List page, change the banner status by clicking the toggle button as shown below. To activate a banner, enable the status toggle until it turns blue.
How to Create a Push Notification Campaign
1. Open the “Campaign” menu, then click “Push Notification”.
 2. Fill in the Campaign Name field. This is the internal campaign name that will be displayed in Campaign History. Enter the Campaign Title, which will be shown as the notification title received by members.
 3. If needed, upload an image by clicking “Upload Image”. Recommended image resolution: 300 × 150 px with maximum file size: 300 Kb.
 4. Enter the push notification content in the Description field with a maximum length of 100 characters. Users can use the {{Name}} tag to automatically display each member’s name in the notification.
 5. Choose the destination when members click the push notification. The following redirect options are available:
a. Card detail: Redirects members to the selected card detail page.
b. E-voucher detail: Redirects members to the selected e-voucher detail page.
c. Privilege detail: Redirects members to the selected privilege detail page.
d. Referral: Redirects members to the referral program page.
6. Select when the push notification will be sent:
- Now: The push notification will be sent immediately after the campaign creation process is completed.
- Later: The push notification will be sent at a specific date and time. If Later is selected, specify the Start Date, including both the delivery date and time.
 7. To send push notifications repeatedly, enable the Recurrence toggle. This feature allows the notification to be sent automatically based on a recurring schedule.
When Recurrence is enabled, configure the following parameters:
a. Repeat every: Determines the resend interval, such as every 1 day, every 2 days, and so on.
b. Time to send notification: Determines the time the notification will be sent. Users can choose from the available time options provided by the system.
c. Ends: Determines when the recurring notification schedule will stop. Available options include:
- Never: The push notification will continue indefinitely.
- On: Stops sending notifications on a specific date and time.

- After: Stops sending notifications after a specified number of deliveries. Example: The notification will stop after it has been sent 2 times to the recipient.
 8. Choose the recipients who will receive the campaign. There are three available options:
a. All members: All members will receive the campaign.
b. Specific members: Users can define specific criteria to determine which members will receive the campaign. Available filters include:
- Phone number
- Card number
- Customer name
- Customer email
- Program name
- Top member spending: If users enter 10, the campaign will be sent to the top 10 members with the highest spending transactions (Delivery Order, Shop, Subscription, Wallet Top Up, and Top Up).
- SKU purchased
- Item purchased
- City
- Last transaction: For example, if users select Less than a Week, members who made transactions within the last week will receive the campaign.
- Store activation: Members who activated their account at the selected store will receive the campaign.
- Birthday: Users can define a birthday date range. Members whose birthdays fall within the selected range will receive the campaign.
- Age: Users can define an age range. Members within the selected age range will receive the campaign.
- Gender
- Status member
- Level
- Other Member Data: Members who have specific additional data values selected in the Other Member Data dropdown will receive the campaign.

 c. List of members: Users can upload an Excel file containing member identifiers (Phone Number or User ID) that will receive the campaign.
 9. After all settings have been configured, click “Continue” to complete the campaign creation process.
How to Create an SMS Blast Campaign
1. Open the “Campaign” menu, then click “SMS Blast”.
 2. Complete the Campaign Information section:
a. Campaign name: Enter the name of the campaign. This name will appear in the Campaign History menu. Ensure the name does not exceed 25 characters.
b. Description: Enter the SMS message content that will be sent to recipients. Ensure the message does not exceed 150 characters.
 3. Choose when the SMS campaign will be sent:
- Now: The SMS will be sent immediately after the campaign creation process is completed.
- Later: The SMS will be sent at a specific date and time. If Later is selected, specify the Start Date.
 4. Choose the recipients who will receive the campaign. There are three available options:
a. All members: All members will receive the campaign.
b. Specific members: Users can define specific criteria to determine which members will receive the campaign. Available filters include:
- Phone number
- Card number
- Customer name
- Customer email
- Program name
- Top member spending: If users enter 10, the campaign will be sent to the top 10 members with the highest spending transactions (Delivery Order, Shop, Subscription, Wallet Top Up, and Top Up).
- SKU purchased
- Item purchased
- City
- Last transaction: For example, if users select Less than a Week, members who made transactions within the last week will receive the campaign.
- Store activation: Members who activated their account at the selected store will receive the campaign.
- Birthday: Users can define a birthday date range. Members whose birthdays fall within the selected range will receive the campaign.
- Age: Users can define an age range. Members within the selected age range will receive the campaign.
- Gender
- Status member
- Level
- Other Member Data: Members who have specific additional data values selected in the Other Member Data dropdown will receive the campaign.

 c. List of members: User akan upload file dengan format excel yang berisi identifier member (phone number/user ID) yang akan menerima campaign.
 5. Terakhir, klik “Continue” untuk mengakhiri proses pembuatan campaign
How to Create a WhatsApp Template
1. Open the “Campaign” menu, then click “WhatsApp Blast”.
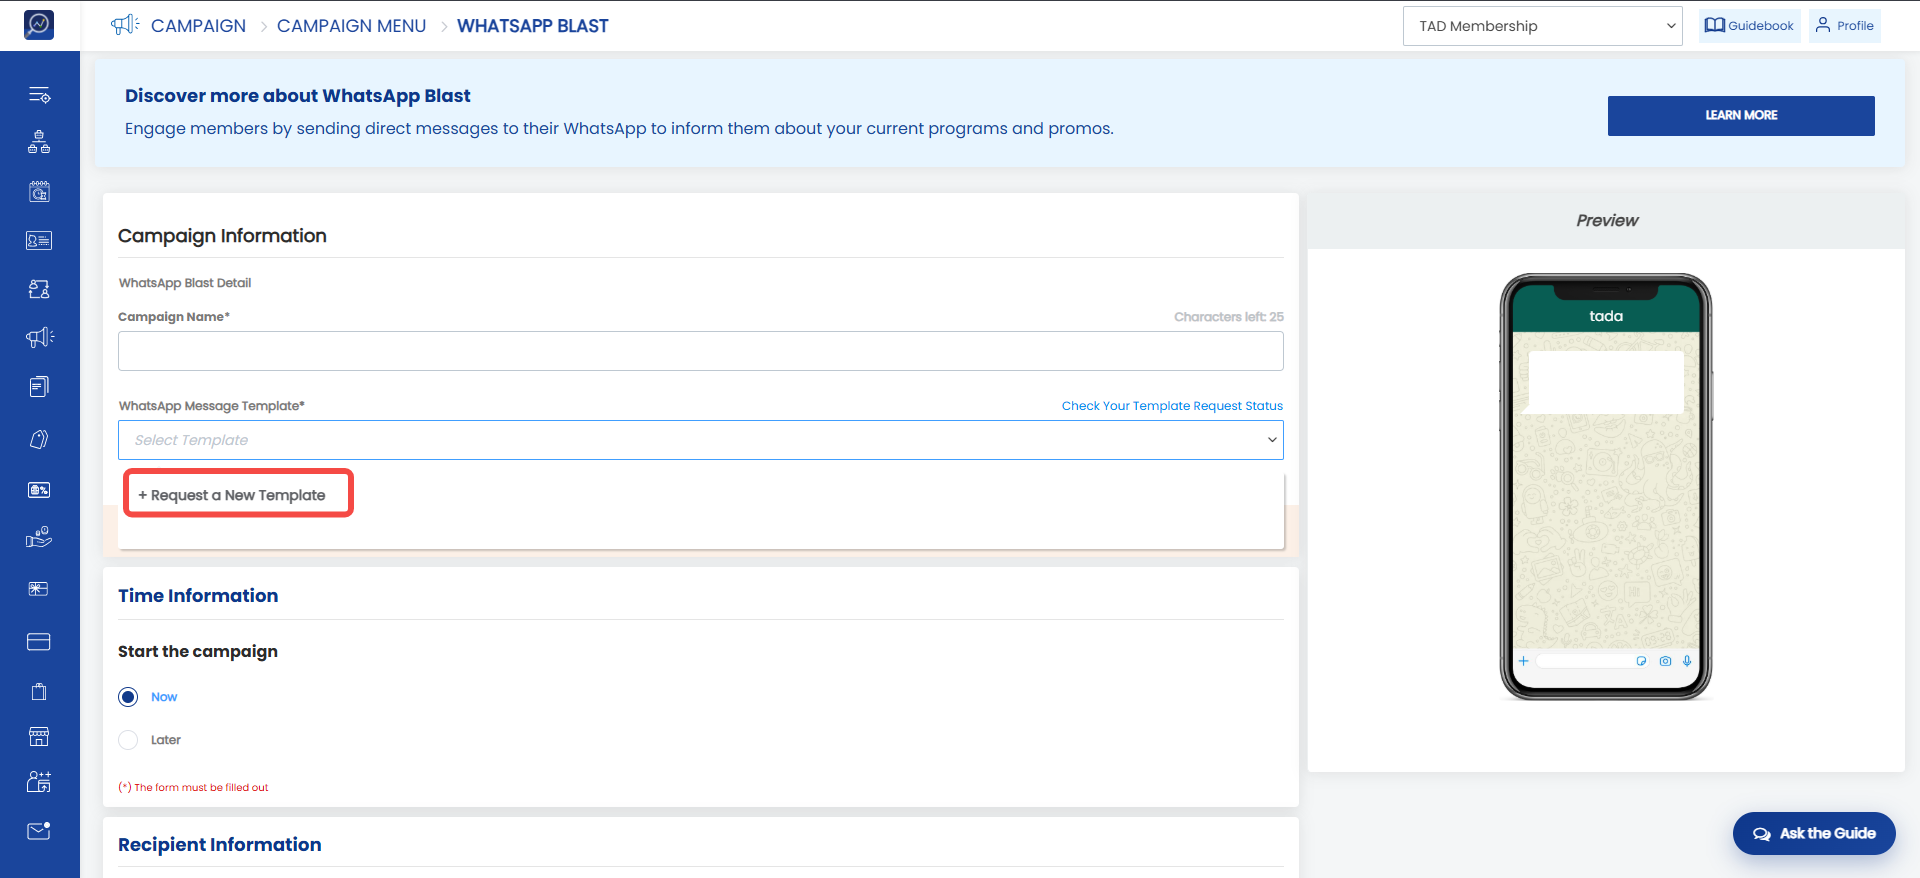
 2. In the Campaign Information section, click “WhatsApp Message Template”, then select “Request New Template”.
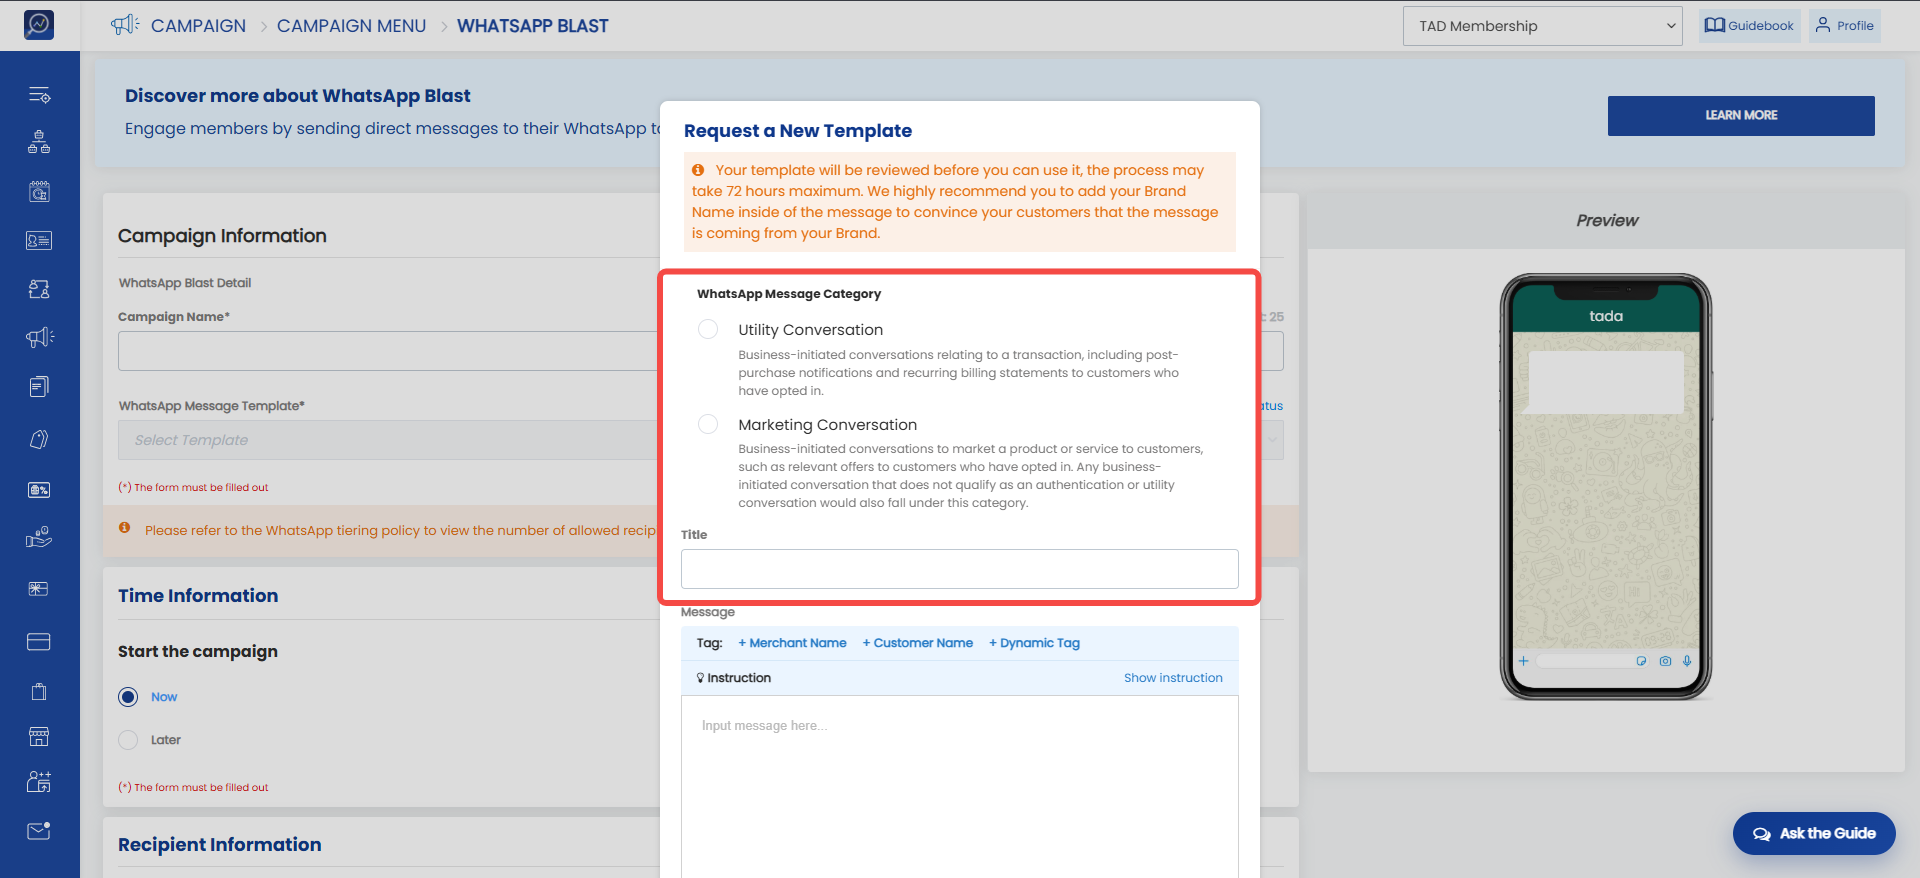
 3. The system will display a pop-up for creating a new template. Select the message category and fill in the Title field.
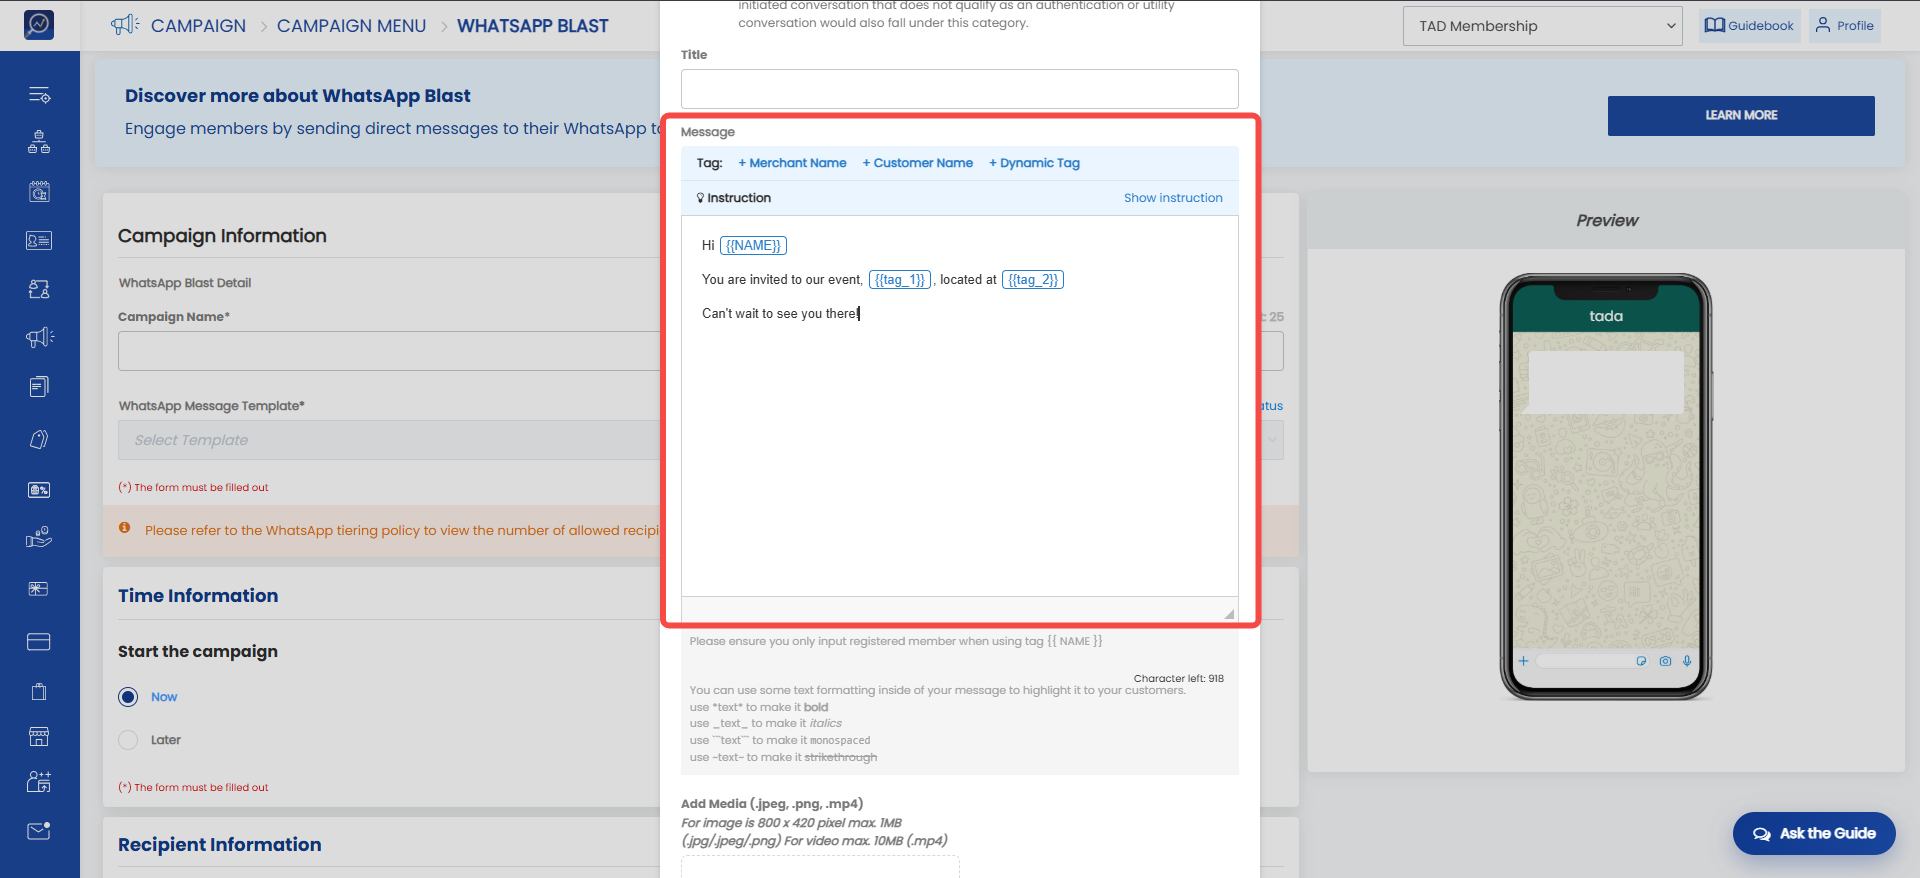
 4. Enter the message content in the Message field with a maximum character limit of 1,024 characters. This message will be received by the end user.
- {{Merchant name}}: Displays the merchant name within the WhatsApp message.
- {{Customer name}}: Displays the recipient's name within the WhatsApp message.
Note: If the WhatsApp message is sent to a recipient who is not a member, the {{Customer name}} tag will automatically display “Sir/Madam”. - {{Dynamic tag}}: Dynamic content lets you personalize messages by inserting recipient-specific details, such as names, voucher values, or event dates. Templates with dynamic variables can be reused multiple times by providing different values for each variable during campaign setup. You can add the dynamic tag up to 8 tags.
- Example:
If you want to send: "You are invited to the New Year Event on 1 January 2026!"
Your template should be: "You are invited to the {{tag_1}} on {{tag_2}}!"
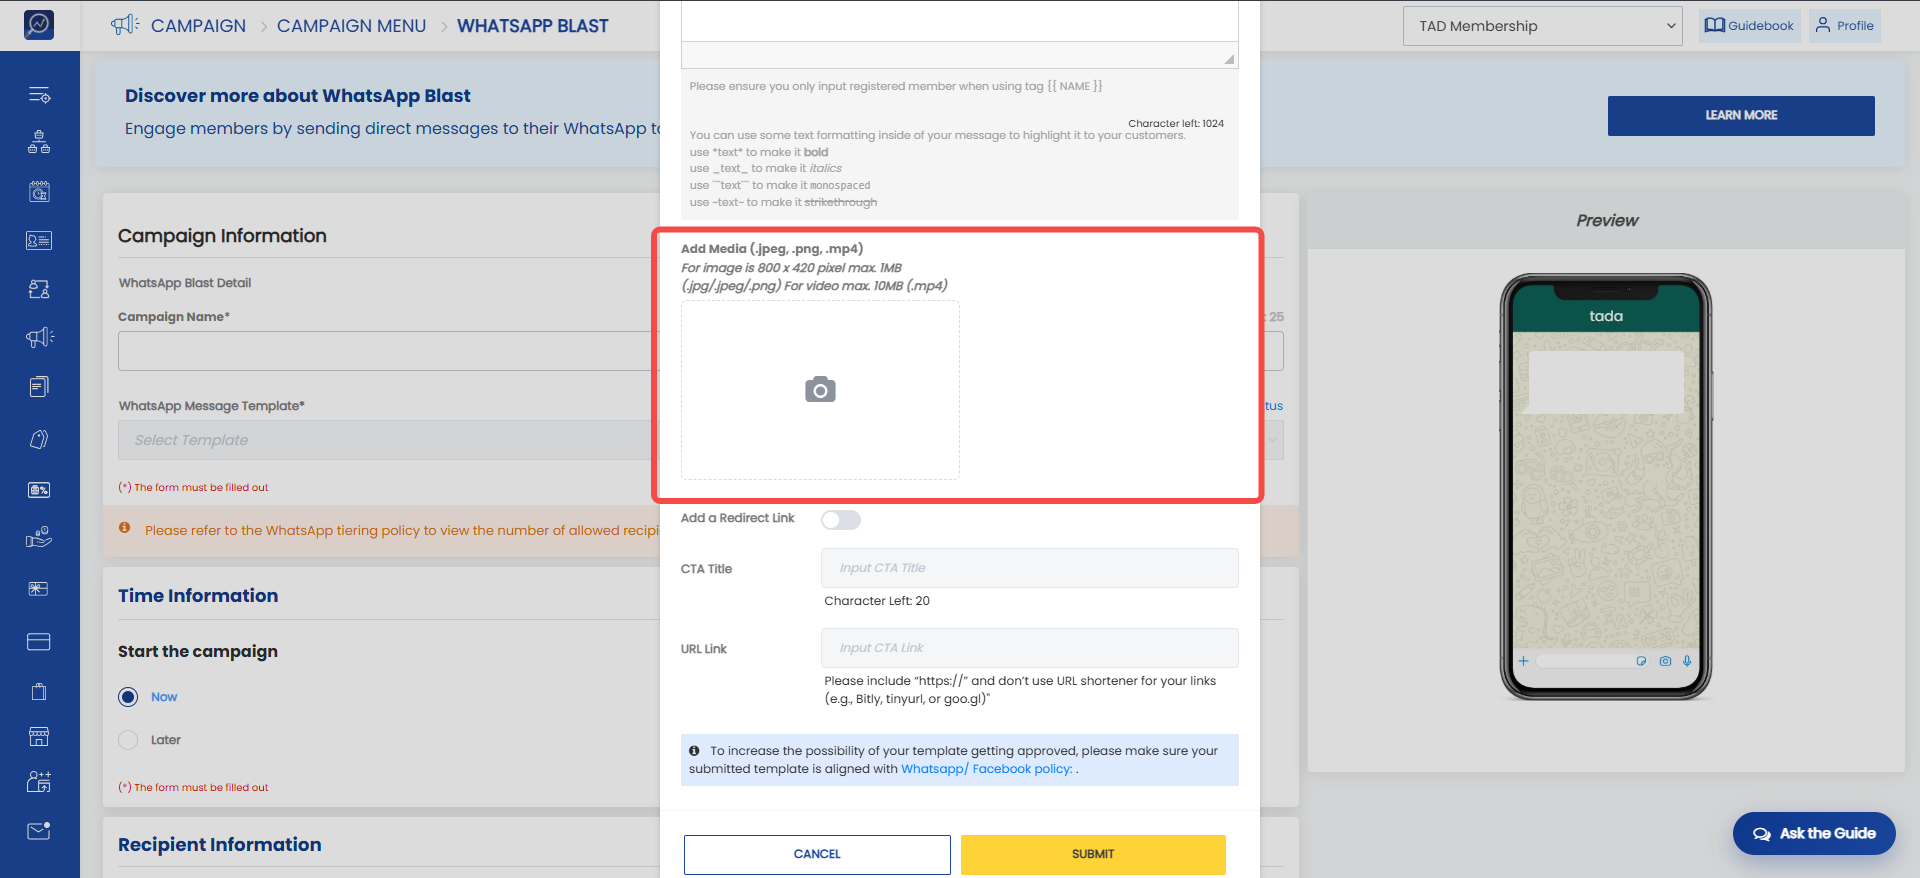
 5. Upload an image or video in the Add Media section if required.
- Image Requirements: Recommended resolution: 800 × 420 pixels, Maximum file size: 1 MB, Supported formats: .jpg, .png
- Video Requirements: Supported format: .mp4, Maximum file size: 10 MB.
 6. Enable the “Add Redirect Link” toggle if the template includes a call-to-action button. When enabled, complete the following fields:
a. CTA Title: Defines the button label displayed in WhatsApp.
- Maximum length: 20 characters
- Example: Click Here
b. URL Link: Enter the destination URL that users will be redirected to when clicking the CTA button. Make sure the URL includes https://
 7. Click “Submit” to complete the template request process.
Note: All newly requested templates require approval before they can be used. To monitor the approval status, click “Check Your Template Request Status” periodically.


How to Create a WhatsApp Blast Campaign
1. Open the "Campaign" menu and click "WhatsApp Blast".
 2. Fill in the "Campaign Information" section, which consists of:
a. Campaign name: Define the name of the campaign. This campaign name will appear in the Campaign History menu. Ensure that the campaign name does not exceed 25 characters.
b. Whatsapp message template: Select the template to be used by clicking on one of the available template titles.
 3. Choose when to send the WhatsApp message:
- Select "Now" if the WhatsApp message should be sent immediately after the campaign creation process is completed.
- Select "Later" if the WhatsApp message should be sent at a specific time. If "Later" is selected, specify the start date and time for the blast.
 4. Next, define the recipients of the WhatsApp campaign. There are three options available:
a. All members: All members will receive the campaign.
b. Specific members: Users can define specific criteria to determine which members will receive the campaign. Available filters include:
- Phone number
- Card number
- Customer name
- Customer email
- Program name
- Top member spending: If users enter 10, the campaign will be sent to the top 10 members with the highest spending transactions (Delivery Order, Shop, Subscription, Wallet Top Up, and Top Up).
- SKU purchased
- Item purchased
- City
- Last transaction: For example, if users select Less than a Week, members who made transactions within the last week will receive the campaign.
- Store activation: Members who activated their account at the selected store will receive the campaign.
- Birthday: Users can define a birthday date range. Members whose birthdays fall within the selected range will receive the campaign.
- Age: Users can define an age range. Members within the selected age range will receive the campaign.
- Gender
- Status member
- Level
- Other Member Data: Members who have specific additional data values selected in the Other Member Data dropdown will receive the campaign.

 c. List of members: Users can upload an Excel file containing member identifiers (Phone Number or User ID) that will receive the campaign.
 5. After all settings have been configured, click “Continue” to complete the campaign creation process.
How to Blast Whatsapp Campaign with Dynamic Variable
1. Open the "Campaign" menu and click "WhatsApp Blast".
2. Fill in the "Campaign Information" section, which consists of:
a. Campaign name: Define the name of the campaign. This campaign name will appear in the Campaign History menu. Ensure that the campaign name does not exceed 25 characters.
b. Whatsapp message template: Select the template to be used by clicking on one of the available template titles.
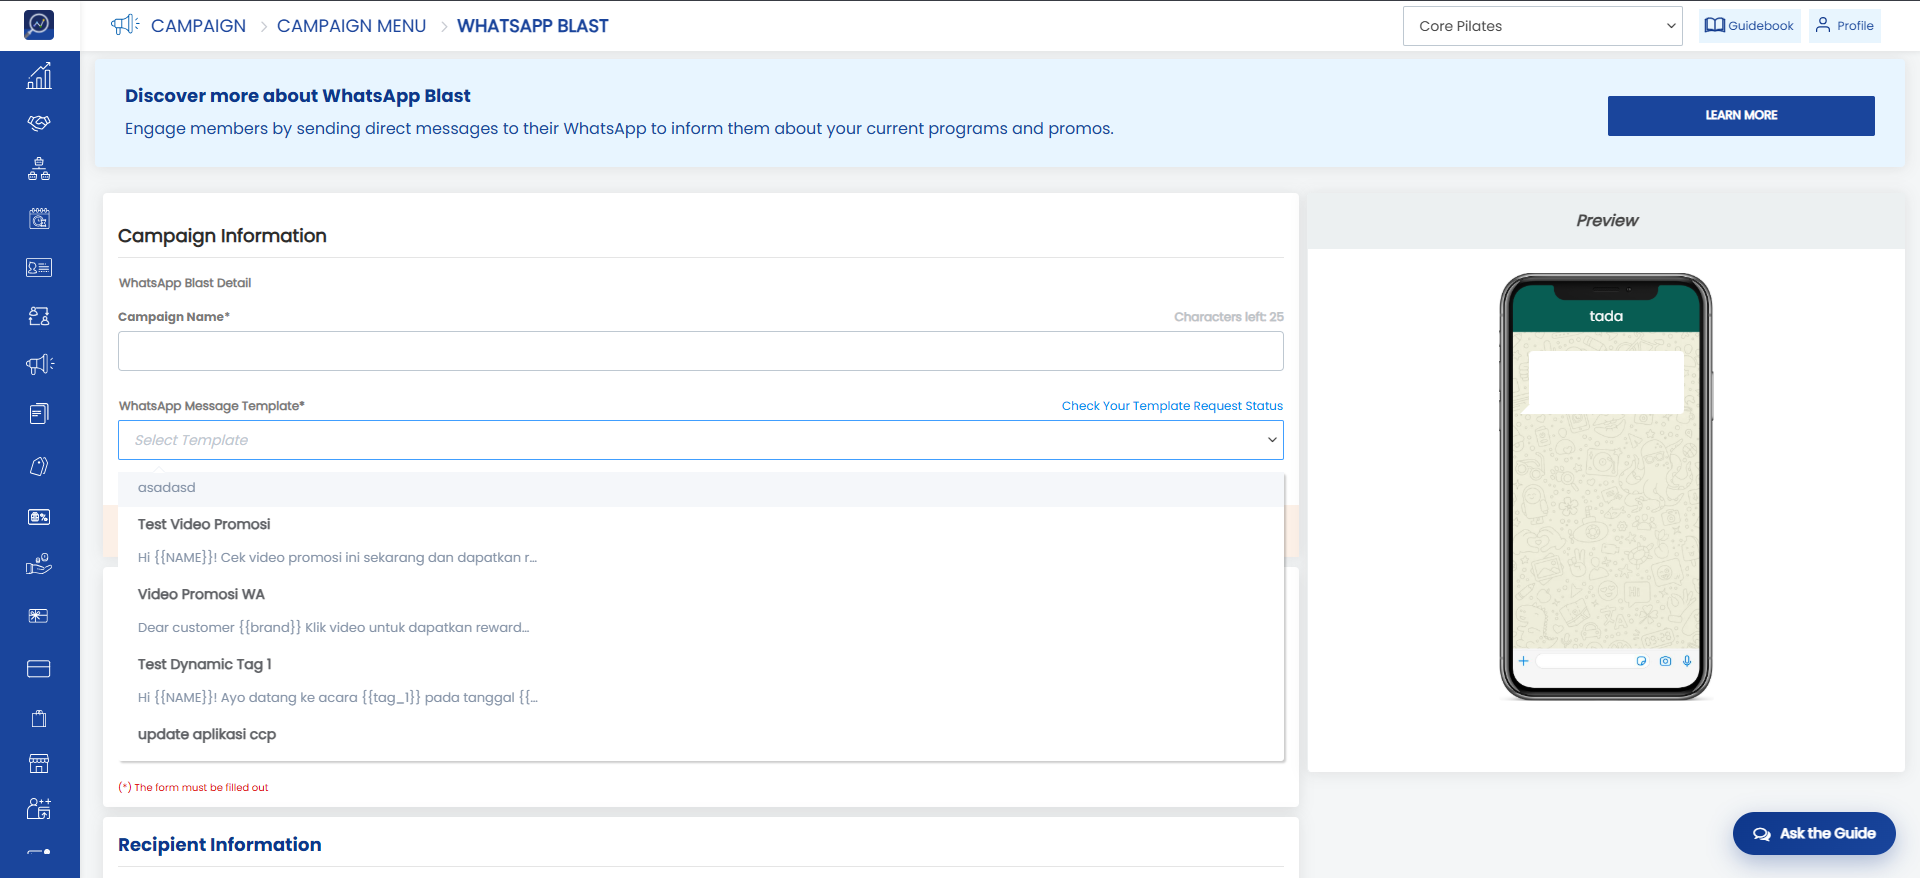 3. Choose when to send the WhatsApp message:
- Select "Now" if the WhatsApp message should be sent immediately after the campaign creation process is completed.
- Select "Later" if the WhatsApp message should be sent at a specific time. If "Later" is selected, specify the start date and time for the blast.
4. Next, define the recipients of the WhatsApp campaign. There are three options available:
a. All members: All members will receive the campaign.
b. Specific members: Users can define specific criteria to determine which members will receive the campaign. Available filters include:
- Phone number
- Card number
- Customer name
- Customer email
- Program name
- Top member spending: If users enter 10, the campaign will be sent to the top 10 members with the highest spending transactions (Delivery Order, Shop, Subscription, Wallet Top Up, and Top Up).
- SKU purchased
- Item purchased
- City
- Last transaction: For example, if users select Less than a Week, members who made transactions within the last week will receive the campaign.
- Store activation: Members who activated their account at the selected store will receive the campaign.
- Birthday: Users can define a birthday date range. Members whose birthdays fall within the selected range will receive the campaign.
- Age: Users can define an age range. Members within the selected age range will receive the campaign.
- Gender
- Status member
- Level
- Other Member Data: Members who have specific additional data values selected in the Other Member Data dropdown will receive the campaign.
c. List of members: Users can upload an Excel file containing member identifiers (Phone Number or User ID) that will receive the campaign.
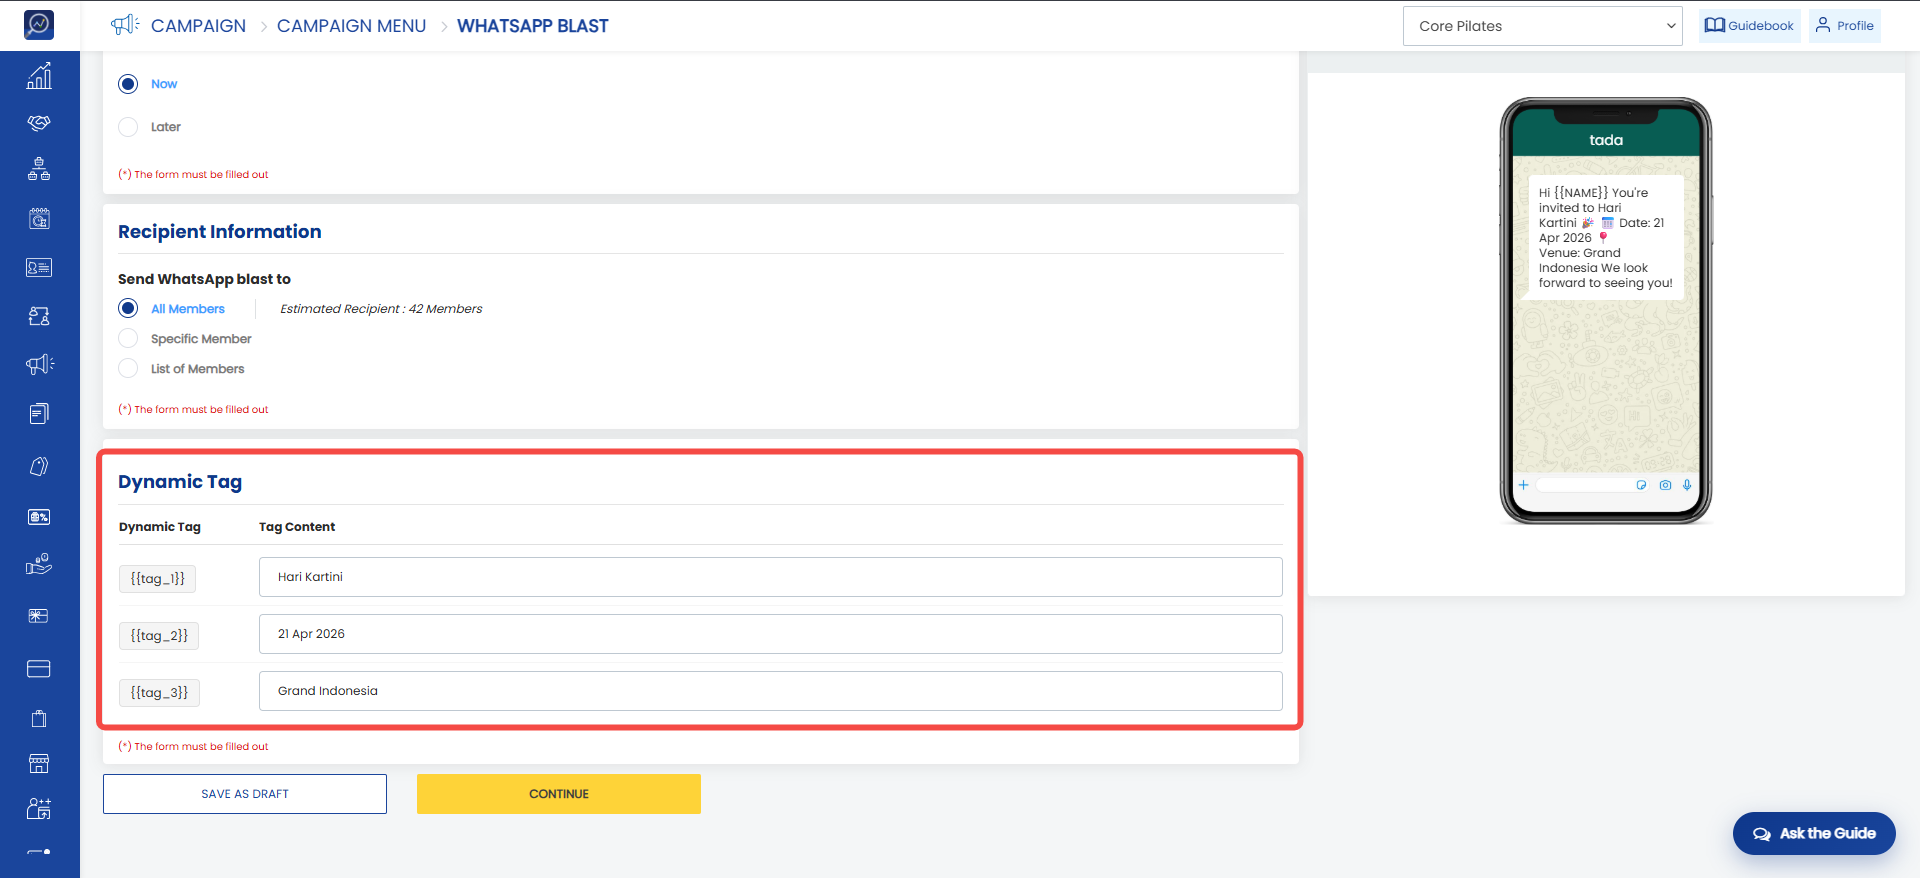
5. Fill in the dynamic tag section
- When selecting All Members or Specific Members, complete the Dynamic Tag section by providing the content that will be sent to members based on the tags configured in the selected template. The dynamic tag values will be the same for all selected members.
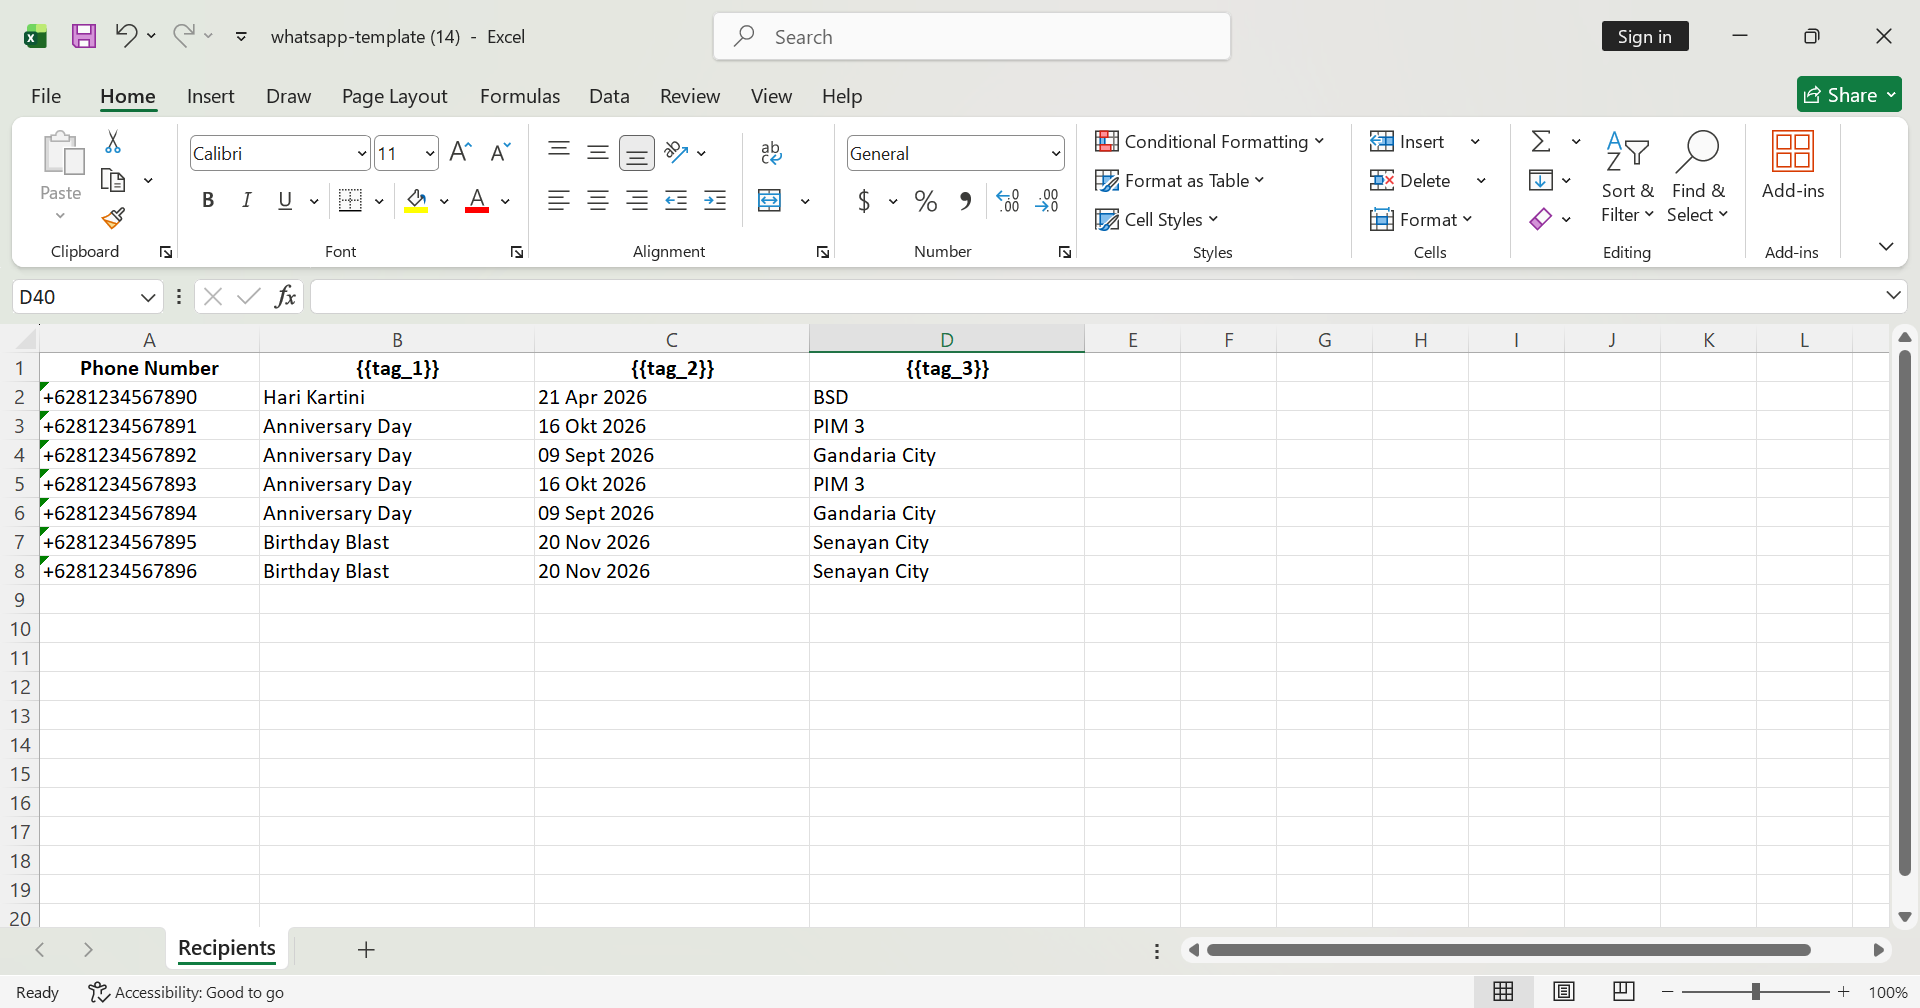
- When selecting List of Members, download the provided template and complete the dynamic tag values based on the tags configured in the selected template. For this option, dynamic tag values can be customized and may vary for each member.
- Note: Each dynamic tag value must not exceed 15 characters.
 6. After all settings have been configured, click “Continue” to complete the campaign creation process.
How to Create an Email Blast Campaign
1. Open the “Campaign” menu, then click “Email Blast”.
 2. Complete the Campaign Information section:
a. Campaign name: Enter the campaign name. This name will appear in the Campaign History menu. Ensure it does not exceed 25 characters.
b. Subject: Enter the email subject line that recipients will receive.
c. Image campaign: Upload a campaign image if needed by clicking “Upload Image”. Recommended resolution: 600 × 300 pixels, Maximum file size: 1 MB.
 d. Description: Enter the email content. Users can personalize the email by inserting the recipient's name using the Recipient Name tag. This tag will automatically display the recipient’s name in the email.
 e. Call to action (CTA): Enable the “Call to Action” toggle if the email should redirect recipients to a specific webpage. When enabled, complete the following fields:
- Button call to action: Defines the CTA button label with a maximum length of 20 characters. Example: Click Here
- Button color: Select the background color of the CTA button.
- Text color: Select the text color displayed on the CTA button.
- Redirect to: Enter the destination URL that recipients will be redirected to when clicking the CTA button. Make sure the URL includes https://
 3. Choose when the email campaign will be sent:
- Now: The email will be sent immediately after the campaign creation process is completed.
- Later: The email will be sent at a specific date and time. If Later is selected, specify the Start Date, including both the delivery date and time.
 4. Choose the recipients who will receive the campaign. There are three available options:
a. All members: All members will receive the campaign.
b. Specific members: Users can define specific criteria to determine which members will receive the campaign. Available filters include:
- Phone number
- Card number
- Customer name
- Customer email
- Program name
- Top member spending: If users enter 10, the campaign will be sent to the top 10 members with the highest spending transactions (Delivery Order, Shop, Subscription, Wallet Top Up, and Top Up).
- SKU purchased
- Item purchased
- City
- Last transaction: For example, if users select Less than a Week, members who made transactions within the last week will receive the campaign.
- Store activation: Members who activated their account at the selected store will receive the campaign.
- Birthday: Users can define a birthday date range. Members whose birthdays fall within the selected range will receive the campaign.
- Age: Users can define an age range. Members within the selected age range will receive the campaign.
- Gender
- Status member
- Level
- Other Member Data: Members who have specific additional data values selected in the Other Member Data dropdown will receive the campaign.

 c. List of members: Users can upload an Excel file containing member identifiers (Phone Number or User ID) that will receive the campaign.
 5. After all settings have been configured, click “Continue” to complete the campaign creation process.
How to Create an Information & Promotion Campaign
1. Open the Campaign menu and click Information & Promotion.
 2. Complete the Campaign Information section:
a. Campaign name: Enter the campaign name. This name will appear in Campaign History. Maximum 50 characters.
b. Image: Upload an image if needed by clicking Upload Image. Recommended resolution is 600 × 600 pixels with a maximum file size of 350 MB
c. Campaign title: Enter the campaign title. Maximum 50 characters.
 3. Enter the privilege description in the Campaign Description field. Users can format the content using bold, italic, underline, and other available text formatting options.
 4. Configure privilege category.
a. If the privilege will be assigned to an existing category: Enable Assign Campaign to Privilege Category and select the desired category.
 b. If the privilege will be assigned to a new category: Enable Assign Campaign to Privilege Category and select Add New Category. Enter the category name in Input New Category.
 5. Schedule the Privilege Display
- Now: The privilege will be displayed immediately after the campaign is created. Set the campaign end date using the End Date and Time Select fields.
- Later: The privilege will be displayed at a scheduled date and time. Set the Start Date, End Date, and Time Select.
 6. Enable the Recurrence toggle if the privilege should be displayed repeatedly. Configure the following settings:
a. Repeat every: Defines the repetition interval (for example, every 1 day or every 2 days).
b. Show campaign: Determines when the privilege will be displayed to end users. There are two available options:
- Always Show: The privilege will always be visible.
- Between: The privilege will only be visible during a specific time range.
 c. Ends: Determines when the recurrence will stop. There are three available options:
- Never: The recurring privilege will continue indefinitely.
- On: Stops on a specific date and time.

- After: Stops after a specific number of occurrences.
 7. Available recipient options:
a. All members: All members will receive the campaign.
b. Specific members: Users can define specific criteria to determine which members will receive the campaign. Available filters include:
- Phone number
- Card number
- Customer name
- Customer email
- Program name
- Top member spending: If users enter 10, the campaign will be sent to the top 10 members with the highest spending transactions (Delivery Order, Shop, Subscription, Wallet Top Up, and Top Up).
- SKU purchased
- Item purchased
- City
- Last transaction: For example, if users select Less than a Week, members who made transactions within the last week will receive the campaign.
- Store activation: Members who activated their account at the selected store will receive the campaign.
- Birthday: Users can define a birthday date range. Members whose birthdays fall within the selected range will receive the campaign.
- Age: Users can define an age range. Members within the selected age range will receive the campaign.
- Gender
- Status member
- Level
- Other Member Data: Members who have specific additional data values selected in the Other Member Data dropdown will receive the campaign.

 c. List of members: Users can upload an Excel file containing member identifiers (Phone Number or User ID) that will receive the campaign.
 7. Enable Would You Like to Send Push Notification for This Campaign? if you want a push notification to be sent whenever the privilege becomes available.
 8. Click Continue to complete the campaign creation process.
How to Create a Send Rewards Campaign
1. Open the Campaign menu and click Send Rewards.
 2. Complete the Campaign Information section:
a. Campaign Name: Enter the campaign name. This name will appear in Campaign History. Maximum 50 characters.
b. Image: Upload an image if needed by clicking Upload Image. Resolution: 600 x 600 pixels, maximum size 350 MB.
c. Campaign Title: Enter the campaign title in this field. Maximum 50 characters.
 3. Next, enter the privilege description in the Campaign Description field. Users can use text formatting such as bold, italic, underline, and other formatting options.
 4. Determine the rewards to be distributed in Select Rewards You Would Like to Give. Rewards can be in the form of wallet points or e-vouchers:
a. Select e-Voucher if the reward will be provided as a voucher. Then choose the type of e-voucher to be distributed.
b. Select Balance / Point if the reward will be provided as points. Users will be required to configure the following:
- Program
- Wallet / Balance Type
- Reward Amount
 5. Determine how many times the privilege should be displayed in Select the Number of Times You Want to Display the Rewards. Available options are:
- One Time Only: Once the end user receives the reward, the privilege will no longer be displayed.
- Limited Times Only: Limits the number of times the privilege can be displayed. Users must specify the maximum number of displays for each end user.
- Unlimited: No display limit.
6. Determine the category for the privilege.
a. If the privilege will be assigned to an existing category, enable the Assign Campaign to Privilege Category toggle and select an existing category.
 b. If the privilege will be assigned to a new category that does not yet exist, enable the Assign Campaign to Privilege Category toggle, select Add New Category, then enter the category name in the Input New Category field.
 7. Schedule the Privilege Display
- Now: The privilege will be displayed immediately after the campaign is created. Set the campaign end date using the End Date and Time Select fields.
- Later: The privilege will be displayed at a scheduled date and time. Set the Start Date, End Date, and Time Select.
 8. Enable the Recurrence toggle if the privilege should be displayed repeatedly. Configure the following settings:
a. Repeat every: Defines the repetition interval (for example, every 1 day or every 2 days).
b. Show campaign: Determines when the privilege will be displayed to end users. There are two available options:
- Always Show: The privilege will always be visible.
- Between: The privilege will only be visible during a specific time range.
 c. Ends: Determines when the recurrence will stop. There are three available options:
- Never: The recurring privilege will continue indefinitely
- On: Stops on a specific date and time.

- After: Stops after a specific number of occurrences.
 9. Available recipient options:
a. All members: All members will receive the campaign.
b. Specific members: Users can define specific criteria to determine which members will receive the campaign. Available filters include:
- Phone number
- Card number
- Customer name
- Customer email
- Program name
- Top member spending: If users enter 10, the campaign will be sent to the top 10 members with the highest spending transactions (Delivery Order, Shop, Subscription, Wallet Top Up, and Top Up).
- SKU purchased
- Item purchased
- City
- Last transaction: For example, if users select Less than a Week, members who made transactions within the last week will receive the campaign.
- Store activation: Members who activated their account at the selected store will receive the campaign.
- Birthday: Users can define a birthday date range. Members whose birthdays fall within the selected range will receive the campaign.
- Age: Users can define an age range. Members within the selected age range will receive the campaign.
- Gender
- Status member
- Level
- Other Member Data: Members who have specific additional data values selected in the Other Member Data dropdown will receive the campaign.

 c. List of members: Users can upload an Excel file containing member identifiers (Phone Number or User ID) that will receive the campaign.
 10. Enable Would You Like to Send Push Notification for This Campaign? if you want a push notification to be sent whenever the privilege becomes available.
 11. Click Continue to complete the campaign creation process.
How to Create a Survey Campaign
1. Open the “Campaign” menu, then click “Survey”
 2. Fill in the campaign information, which consists of:
a. Campaign name: Enter the name of the campaign to be created. This campaign name will appear and be visible in the Campaign History menu. Make sure the character count does not exceed 50 characters.
b. Image: Upload an image if needed by clicking “Upload image”. Recommended resolution is 800 x 800 pixels with a maximum file size of 1MB.
c. Description: Enter the survey description with a maximum of 2000 characters. Users can use text formatting such as bold, italic, underline, and others.
 d. Privilege category: Specify the privilege category where the survey will be displayed. If you want to create a new category, click “Create new” and enter the category name.
e. Select program: Specify which program the survey will appear in. Click the desired program name. If the selected program contains levels, the “Select Level” option will appear.
f. Select level: Specify the member level that is eligible to access and submit the survey. The survey will be sent to all members, but only members with the selected level can access and submit it.
 g. Select rewards: Determine the rewards that will be given after the survey is completed and approved (if approval is required).
- No rewards: Use this option if the survey does not provide any rewards.

- Balance/wallet: Use this option if rewards will be given in the form of balance/wallet points. When using this option, select the balance/wallet type and the amount to be awarded.

- E-voucher: Use this option if rewards will be given in the form of an e-voucher. When using this option, select the e-voucher type to be awarded.
 h. Attempt per user: Determine how many times the survey will appear to each end user.
- One time: Once the end user has completed the survey, it will no longer appear to that user.
- Limited times: Limit how many times the survey appears to an end user. When using this option, enter the number of times the survey should be displayed.
- Unlimited: The survey will continue to appear for the end user.
i. Need approval: Determine whether the survey requires approval. Enable the toggle if survey submissions must be approved after the end user submits the survey.
 3. Select when the privilege should be displayed.
- Choose “Now” if the privilege should be displayed immediately after the campaign creation process is completed (please wait a few moments for the survey to appear on the end-user side). Also, enter the campaign end date in the “End date” and “Time select” fields.
- Choose “Later” if the privilege should be displayed at a specific time. If selecting “Later”, specify the start date, including both the date and time. Also, enter the campaign end date in the “End date” and “Time select” fields.

- Enable the Disable Campaign Expiry toggle to keep the survey campaign active indefinitely and ignore the End Date.
4. Next, determine the recipients of the survey. There are three options available:
a. All members: All members will receive the campaign.
b. Specific members: Users can define specific criteria to determine which members will receive the campaign. Available filters include:
- Phone number
- Card number
- Customer name
- Customer email
- Program name
- Top member spending: If users enter 10, the campaign will be sent to the top 10 members with the highest spending transactions (Delivery Order, Shop, Subscription, Wallet Top Up, and Top Up).
- SKU purchased
- Item purchased
- City
- Last transaction: For example, if users select Less than a Week, members who made transactions within the last week will receive the campaign.
- Store activation: Members who activated their account at the selected store will receive the campaign.
- Birthday: Users can define a birthday date range. Members whose birthdays fall within the selected range will receive the campaign.
- Age: Users can define an age range. Members within the selected age range will receive the campaign.
- Gender
- Status member
- Level
- Other Member Data: Members who have specific additional data values selected in the Other Member Data dropdown will receive the campaign.

 c. List of members: Users can upload an Excel file containing member identifiers (Phone Number or User ID) that will receive the campaign.
 5. Determine the questions that will appear in the survey under “Question list”:
a. Question: Enter the question that the end user needs to answer.
b. Question type: Determine the type of question. The available types are:
- Short Text: End users enter a short text response.
- Long Text (Paragraph): End users enter a longer response, such as a paragraph.
- Radio button: Users must provide answer options that the end user can select. Click “Add option” to add options and click the X button to remove them
- Email: End users enter an email address.
- Phone Number: End users enter a phone number.
- Date Picker: End users select a date provided by the system.
- Dropdown: Users must provide answer options that the end user can select. Click “Add option” to add options and click the X button to remove them.
- Checkbox: Users must provide answer options that the end user can select. Click “Add option” to add options and click the X button to remove them.
- File upload: End users are required to upload a file.
- Rating: End users provide a rating using stars.
- Tag Location: End users select a location provided by the system.
- Time Picker: End users select a time provided by the system.
- Upload Image: End users upload an image.
- Take Photo: End users take a photo directly while filling out the survey.
c. Enable the Required toggle for each question if it must be answered before the survey can be submitted.
6. Finally, click “Continue” to complete the campaign creation process.
How to Create a Welcome Email
1. Open the “Campaign” menu, then click “Welcome email”
 2. Enter the “Campaign Name”. The campaign name will be used to categorize created campaigns. The campaign name must not exceed 50 characters.
3. Select the “Program ID” to be used.
 4. Complete the email title in the “Email Title” field. The email title must not exceed 50 characters, and users can select the title color that will appear to end users.
 5. Enter the email description that will be displayed to members.
If the brand wants to send a more personalized email, the member’s name can be displayed in the email subject and body by enabling the Personalize “To” Field feature. Once enabled, select the member name field provided.

 6. Upload the image that will be displayed in the email. The maximum image size is 350KB, with dimensions of 600 x 600 px or a 1:1 ratio.
 7. Specify the Footer Text and its text color. The footer text must not exceed 50 characters.
8. Specify the Button Call to Action title and button color. The CTA button title must not exceed 50 characters.
9. Enter the CTA button URL.
10. Select the background color by clicking the color box next to “Background Color”.
 11. A preview of the Welcome Email can be viewed on the right side of the Campaign Information page.
 12. Click “Continue” to proceed to the next step.
 13. Click “Send Now” to send the email.
How to Create Comeback Rewards
1. Open the “Campaign” menu and select the “Create campaign” sub-menu.
2. Choose “Comeback rewards”.
 3. Enter the campaign name in “Campaign Name” with a maximum of 50 characters.
4. Select the Program ID to determine which members will receive the campaign. Users can select more than one Program ID.
 5. Specify the minimum number of days a member has not made a transaction. Users can only enter a value between 15–45 days.
Example: If the user enters 30 days, the campaign will be sent to members who have not made any transactions in the last 30 days.
6. Select the type of rewards that will be given to members.
7. Specify the campaign delivery schedule.
 8. Choose the campaign channels to be used (push notification, WhatsApp, email, and/or SMS). Users may select more than one channel.
 9. Complete the campaign details. The required details will depend on the selected campaign channels.
 10. Click “Continue”, and the Comeback Rewards campaign will become active.

How to Create Lapsed Rewards
1. Open the “Campaign” menu and select the “Create campaign” sub-menu.
2. Choose “Lapsed rewards”.
 3. Enter the campaign name in “Campaign Name” with a maximum of 50 characters.
4. Select the Program ID to determine which members will receive the campaign. Users can select more than one Program ID.
 5. Specify the minimum number of days a member has not made a transaction. Users can only enter a value between 60–150 days.
Example: If the user enters 60 days, the campaign will be sent to members who have not made any transactions in the last 60 days.
6. Select the type of rewards that will be given to members.
7. Specify the campaign delivery schedule.
 8. Choose the campaign channels to be used (push notification, WhatsApp, email, and/or SMS). Users may select more than one channel.
 9. Complete the campaign details. The required details will depend on the selected campaign channels.
 10. Click “Continue”, and the Comeback Rewards campaign will become active.

How to Create Lost Rewards
1. Open the “Campaign” menu and select the “Create campaign” sub-menu.
2. Choose “Lost rewards”.
 3. Enter the campaign name in “Campaign Name” with a maximum of 50 characters.
4. Select the Program ID to determine which members will receive the campaign. Users can select more than one Program ID.
 5. Specify the minimum number of days a member has not made a transaction. Users can only enter a value between 180–365 days.
Example: If the user enters 180 days, the campaign will be sent to members who have not made any transactions in the last 180 days.
6. Select the type of rewards that will be given to members.
7. Specify the campaign delivery schedule.
 8. Choose the campaign channels to be used (push notification, WhatsApp, email, and/or SMS). Users may select more than one channel.
 9. Complete the campaign details. The required details will depend on the selected campaign channels.
 10. Click “Continue”, and the Comeback Rewards campaign will become active.

How to Disable a Smart Campaign
1. Open the “Campaign” menu, then select the “Create campaign” sub-menu.
2. Select the campaign that you want to disable, then turn off its toggle.
How to Read Campaign Analytics
The Campaign Analytics menu is used to view the performance and statistics of campaigns that have been sent. Analytics data will be available within a maximum of 24 hours after the campaign has been successfully delivered.
Whatsapp Blast Campaign

- Read rate: The number of members who have read the WhatsApp message divided by the number of messages delivered.
- Conversion rate: The number of members who have made transactions (top up and wallet top up) divided by the number of members who have read the WhatsApp message.
- Only transactions made by members who received the WhatsApp message and completed a transaction within 48 hours of receiving the message are counted.
- Delivered: The number of messages successfully delivered to recipients.
- Read: The number of members who have read the WhatsApp message.
- Member made transaction: The number of members who received the WhatsApp message and made a top up or wallet top up transaction.
- Total revenue: The total transaction value generated by members who received the WhatsApp message and made a transaction.
- Average revenue per member: The average revenue generated, calculated by dividing total revenue by the number of members who received the WhatsApp message and made a transaction.
Email Blast Campaign

- Open rate: The number of members who opened the email divided by the number of emails delivered.
- Click to open rate: The number of members who clicked a button within the email divided by the number of members who opened the email.
- Conversion rate: The number of members who have made transactions (top up and wallet top up) divided by the number of members who opened the email.
- Only transactions made by members who received the email and completed a transaction within 48 hours of receiving the email are counted.
- Delivered: The number of emails successfully delivered to recipients.
- Opened: The number of members who opened the email.
- Clicked: The number of members who clicked a button within the email.
- Member made transaction: The number of members who received the email and made a top up or wallet top up transaction.
- Total revenue: The total transaction value generated by members who received the email and made a transaction.
- Average revenue per member: The average revenue generated, calculated by dividing total revenue by the number of members who received the email and made a transaction.
Push Notification Blast Campaign

- Click Through Rate (CTR): The number of members who clicked the push notification divided by the number of notifications delivered.
- Conversion rate: The number of members who have made transactions (top up and wallet top up) divided by the number of members who opened the push notification.
- Only transactions made by members who received the push notification and completed a transaction within 48 hours of receiving the notification are counted.
- Delivered: The number of notifications successfully delivered to recipients.
- Clicked: The number of members who clicked the push notification.
- Member made transaction: The number of members who received the push notification and made a top up or wallet top up transaction.
- Total revenue: The total transaction value generated by members who received the push notification and made a transaction.
- Average revenue per member: The average revenue generated, calculated by dividing total revenue by the number of members who received the push notification and made a transaction.
Information & Promotion Campaign
- Open rate: The number of members who opened the Information & Promotion message divided by the number of messages delivered.
- Delivered: The number of messages successfully delivered to recipients.
- Opened: The number of members who opened the Information & Promotion message.
Send Rewards / Privileges Rewards Campaign
- Open rate: The number of members who opened the Send Rewards message divided by the number of messages delivered.
- Conversion rate: The number of members who have made transactions (top up and wallet top up) divided by the number of members who opened the Send Rewards message.
- Only transactions made by members who received the push notification and completed a transaction within 48 hours of receiving the message are counted.
- Delivered: The number of messages successfully delivered to recipients.
- Total revenue: The total transaction value generated by members who received the Privileges Reward and made a transaction.
- Average revenue per member: The average revenue generated, calculated by dividing total revenue by the number of members who received the Privileges Reward and made a transaction.
How to Change the Email Sender
The Email Sender Settings menu is used to configure the email address that will be used by the client for sending Campaigns, e-Vouchers, and other communications to members.
How to Change the Email Sender
1. Open the “Campaign” menu and select the “Email Sender Settings” sub-menu.
 2. Click the “Change” button.
 3. Enter the email address you want to use, then click “Send Verification Code”. Ensure that the email address does not use a common domain such as gmail.com, yahoo.com, or other default email domains.
 4. The registered email address will receive a verification code.
 5. Click “Enter Code” and enter the verification code.
 6. Once the verification is successful, the registered email address will receive an email containing DNS configuration instructions.
Note: The client must configure the DNS records, including adding TXT records, through their own DNS Manager.
 7. Before the DNS records have been fully configured, the email sender status on the Dashboard will be displayed as “Wait for Sync”.
 8. After the email sender has been successfully verified and the DNS configuration is completed, all emails sent by the client will use the new email sender address.

