
Members
The Members menu is used to view and manage member data registered in a brand’s program. Through this menu, users can monitor member information, transaction activity, membership status, and member loyalty levels toward the brand.
How to View the Member List
1. Open the “Member” menu, then click the “List” tab.
2. Enter the desired filter data to display specific members, then click “Apply filter”.
 3. All member data matching the selected filter will be displayed.

Member Status Definitions
Below are several statuses available in the member list:
- Pending: The member has not completed the registration process (registration form submission).
- Registered: The member has completed the registration process.
- Active: The member is subscribed to the subscription program.
- Inactive: The member is currently not subscribed to the subscription program.
- Suspended: The member’s card has been suspended, preventing the member from using the card.
- Restricted : The member is restricted from receiving any point top-ups or point accruals from any source, but can still redeem existing points.
Steps to Download Member Data
Follow these steps to download the member list data:
1. Open the “Member” menu, then click the “List” tab.
2. Enter the desired filter data, then click “Apply filter”.
3. Click “Download list” to download the member data. The system will download all displayed data, both filtered and unfiltered.
 4. Enter your email address in the “Email” field. The system will send the download result in CSV format via email.

Information in the Downloaded Member List
Below are several data fields available in the downloaded member file:
1. Card Number: Member card number.
2. Program Name: Name of the program joined by the member.
3. Name: Member name.
4. User ID: Member ID used as the primary identifier. (This data will only appear if the brand uses user numbers as the main identifier.)
5. Phone Number: Member phone number.
6. Email: Member email address.
7. Gender: Member gender.
8. Birthday: Member date of birth.
9. Age: Member age.
10. City: Member’s city of residence.
11. Address: Member’s residential address.
12. [Wallet Name]: Displays the wallet name used in the program. This column shows the member’s wallet balance.
13. Frequency: Total number of member transactions, including wallet top up, top up, wallet redeem, redemption, delivery order, shop, and subscription payment transactions.
14. Average Spending: Average member spending.
15. Store Activation: Store where the member completed activation.
16. Activation Date: Member activation date.
17. Last Transaction: Date of the member’s latest transaction. Transactions include wallet top up, top up, wallet redeem, redemption, shop, and subscription payments.
18. Total Transaction: Total number of transactions made by the member. Transactions include wallet top up, top up, wallet redeem, redemption, shop, and subscription payments.
19. Total Spending: Total member spending. Spending transactions include top up, wallet top up, shop, and subscription payments.
20. Registration Date: Member registration date.
21. Level: Displays the member level.
22. Status Member: Displays the member status.
23. Churn Risk: Indicates the risk level of a member leaving the loyalty program. This value is calculated based on the member’s latest transaction activity.
24. Sherlock Score: Indicates the member’s loyalty level toward the brand on a scale from 1 (low loyalty) to 100 (high loyalty). The Sherlock Score is calculated based on:
- Recency: How recently the member made a transaction. The more recent the transaction, the better the Sherlock Score.
- Frequency: How often the member makes transactions. The more frequent the transactions, the better the Sherlock Score.
- Monetary: The member’s total spending amount. Higher spending contributes to a better Sherlock Score.
- Advocacy: How actively the member invites others to join the brand’s program.
How to Check Member Information and Member Points
Users can view all member-related data through the member detail page.
1. Open the “Member” menu, then click the “List” tab.
2. Search for and click the “Card Number”.
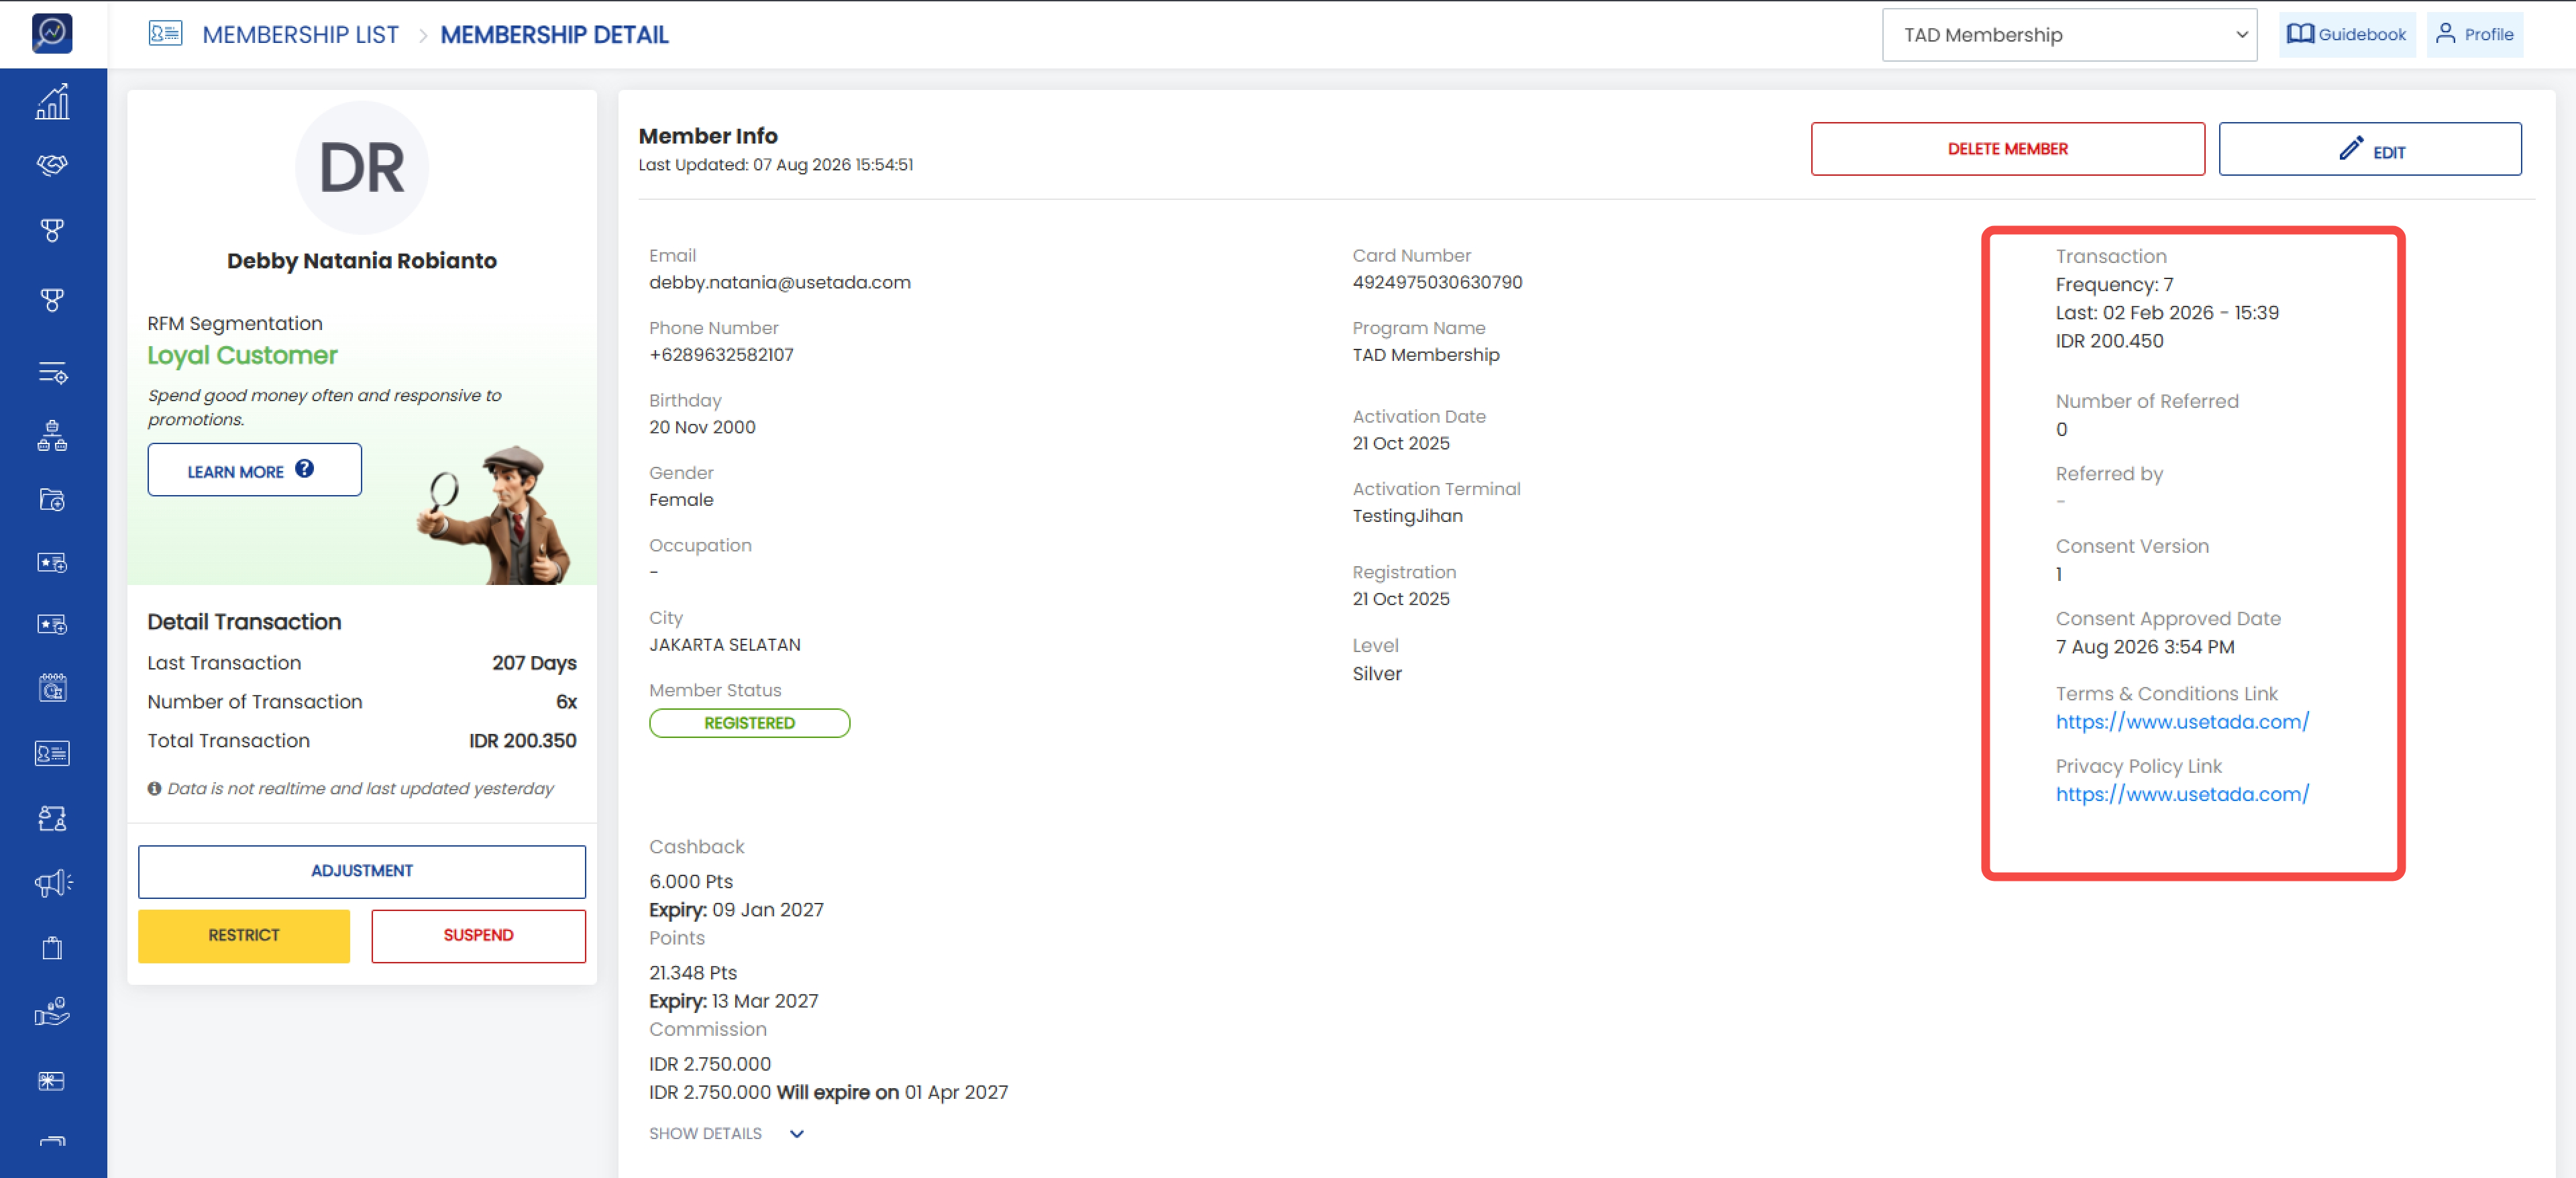
 3. View the “Member Info” section.
The following data is available in Member Info:
- Last Update: The latest date and time when the member data was updated.
- Email: Member email address.
- Phone Number: Member phone number.
- Birthday: Member date of birth.
- Gender: Member gender.
- Occupation: Member occupation.
- City: Member city of residence.
- Member Status: Membership status of the member.

- Card Number: Member card number.
- Program Name: Program where the member is registered.
- Activation Date: Member activation date.
- Activation Terminal: Terminal/cashier where the member completed activation.
- Registration: Date when the member registered.
- Level: Membership level owned by the member.

- Transaction Frequency: Total number of transactions made by the member.
- Last Transaction: Date and time of the member’s latest transaction.
- Total Transaction: Total number of completed transactions by the member.
- Number of Referred: Total members successfully referred through the referral program.
- Referred By: The member who referred the member.
- Consent Version: Displays the version of the consent that the member agreed to during registration.
- Consent Approved Date: Displays the date when the member agreed to the consent.
- Terms & Conditions Link: Displays the URL of the Terms & Conditions that the member agreed to during registration.
- Privacy Policy Link: Displays the URL of the Privacy Policy that the member agreed to during registration.
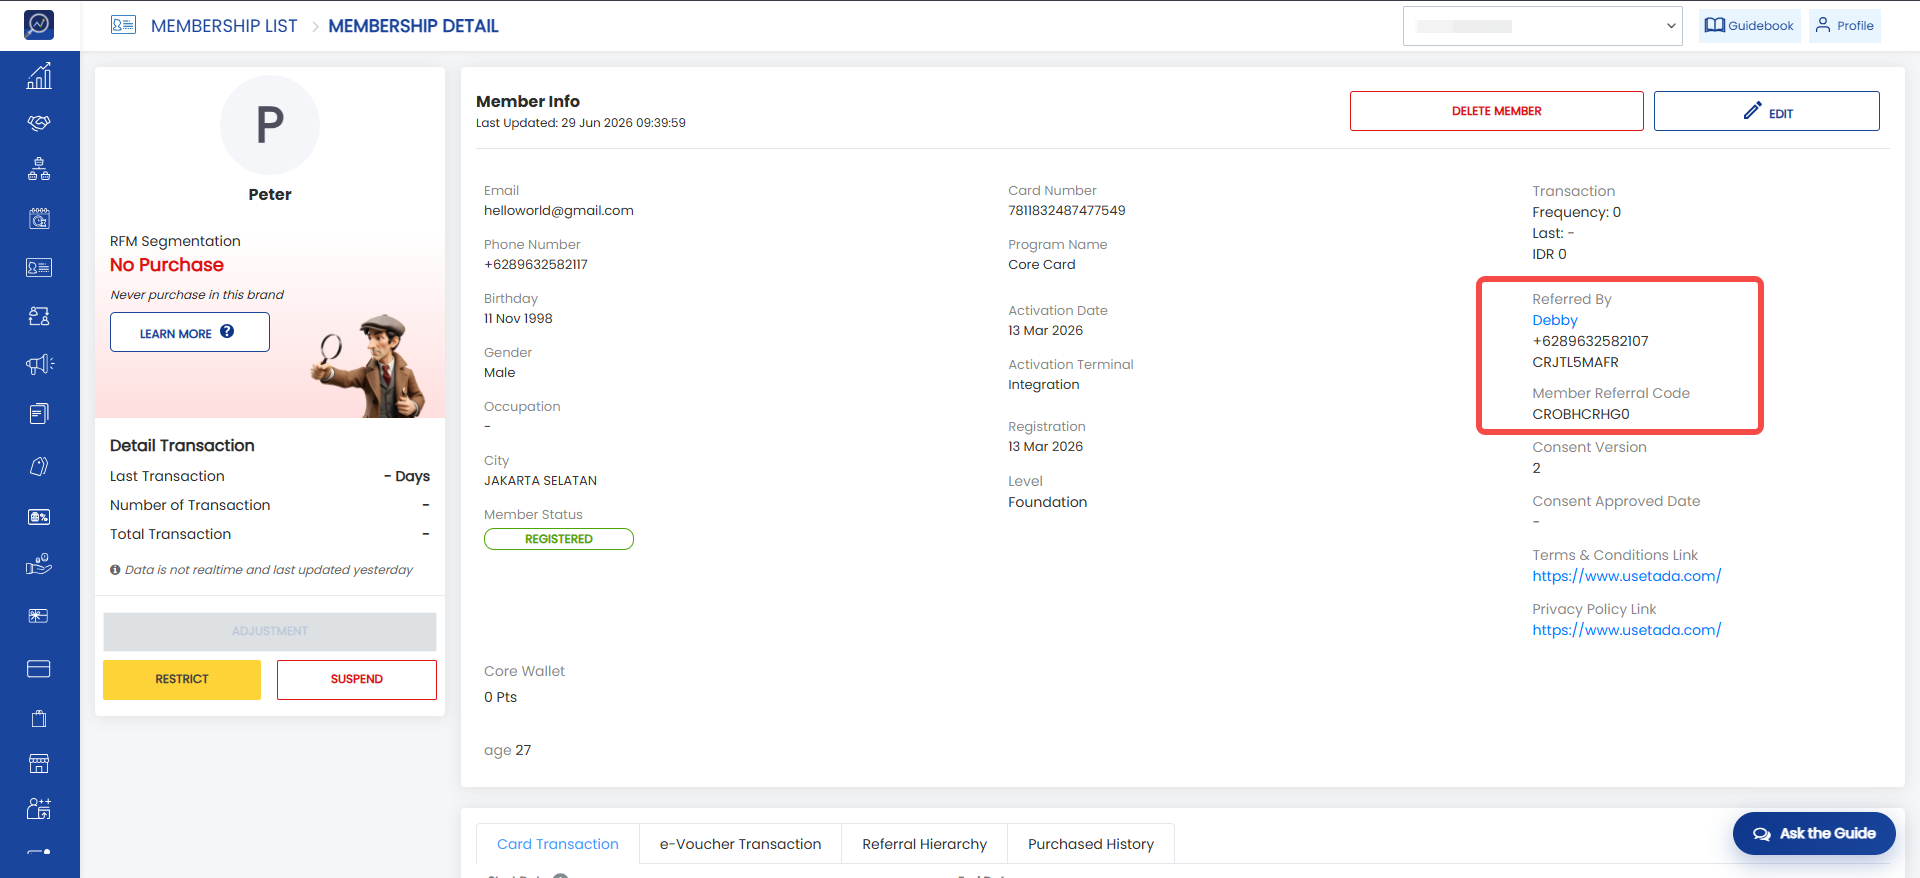
Available only for clients who have the Relationship Group feature enabled.
- Referred By : Displays the parent member of the selected member. This indicates that the selected member registered using the referral link or membership invitation from the Referred By member.
- Member Referral Code : Displays the referral code assigned to the selected member.
- Wallet Name: Wallet name used to store member points.

- Total Points: Total points owned by the member in each wallet.

- Point Expiry: Expiration date of points in each wallet.

- Additional Data: Additional information outside the default registration form data. This data can be added through the Edit Member menu.

4. View all member transaction data in the “Card Transaction” tab.
 5. View all member e-voucher transaction data in the “e-Voucher Transaction” tab.
 6. View all referred member data in the “List of Referred” tab.
 7. View the member’s purchase history in the “Purchased History” tab.
 8. Manage member notifications in the “Channel Notification Settings” section.
 9. Check all changes made to member data in the “History Log” section.

How to View the e-Voucher List for Each Member
Users can view all e-vouchers owned by a member through the member detail page.
1. Open the “Member” menu, then click the “List” tab.
2. Search for and click the “Card Number”.
3. View the “List of e-voucher” section.

e-Voucher Status
There are several statuses available in the e-voucher list:
- Activated: The e-voucher is active and can still be used.
- Expired: The e-voucher validity period has ended and can no longer be used by the member.
- Suspend: The e-voucher is suspended and cannot be used.
- Used: The e-voucher has already been used.
- On Hold: The e-voucher is temporarily unavailable because the WhatsApp, SMS, or Email delivery callback status is undelivered.
- Release: An e-voucher previously marked as On Hold has been reactivated.
How to Adjust Member Points
The Adjustment feature is used to adjust the member’s wallet balance.
1. Open the “Member” menu, then click the “List” tab.
2. Search for and click the “Card Number” of the member whose points will be adjusted.
 3. On the member detail page, click “Adjustment”.
 4. The system will display the adjustment pop-up menu.
5. Select the wallet to adjust in the “Select Wallet” field.
6. Enter the final balance amount in the “Amount” field. The value entered here will become the final wallet balance.
7. Set the wallet expiry date in the “Expiry Date” field.
8. Enter the reason for the wallet balance adjustment.
 9. Click “Submit” to complete the adjustment process.
How to Suspend a Member
The Suspend feature is used to disable a member’s access to their membership card.
1. Open the “Member” menu, then click the “List” tab.
2. Search for and click the “Card Number” of the member to be suspended.
 3. Click the “Suspend” button.
 4. Enter the suspend reason and click “Submit”. Once the member has been successfully suspended:
- The member will no longer be able to access their card from Tada Wallet/WLA/WLW.
- The card status will change to Suspended.


How to Delete a Member
The Delete feature is used to remove a member from the membership program.
1. Open the “Member” menu, then click the “List” tab.
2. Search for and click the “Card Number” of the member to be deleted.
 3. Click the “Delete” button.
 4. Click “Yes, Delete Member”. Once the member has been successfully deleted, the card status will change to Deleted.

How to Suspend an e-Voucher from the Member Menu
1. Open the “Member” menu, then click the “List” tab.
2. Search for and click the “Card Number” of the member whose e-voucher will be suspended.
Note: Only e-vouchers with “Active” status can be suspended.
3. In the “List of e-voucher” section, search for and click the “Number” of the e-voucher to be suspended.
 4. The system will display the “e-Voucher Info” pop-up. Click “Suspend”.
 5. Enter the suspend reason and click “Submit” to complete the e-voucher suspension process.

How to Extend an e-Voucher Expiry Date from the Member Menu
1. Open the “Member” menu, then click the “List” tab.
2. Search for and click the “Card Number” of the member whose e-voucher expiry date will be extended.
Note: Only e-vouchers with “Active” and “Expired” statuses can have their expiry date extended. Users cannot extend the expiry date for e-vouchers with “Used” or “Suspend” status.
3. In the “List of e-voucher” section, search for and click the “Number” of the e-voucher to be extended.
 4. The system will display the “e-Voucher Info” pop-up. Click “Extend Expiry”.
 5. Enter the reason and set the new expiry date in the “Expiry Date” field.
6. Click “Extend” to complete the e-voucher expiry extension process.

How to Void an e-Voucher from the Member Menu
1. Open the “Member” menu, then click the “List” tab.
2. Search for and click the “Card Number” of the member whose e-voucher will be voided.
Note: Only e-vouchers with “Used” status can be voided.
3. In the “List of e-voucher” section, search for and click the “Number” of the e-voucher to be voided.
 4. The system will display the “e-Voucher Info” pop-up. Click “Void”.
Enter the reason, then click “Void” to complete the e-voucher void process.

How to Approve/Reject Open Membership Requests
The Open Membership Request menu is used to review and process member registration requests submitted through the Tada Wallet application that require approval.
The difference between Membership Request and Open Membership Request lies in the registration source:
- Membership Request : Members register through a merchant link and require approval.
- Open Membership Request : Members register through Tada Wallet and require approval.
Steps to Approve/Reject Open Membership Requests
1. Open the “Member” menu, then click the “Open Membership Request” tab.
2. Search for and click the “Name” to approve or reject.
 3. Users will be directed to the detail page to view the program detail and registration detail. To approve the request, click the “Approve” button. To reject the request, click the “Reject” button.
How to Approve/Reject Membership Requests
The Membership Request menu is used to process member registration requests submitted through merchant links that require approval.
The difference between Membership Request and Open Membership Request lies in the registration source:
- Membership Request : Members register through a merchant link and require approval.
- Open Membership Request : Members register through Tada Wallet and require approval.
Steps to Approve/Reject Membership Requests
1. Open the “Member” menu, then click the “Membership Request” tab.
2. Search for and click the “Name” to approve or reject.
 3. Users will be directed to the detail page to view the program detail and registration detail. To approve the request, click the “Approve” button. To reject the request, click the “Reject” button.
How to Edit Customer Data & Merge Cards
This feature is used to update member data and merge cards if the new phone number is already connected to another card.
Steps to Edit Customer Data
1. Open the “Member” menu, then click the “List” tab.
2. Search for and click the “Card Number” of the member whose data will be updated.
3. Click “Edit” in the top-right corner of the page.
 4. On the edit page, the member’s existing data will be displayed. This data is collected from the registration form completed by the member.
 5. If users want to change the phone number, they can click the pencil icon button. When updating the phone number, the system can detect whether the new phone number is already connected to another card. Users can also merge cards with another eligible card during this process.
a. Click the edit button.
 b. Enter the new phone number.
 c. After clicking “Continue”, a pop-up notification will appear if the new phone number is already connected to another card within the brand’s merchant program.
 d. If users only want to change the phone number without merging cards, click “CHANGE NOW”.
e. If users want to merge cards with another card connected to the new phone number, click “MERGE”.
 f. After clicking “MERGE”, a pop-up showing the transfer process between the old card and the new card will appear.
Note: During the point transfer process from the old card to the new card, the expiry date will follow the wallet type used.
- For layer and fixed date wallet types, the expiry date will follow the old card’s expiry date.
- For last transaction wallet types, the expiry date will follow the wallet expiry rules and may change after being transferred to the new card.

Additional Notes:
- The merged card level will follow the highest level between both cards.
- Level experience will be accumulated from both cards. If the combined experience exceeds a certain level threshold, the final merged result may increase the member’s level
g. Click “Merge Now”
 6. Click “Save” after completing the data update.

How to Merge Multiple Cards Within One Program
1. Open the “Member” menu, then click the “List” tab.
2. Search for members using the same phone number but having more than one card within a single program.
3. Click one of the “Card Numbers” to open the “Member Detail” page.
 4. If the system detects more than one card linked to the same phone number, a merge card banner will appear on the “Member Detail” page. Click “Merge Card”.
 5. A merge card confirmation pop-up will appear. Select the card to merge by clicking “Merge”.
 6. Make sure the destination card for the final merge is correct in the pop-up. Use “Swap Card” to determine which card will become the final card.
Note :
- The merged card level will follow the highest level between both cards.
- Level experience will be accumulated from both cards. If the combined experience exceeds a certain level threshold, the final merged result may increase the member’s level.
 7. Once confirmed, click “Merge Now”.
 8. A “merge card successfully processed” notification will appear on the “Member Detail” page. A merge card notification email will also be sent to the user who performed the merge. Please wait a few moments until all card data has been fully updated.

How to View Customer RFM Segmentation
1. Open the “Member” menu, then click the “List” tab.
2. Search for and click the “Card Number” of the customer whose RFM (Recency, Frequency, Monetary) segmentation you want to view.
 3. Users can view the segmentation and detailed calculation on the left side of the screen. RFM data is updated at the end of each day.
4. To view the calculation method and other available segmentations, click the “Learn More” button.

How to View Multilayer Referral
1. Open the “Member” menu, then click the “List” tab.
2. Search for and click the “Card Number” you want to view.
3. In the “Member Info” section, the following information will be displayed:
a. Referred By : The referral code of the member’s upline. Clicking the Referred By name will redirect the user to the upline member detail page.
b. Member Referral Code : The referral code belonging to the currently opened member detail.
 4. Click the “Referral Hierarchy” tab.
 5. The following information will be displayed:
a. The member’s hierarchy level.
b. Data of members who are under the currently opened member.
6. Click the arrow icon to view other members registered within the multilayer referral structure.
 7. Users can search members within the multilayer referral structure using the member name or card number.
 8. Click “Download” to download all member data within the multilayer referral structure. The downloaded data will belong to the currently opened member detail.