Catalog
The Catalog menu is used to create and manage product catalogs on the TADA Dashboard. The catalogs created can consist of Redemption Catalogs, Shop Catalogs, and Virtual Franchise Catalogs for programs operated by the merchant. Through this menu, merchants can create categories and products according to their needs.
This menu consists of 3 submenus:
- Product list : Displays product details owned by the merchant.
- Catalog list : Displays catalog types owned by the merchant within a specific program.
- Store : Assigns products to specific stores where they will be displayed.
If there is more than one Redemption Catalog, the catalogs will be displayed at the bottom of the Catalog List page. Catalogs are independent, meaning clients can modify and add products to one catalog without affecting other catalogs.
How to Create a Physical Product
This feature is used to create physical products that will be displayed in the catalog.
Steps to Create a Physical Product
1. Open the Dashboard, click the “Catalog” menu, and select the “Product List” submenu.
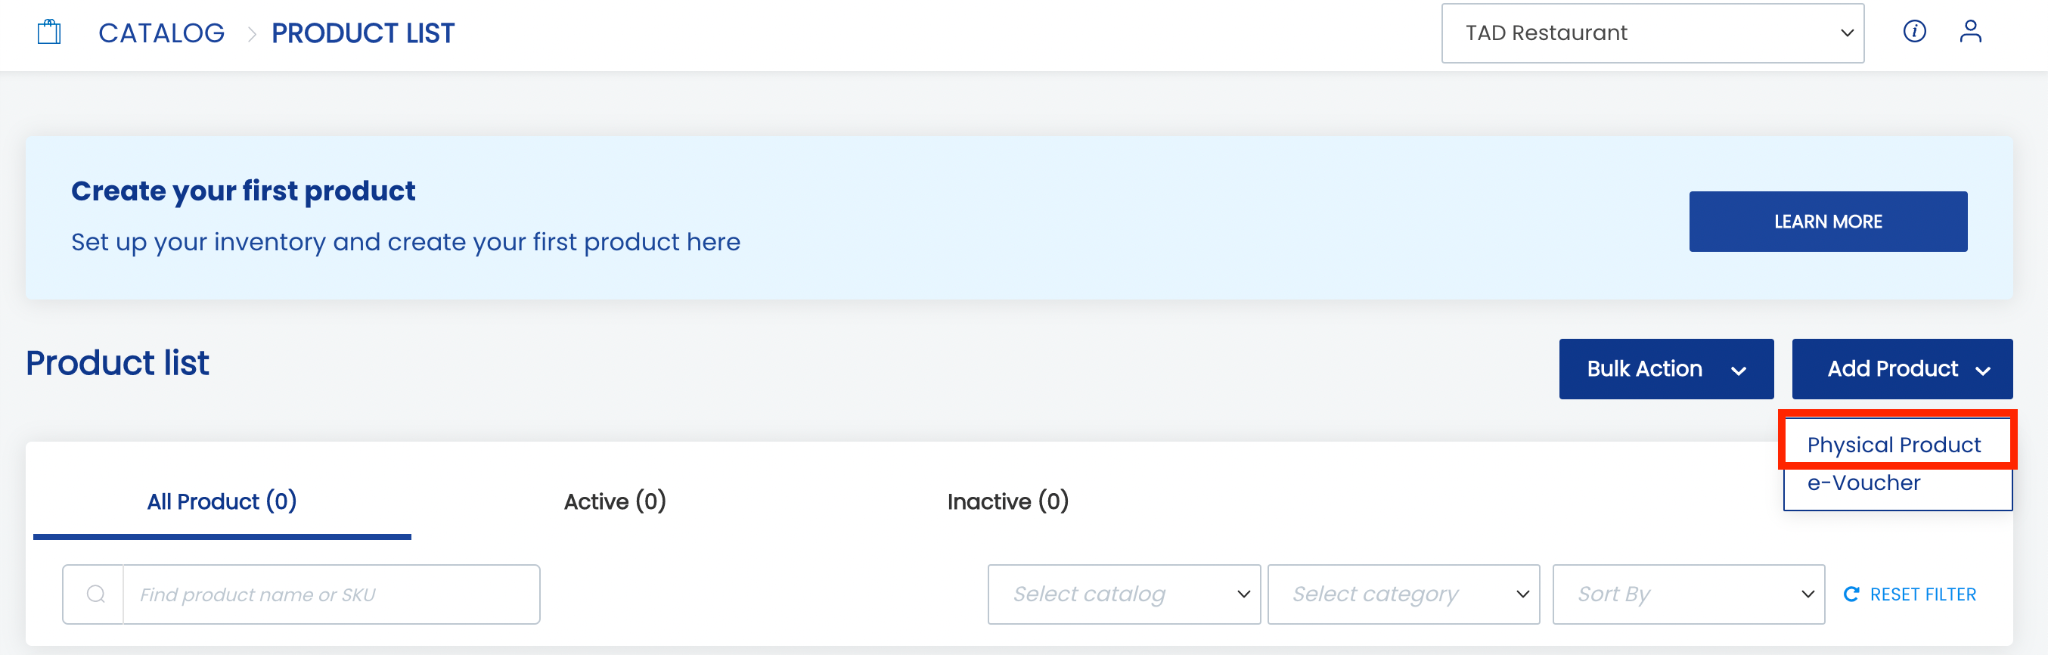
2. To create a single product, click “Add Product” and select “Physical Product”.
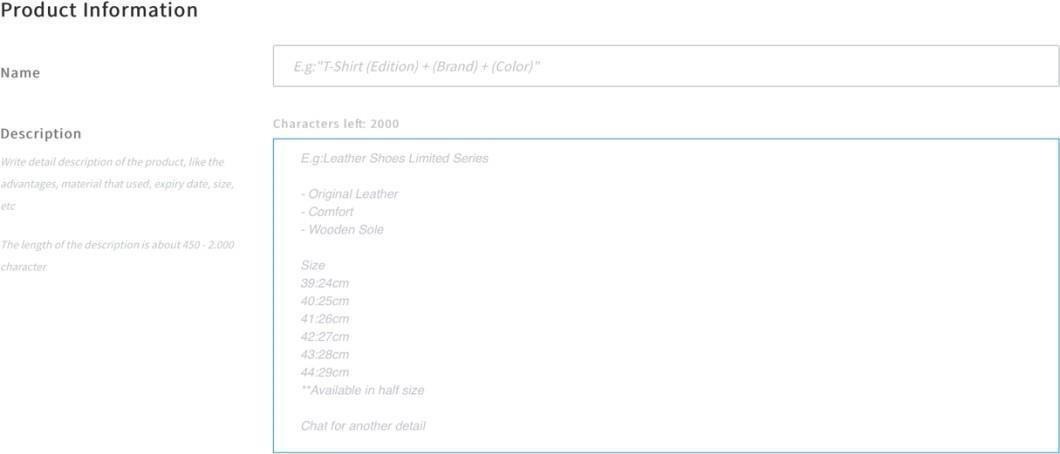
 3. Enter the product Name and Description in the Product Information section.
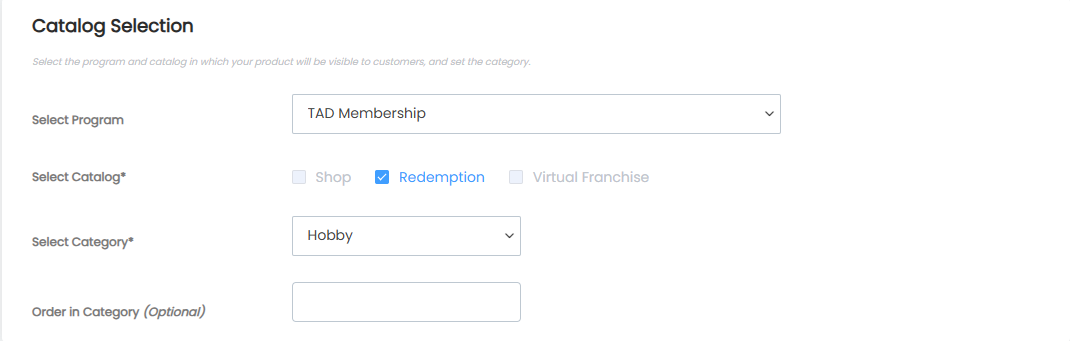
 4. Select the Program where the product will be displayed.
5. Select the Catalog Type (Shop, Redemption, or Virtual Franchise).
6. Select the Category where the product will be displayed and define the product order within the selected category.
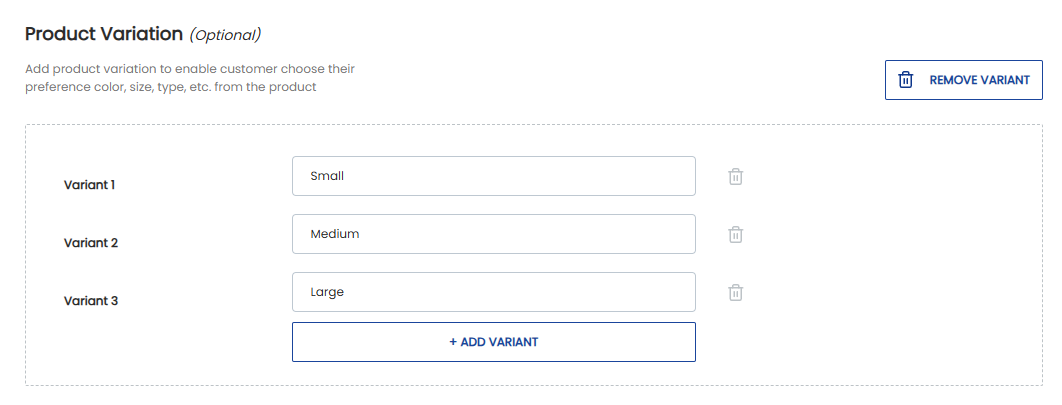
 7. Add product variants if available by filling in Variant 1 and Variant 2 fields. Click +Add Variant to add another variant type or Remove Variant to delete a variant.
 8. Determine whether the product price will be different from the amount paid by members.
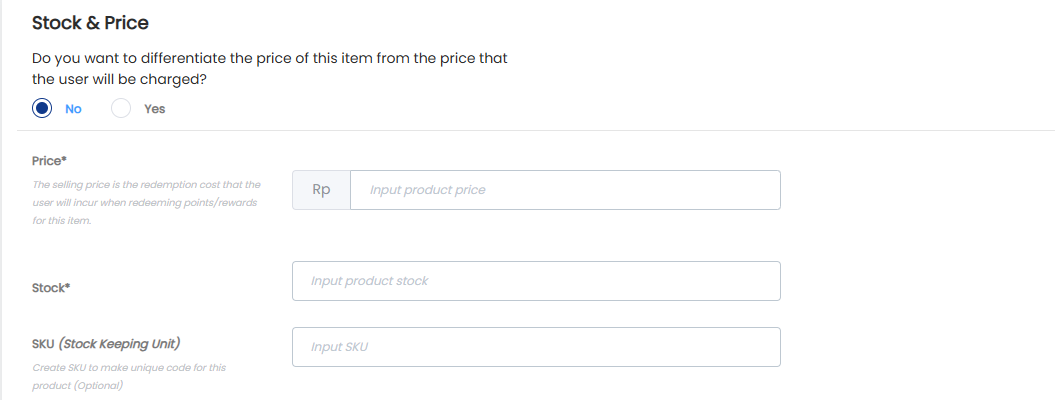
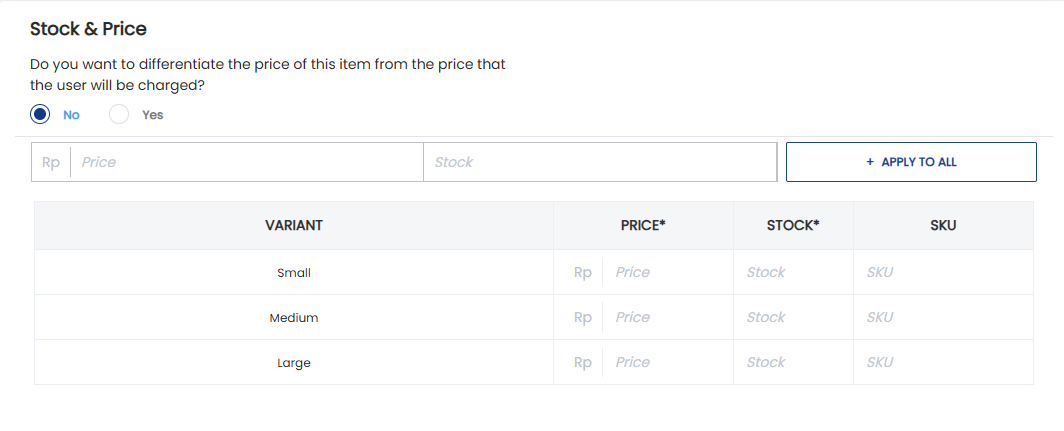
9. Enter the product Price, Stock, and SKU in the Stock & Price section.
 Description:
- Real Price: The actual product price when purchased by a member.
- Selling Price: The redemption price that members must pay using points to redeem the product.
- Stock: The available quantity of the product. Leave blank if the product has unlimited stock.
- SKU: A unique product code used to distinguish and manage each item.
10. Upload the product image by clicking the camera icon in the Upload Product Image section. The recommended image resolution is 700 x 700 px with a maximum file size of 1 MB.
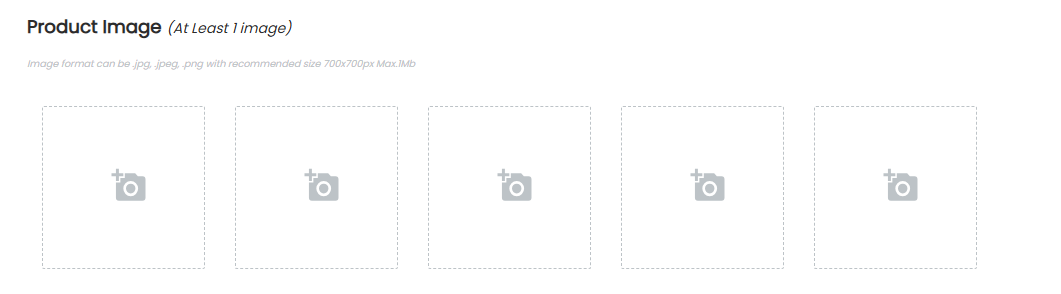 11. Upload variant images (if any) by clicking the camera icon in the Variant Image section.
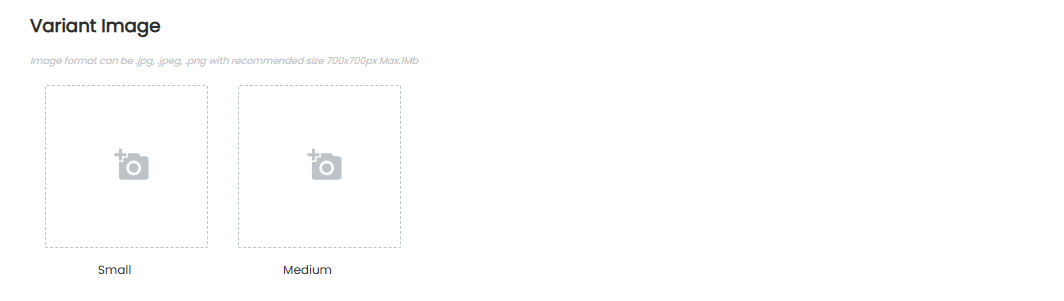 12. Enter the product Weight or Dimensions (Volume - cm) in the Shipping Information section.

 13. Click Save & Add New to save the product and immediately create another product, or click Save to save the product only.
How to Create a Physical Product (Multiple Redemption Catalog)
This feature is used when the merchant has more than one Redemption Catalog dedicated to different membership levels.
Steps to Create a Product
1. Open the Dashboard, click the “Catalog” menu, and select the “Product List” submenu.
2. To create a single product, click “Add Product” and select “Physical Product”.
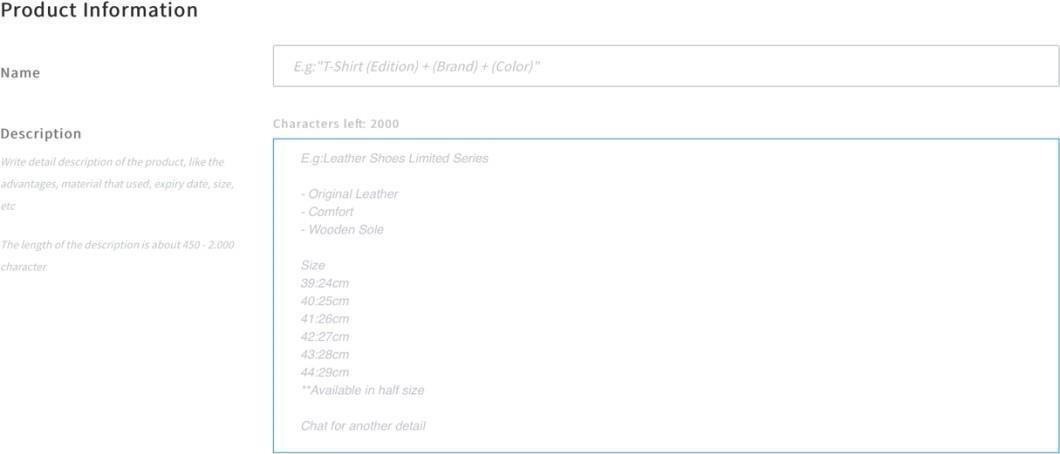
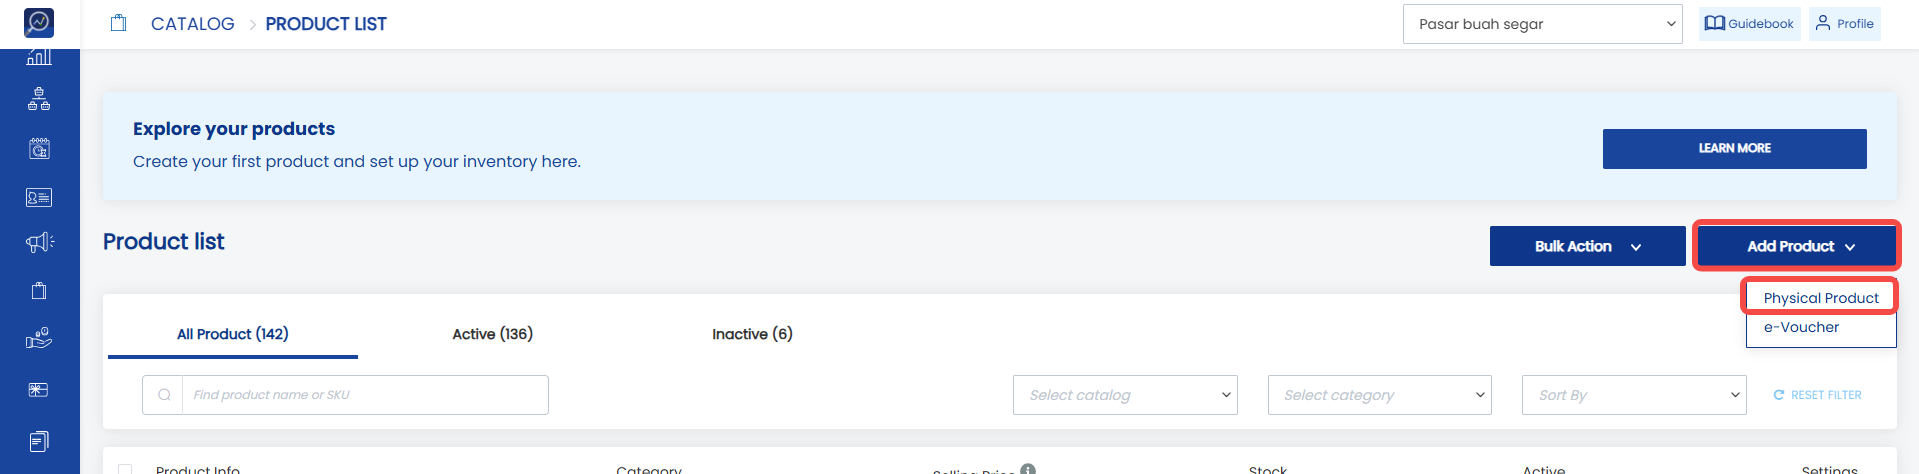 3. Enter the product Name and Description in the Product Information section.
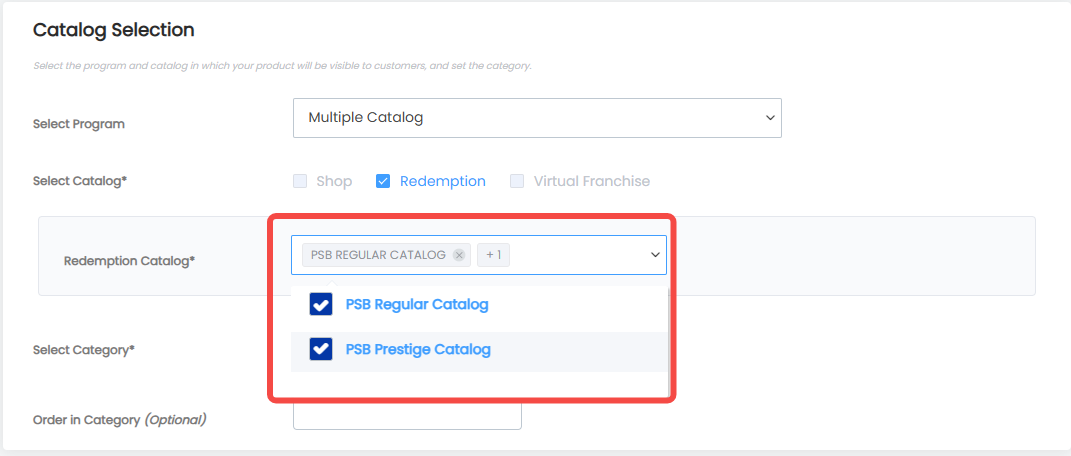
 4. Select the Program where the product will be displayed.
5. Select the Catalog Type (Shop, Redemption, or Virtual Franchise).
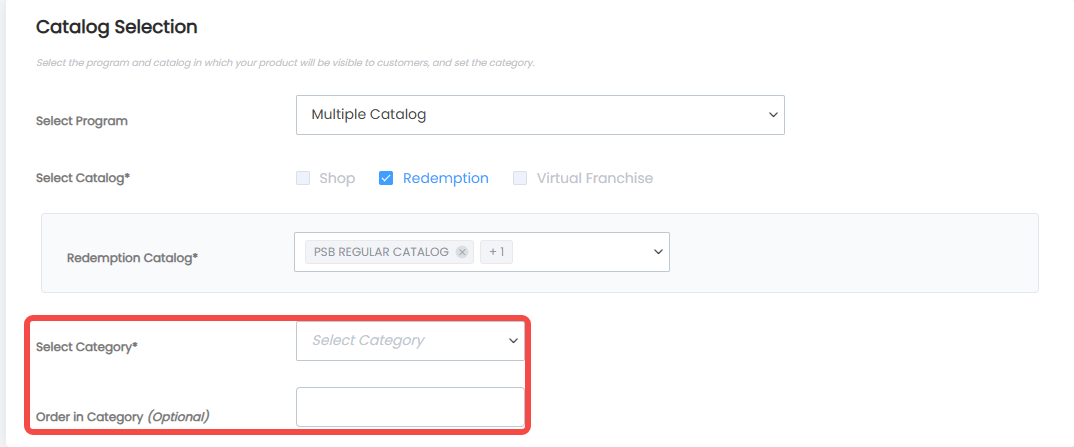
If the client has more than one Redemption Catalog, the client must choose which catalog(s) the product will be added to (multiple catalogs can be selected).
 6. Select the Category where the product will be displayed and define the product order within the selected category.
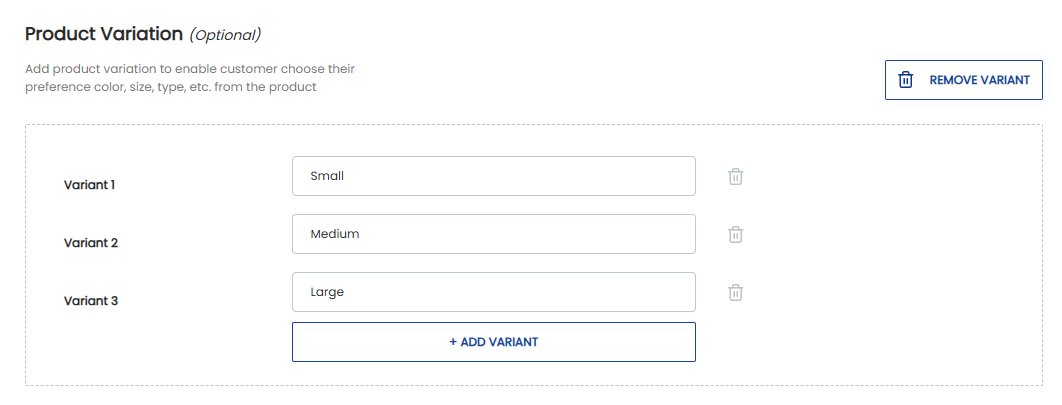
 7. Add product variants if available by filling in Variant 1 and Variant 2 fields. Click +Add Variant to add another variant type or Remove Variant to delete a variant.
 8. Determine whether the product price will be different from the amount paid by members.
9. Enter the product Price, Stock, and SKU in the Stock & Price section.
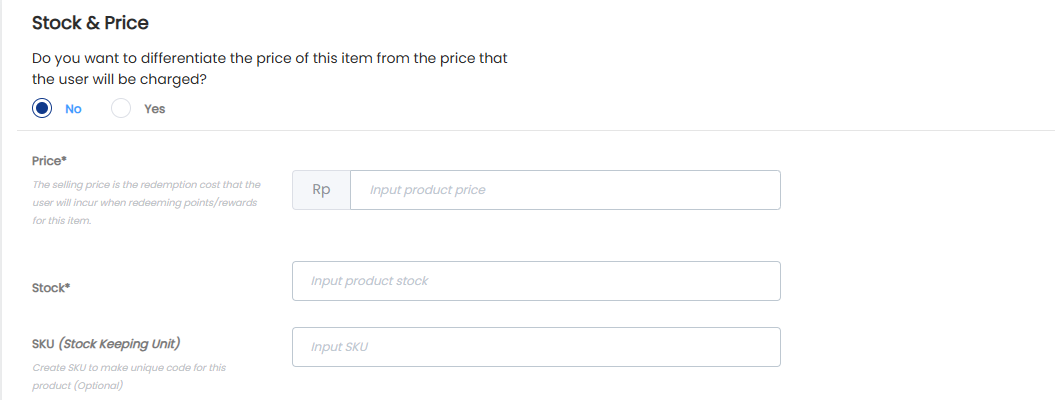
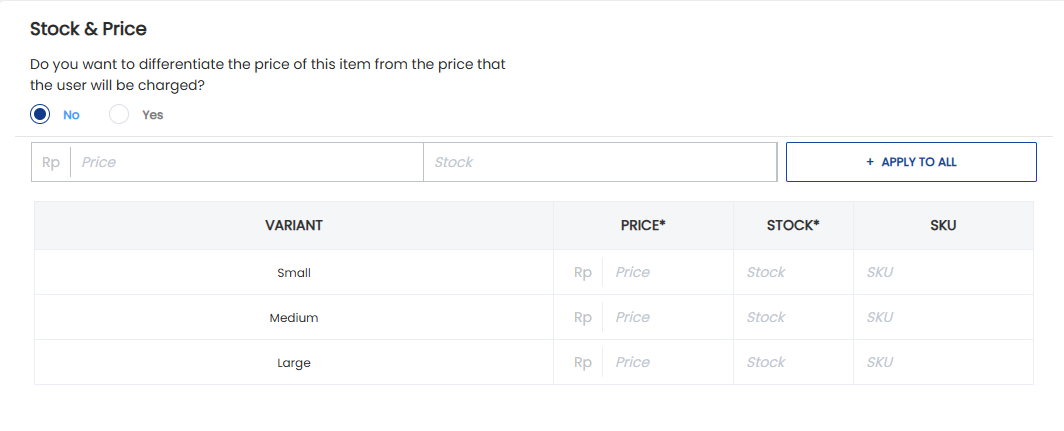 Description:
- Real Price: The actual product price when purchased by a member.
- Selling Price: The redemption price that members must pay using points to redeem the product.
- Stock: The available quantity of the product. Leave blank if the product has unlimited stock.
- SKU: A unique product code used to distinguish and manage each item.
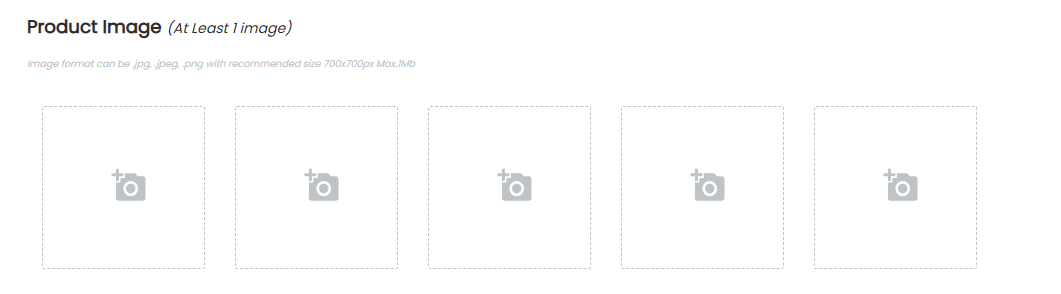
10. Upload the product image by clicking the camera icon in the Upload Product Image section. The recommended image resolution is 700 x 700 px with a maximum file size of 1 MB.
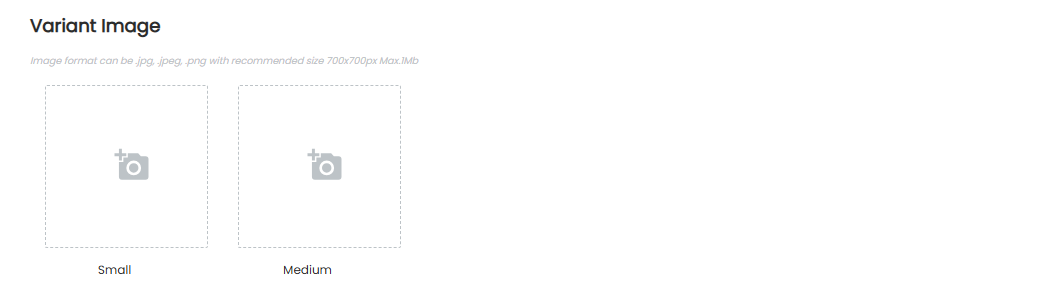
 11. Upload variant images (if any) by clicking the camera icon in the Variant Image section.
 12. Enter the product Weight or Dimensions (Volume - cm) in the Shipping Information section.

 13. Click Save & Add New to save the product and immediately create another product, or click Save to save the product only.
How to Create an E-Voucher Product
This feature is used to create e-voucher products that will be displayed in the catalog.
Steps to Create an E-Voucher Product
1. Open the Dashboard, click the “Catalog” menu, and select the “Product List” submenu.
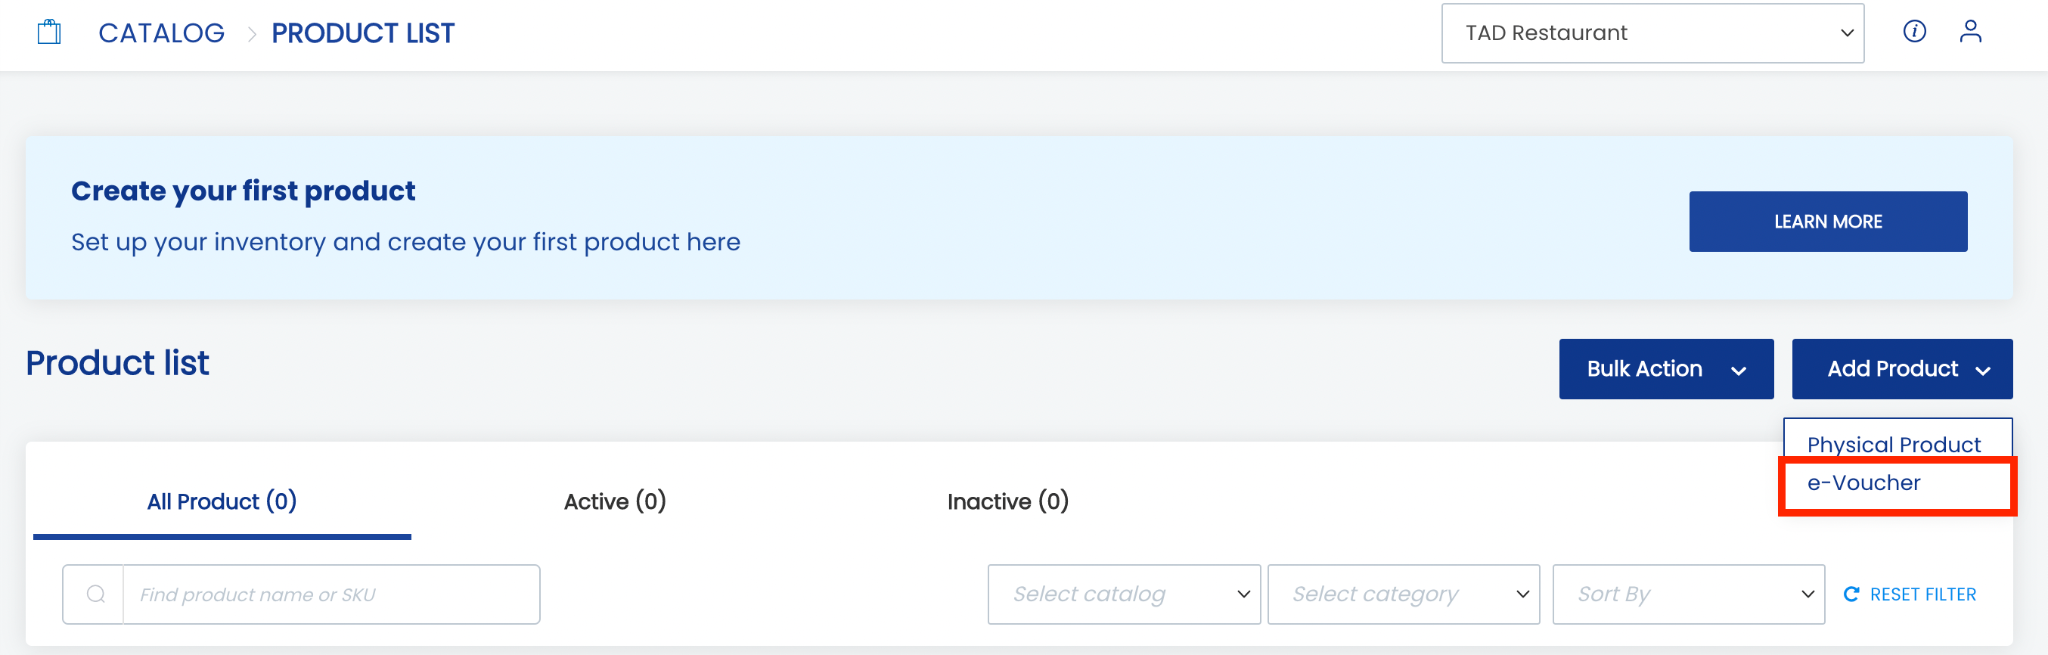
2. To create a single product, click “Add Product” and select “E-Voucher”.
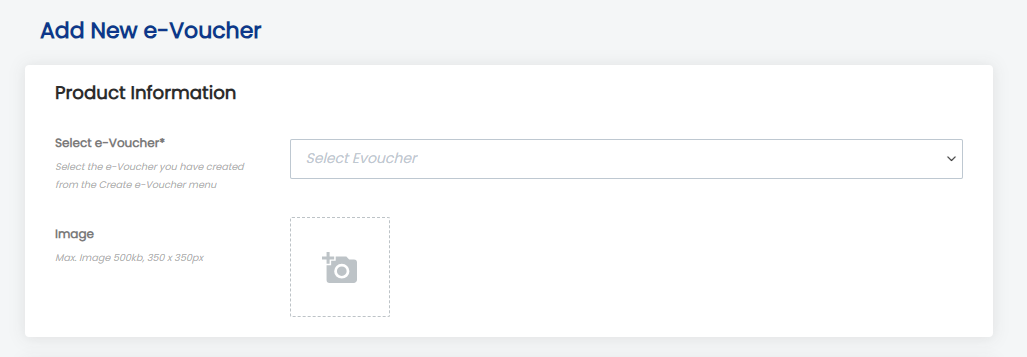
 3. Select the e-Voucher that will be added to the catalog. The e-voucher list is sourced from the e-Voucher - List menu.
Note: After selecting an e-voucher, the Image and Terms & Conditions fields will be automatically populated based on the e-voucher settings.
 If the desired e-voucher is not yet available in the list, click “+Create e-Voucher” and follow the steps in Chapter 10.7: How to Create an e-Voucher.
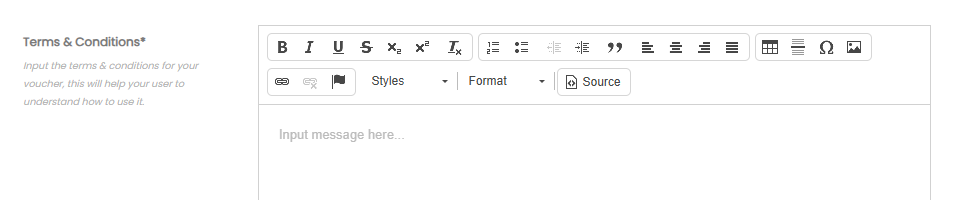
4. Complete the Terms & Conditions for the selected e-voucher.
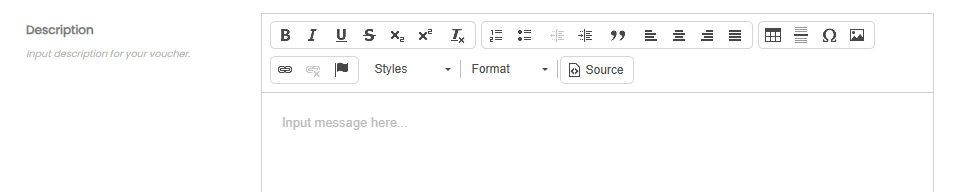
 5. Complete the Description for the selected e-voucher.
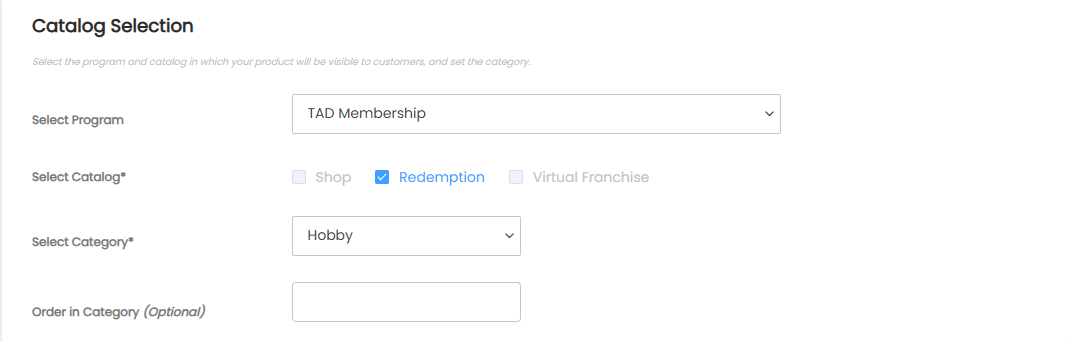
 6. Select the Program where the product will be displayed.
7. Select the Catalog Type (Shop, Redemption, or Virtual Franchise).
8. Select the Category where the product will be displayed and define the product order within the selected category.
 9. Determine whether the e-voucher price will be different from the amount paid by members.
10. Enter the product Price, Stock, and SKU.
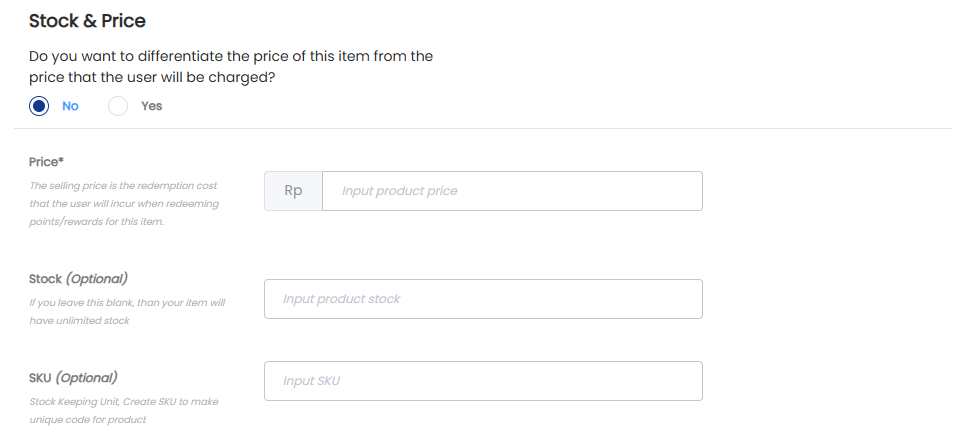
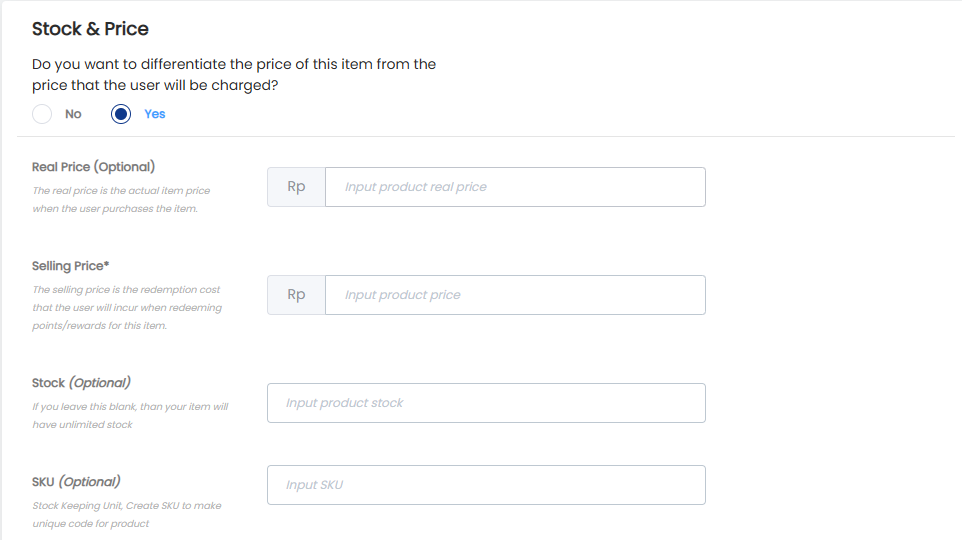 Description:
- Real Price: The actual product price when purchased by a member.
- Selling Price: The redemption price that members must pay using points to redeem the product.
- Stock: The available quantity of the product. Leave blank if the product has unlimited stock.
- SKU: A unique product code used to distinguish and manage each item.\
11. Set the e-Voucher Expiry, which can be: No Expiry, Expire After a Certain Number of Days, A Specific Expiry Date.

 12. Click Save & Add New to save the product and immediately create another product, or click Save to save the product only.
How to Create an E-Voucher Product (Multiple Redemption Catalog)
This feature is used when the merchant has more than one Redemption Catalog dedicated to different membership levels.
Steps to Create a Product
1. Open the Dashboard, click the “Catalog” menu, and select the “Product List” submenu.
2. To create a single product, click “Add Product” and select “E-Voucher”.
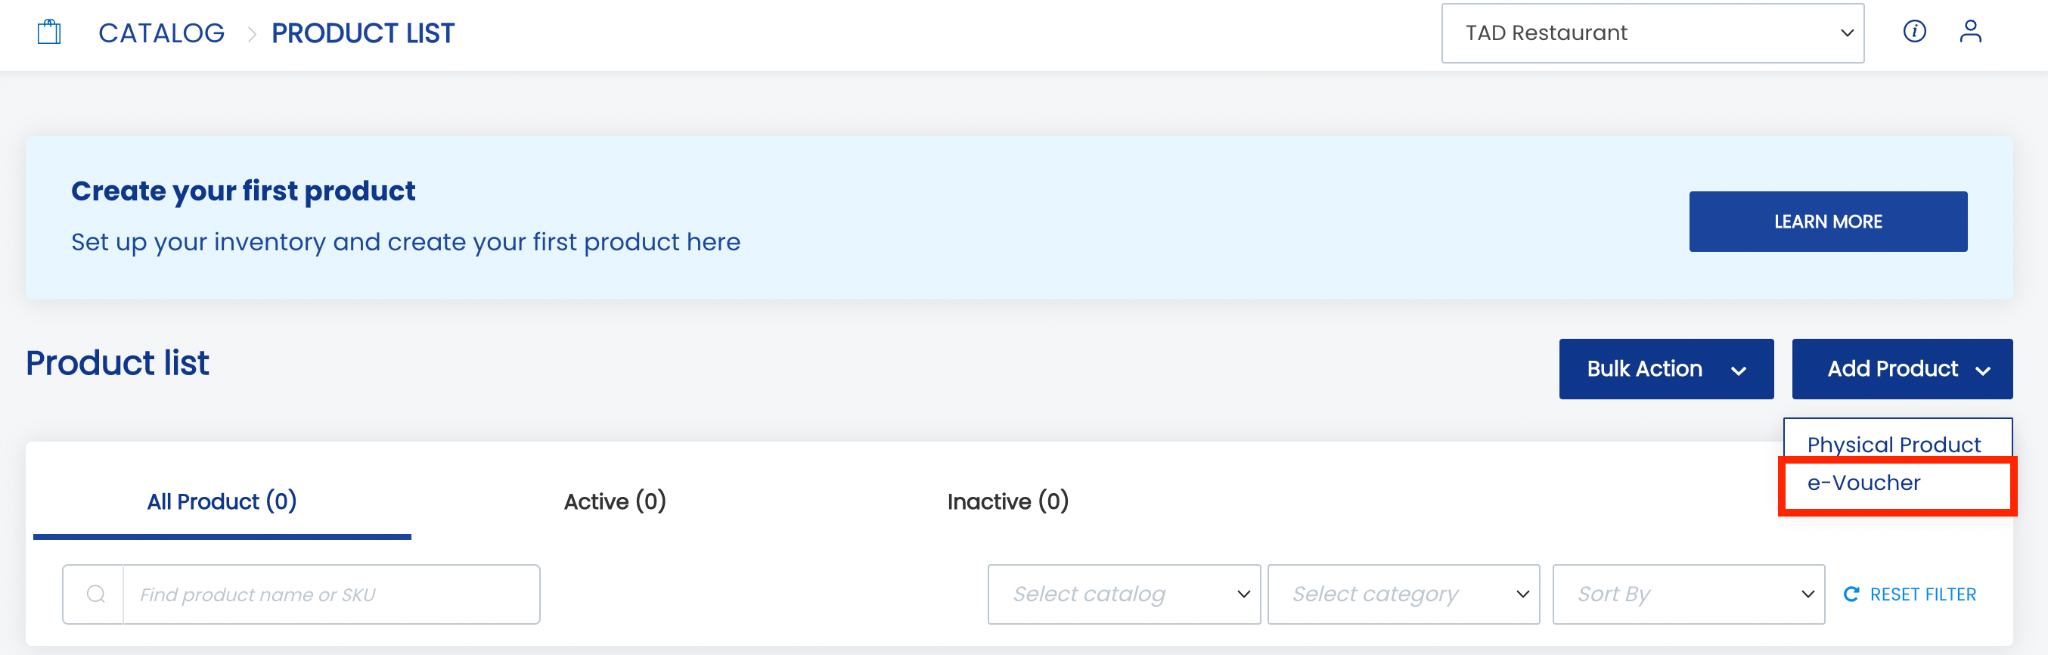 3. Select the e-Voucher that will be added to the catalog. The e-voucher list is sourced from the e-Voucher - List menu.
Note: After selecting an e-voucher, the Image and Terms & Conditions fields will be automatically populated based on the e-voucher settings.
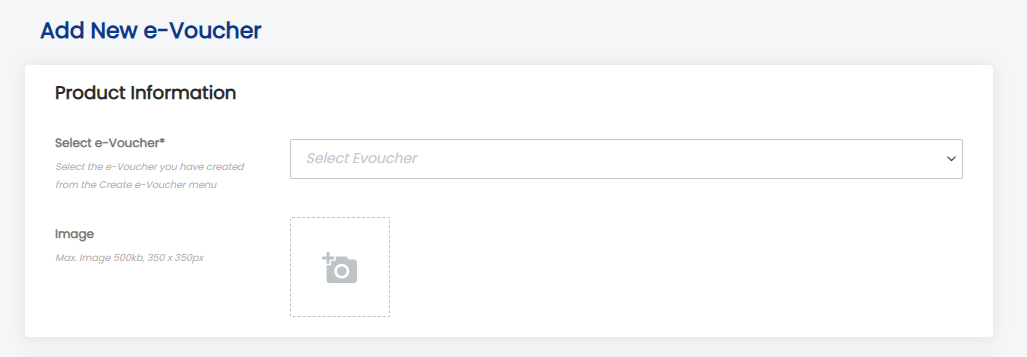 If the desired e-voucher is not yet available in the list, click “+Create e-Voucher” and follow the steps in Chapter 10.7: How to Create an e-Voucher.
4. Complete the Terms & Conditions for the selected e-voucher.
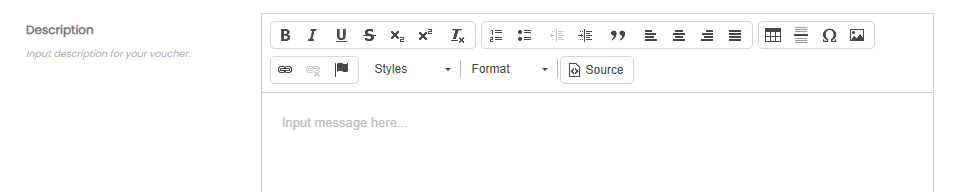
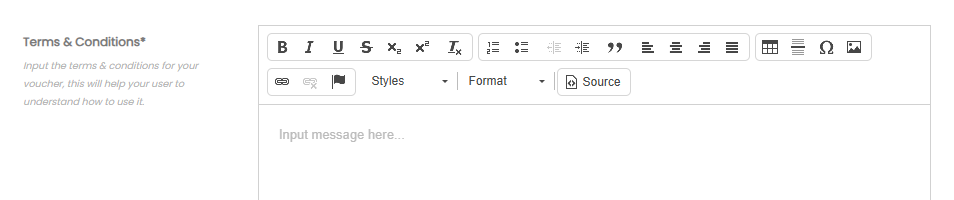 5. Complete the Description for the selected e-voucher.
 6. Select the Program where the product will be displayed.
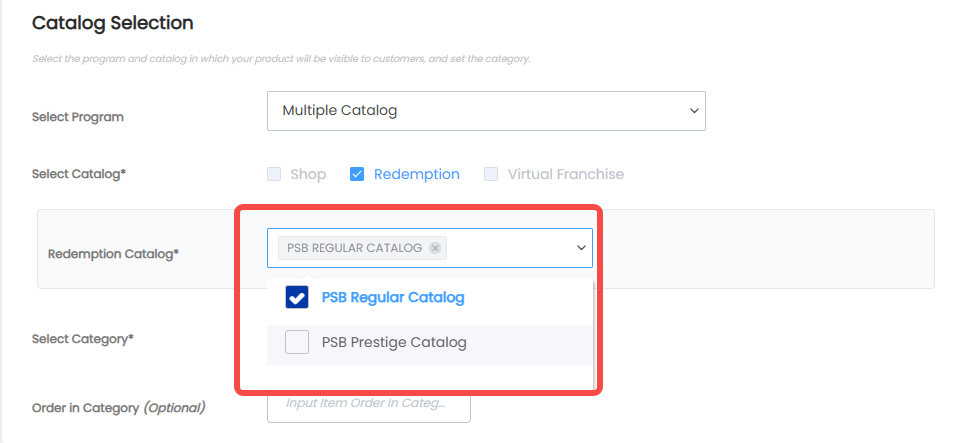
7. Select the Catalog Type (Shop, Redemption, or Virtual Franchise).
If the client has more than one Redemption Catalog, the client must choose which catalog(s) the product will be added to (multiple catalogs can be selected).
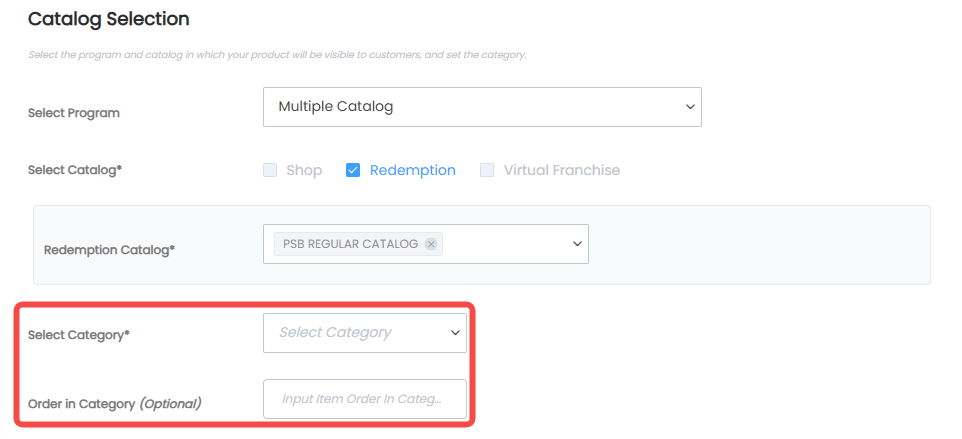
 8. Select the Category where the product will be displayed and define the product order within the selected category.
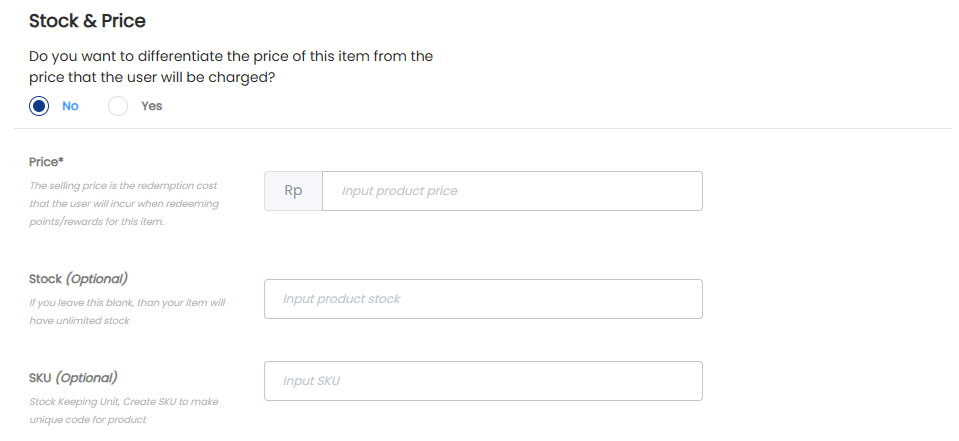
 9. Determine whether the e-voucher price will be different from the amount paid by members.
10. Enter the product Price, Stock, and SKU.
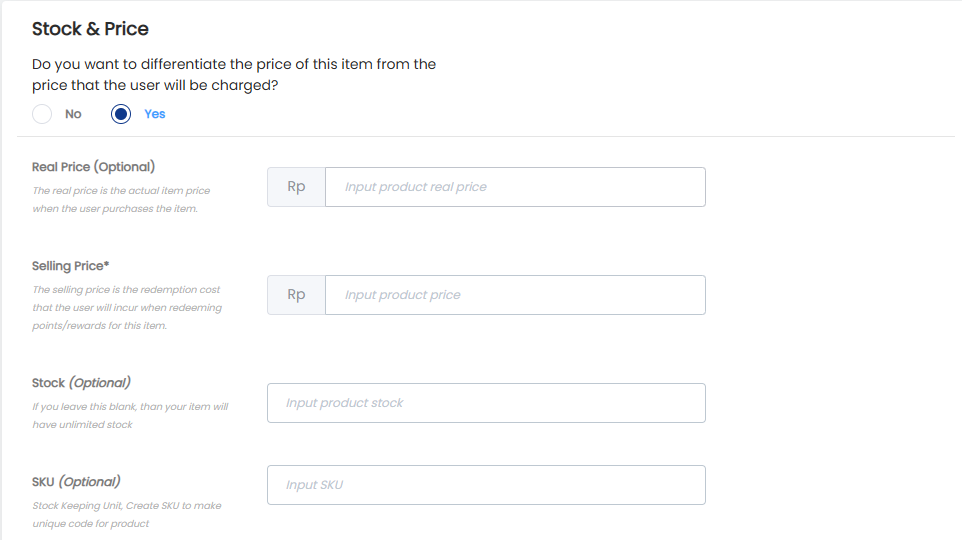 Description:
- Real Price: The actual product price when purchased by a member.
- Selling Price: The redemption price that members must pay using points to redeem the product.
- Stock: The available quantity of the product. Leave blank if the product has unlimited stock.
- SKU: A unique product code used to distinguish and manage each item.
11. Set the e-Voucher Expiry, which can be: No Expiry, Expire After a Certain Number of Days, A Specific Expiry Date.

 12. Click Save & Add New to save the product and immediately create another product, or click Save to save the product only.
How to Create Products in Bulk (Bulking)
The Bulk Product Add feature is used to add multiple products at once through an Excel file.
Steps to Add Products in Bulk
1. Open the Dashboard, click the “Catalog” menu, and select the “Product List” submenu.
2. To add products in bulk, click “Bulk Action” and select “Bulk Product Add”.
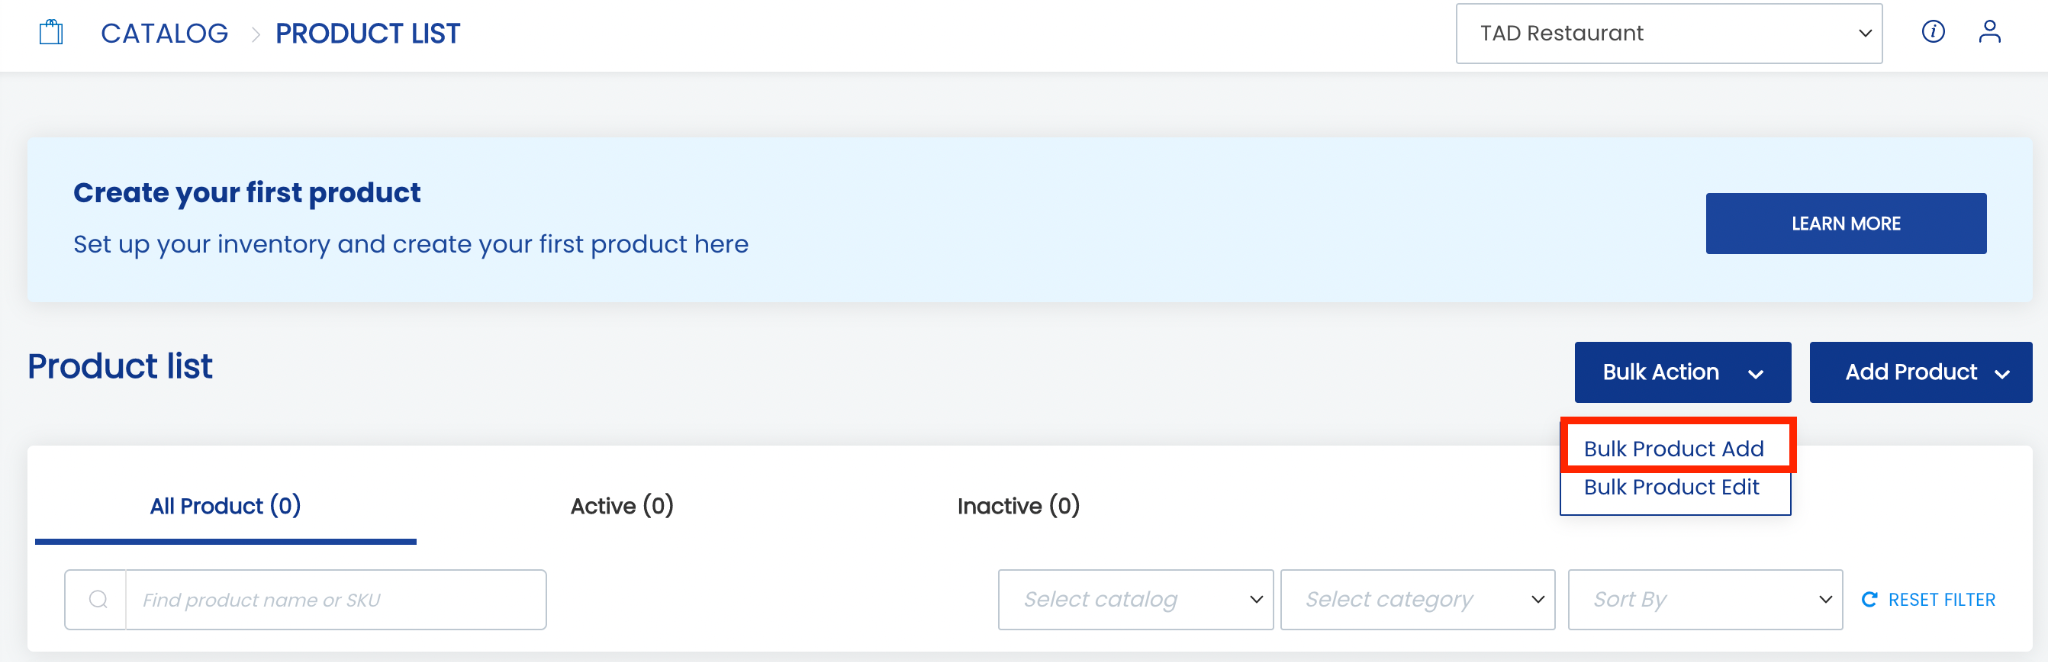 3. Download the Excel template file from the “Download Template” section and fill it out according to the product details in Sheet 1.
To make the process easier, an “Example How to Fill” sheet is provided in the template as a guide for creating products in bulk.
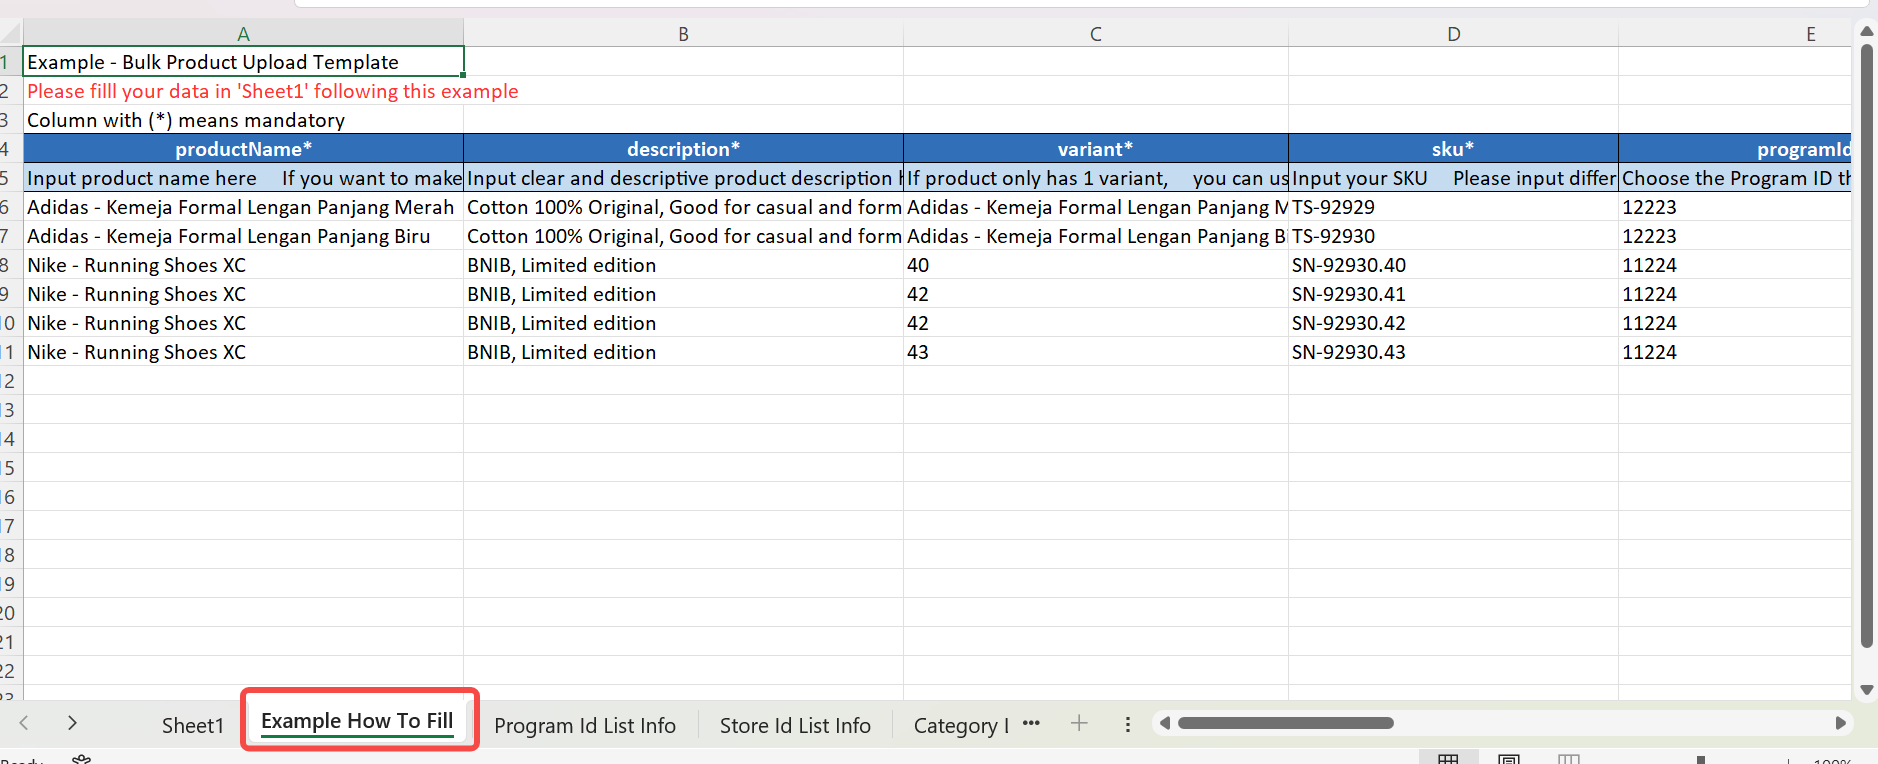 4. Upload the completed Excel file in the “Upload Document” section.
5. Click “Submit”. The Submit button will become active (blue) once the Excel file has been uploaded.
How to View the Product List
1. Open the Dashboard, click the “Catalog” menu, and select the “Product List” submenu.
2. Use filters as needed, such as:
- SKU Name
- Category
- Catalog
3. The system will display products based on the selected filters. If no filters are applied, all products will be displayed.
How to Edit Product Details
1. Open the Dashboard, click the “Catalog” menu, and select the “Product List” submenu.
2. Find the product you want to edit, then click “Edit” on the right side of the product and select “Edit Product”.
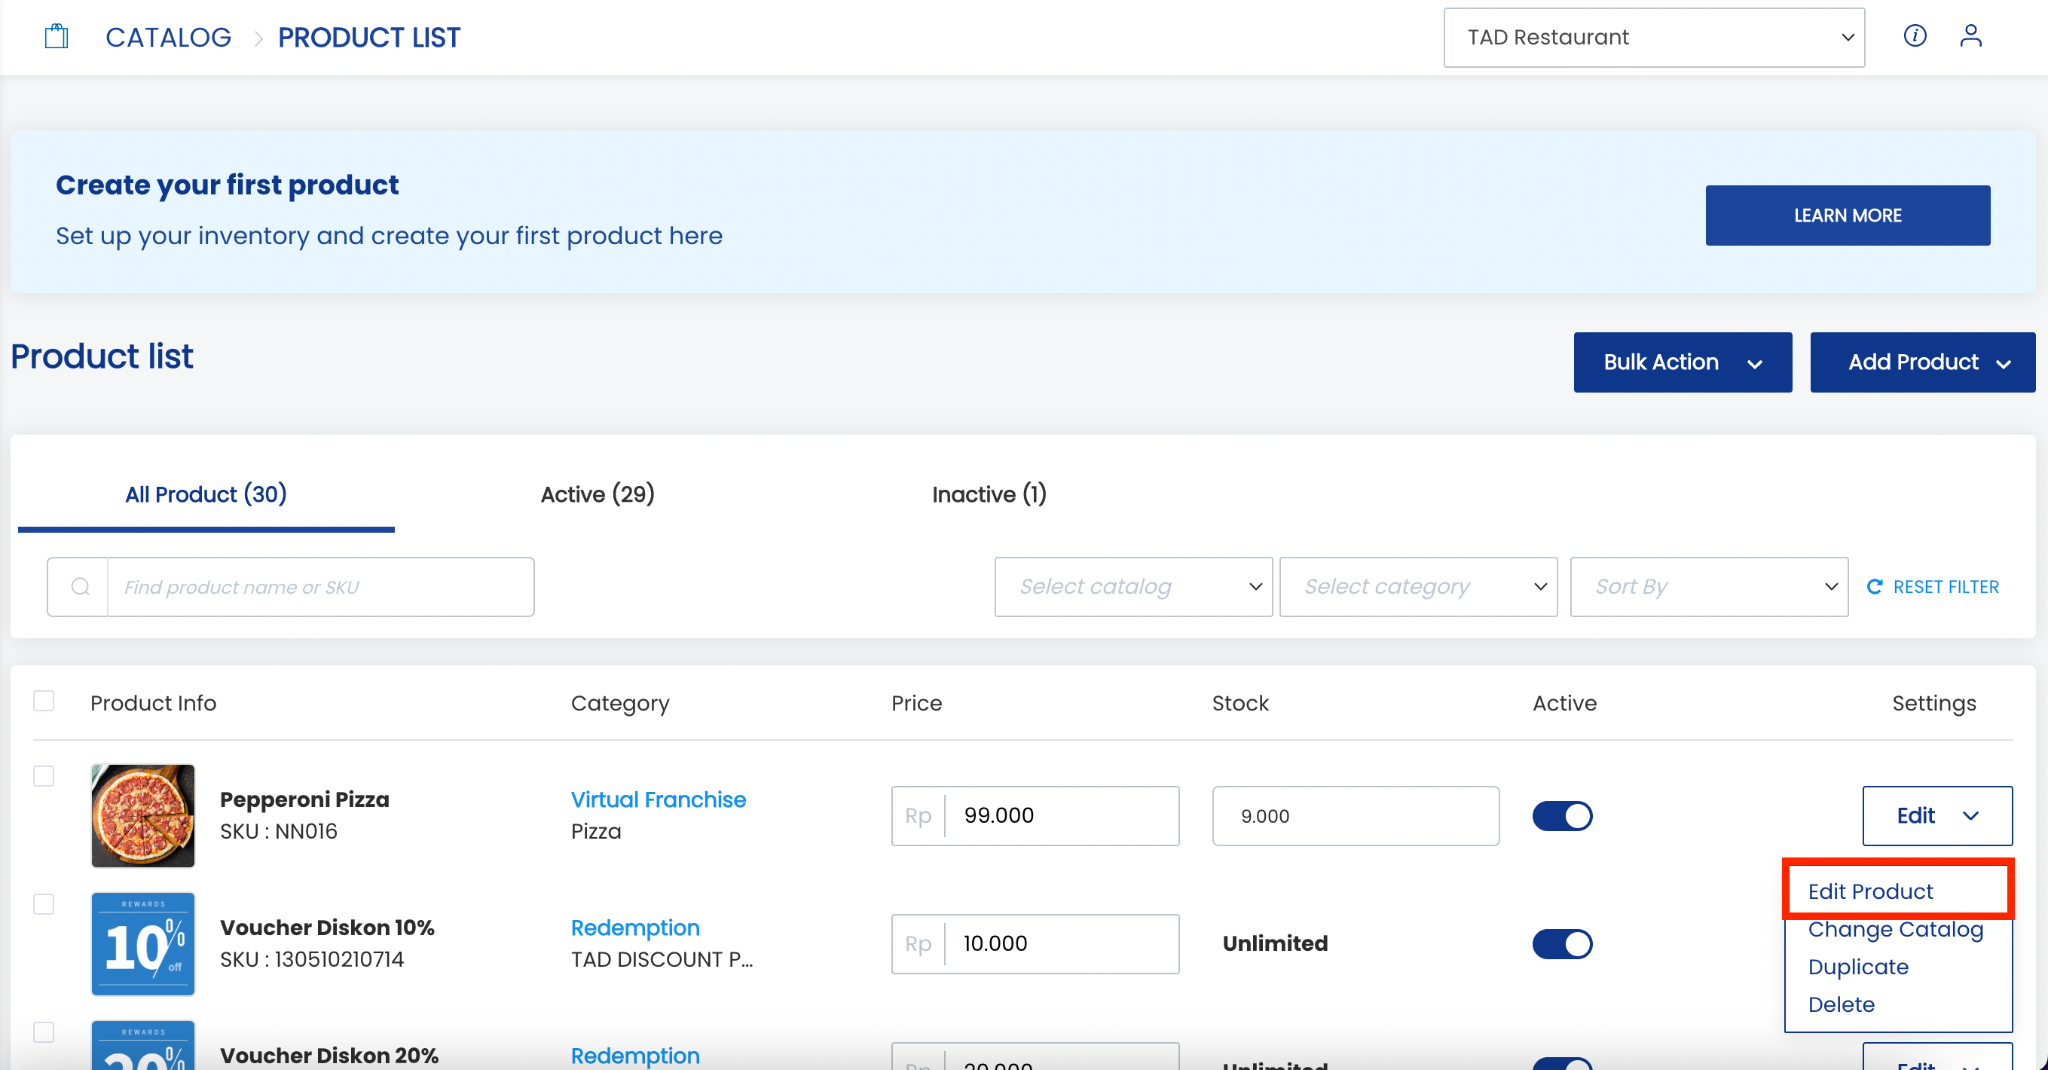 3. Modify the desired data. Editable information includes:
- Name
- Description
- Catalog
- Store availability
- Product variant
- Stock
- Price
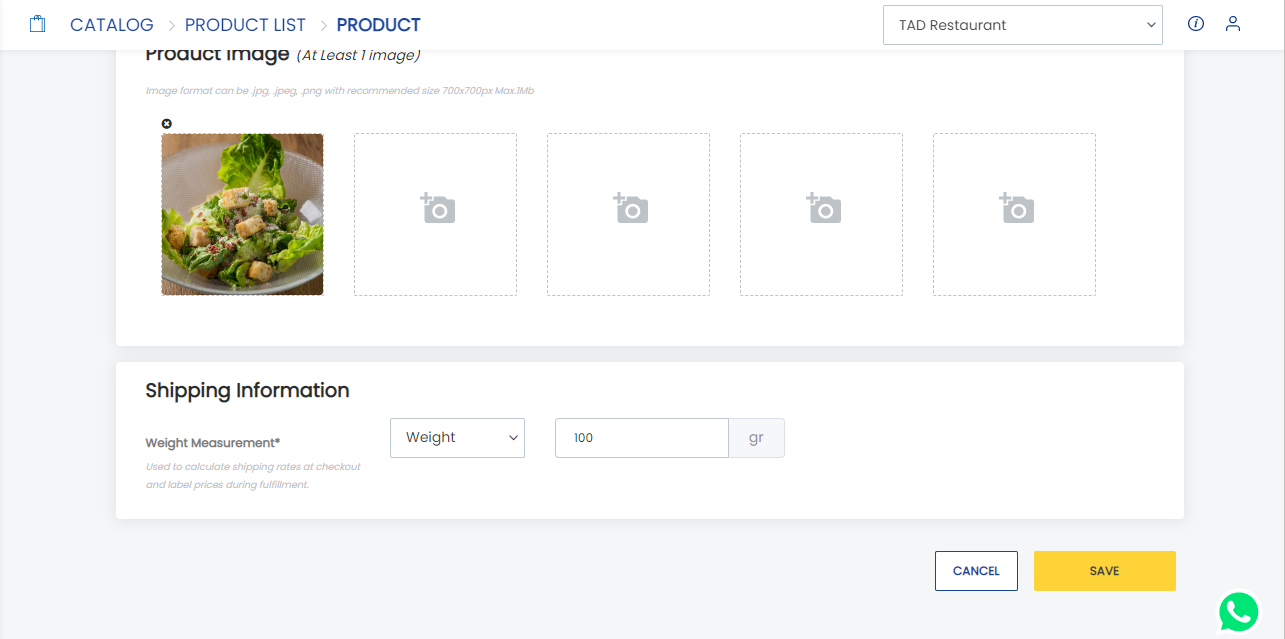
- Image
- Shipping information
4. Click Save, and the product details will be updated automatically.
How to Edit Product Details in Bulk (Bulking)
1. Open the Dashboard, click the “Catalog” menu, and select the “Product List” submenu.
2. Click “Bulk Action”, then select “Bulk Product Edit”.
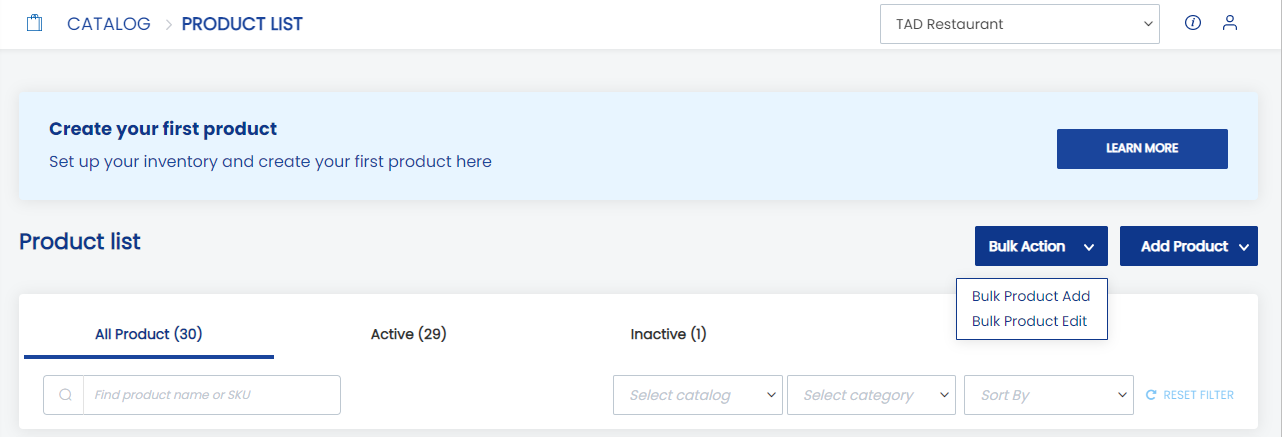 3. Download the Excel template file from the “Download Template” section. The template contains all active and inactive products. Users only need to fill in the products they wish to update.
4. Update the product data in the template file.
5. Upload the completed Excel file in the “Upload Document” section.
6. Click “Submit”. The Submit button will become active (blue) once the Excel file has been uploaded.
How to Create a New Category
1. Open the “Catalog” menu and click the “Catalog List” submenu.
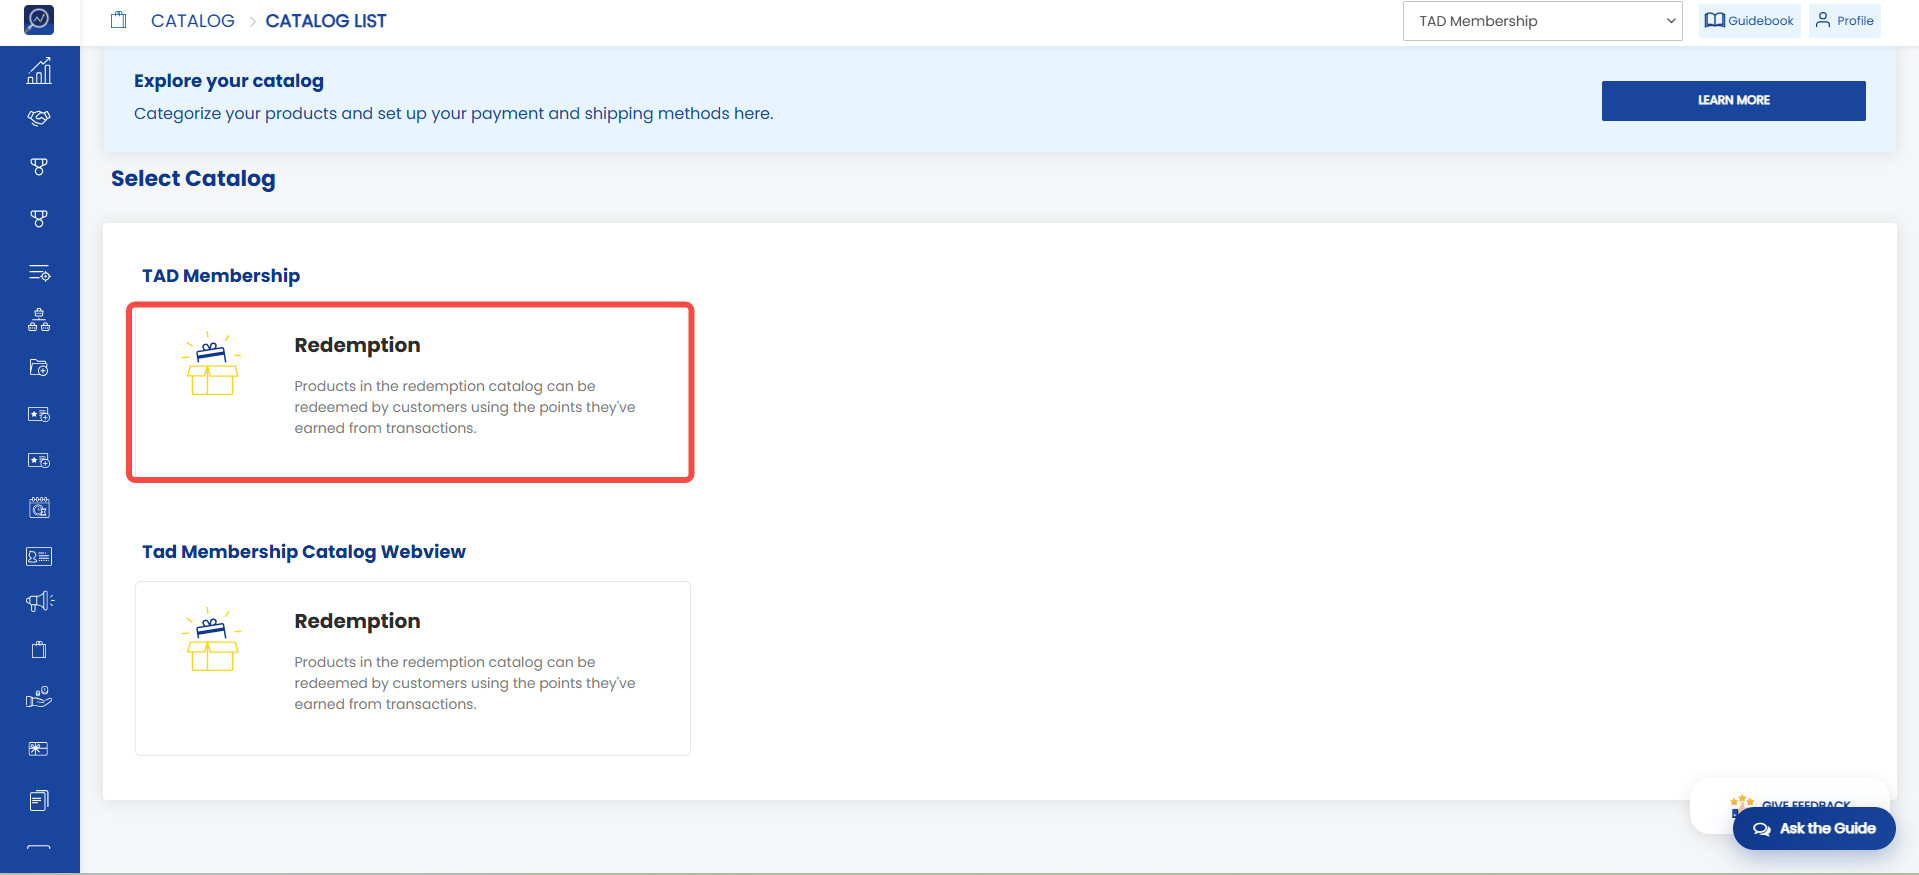
2. Select the catalog where you want to add a category.
 3. Click “Add Category”
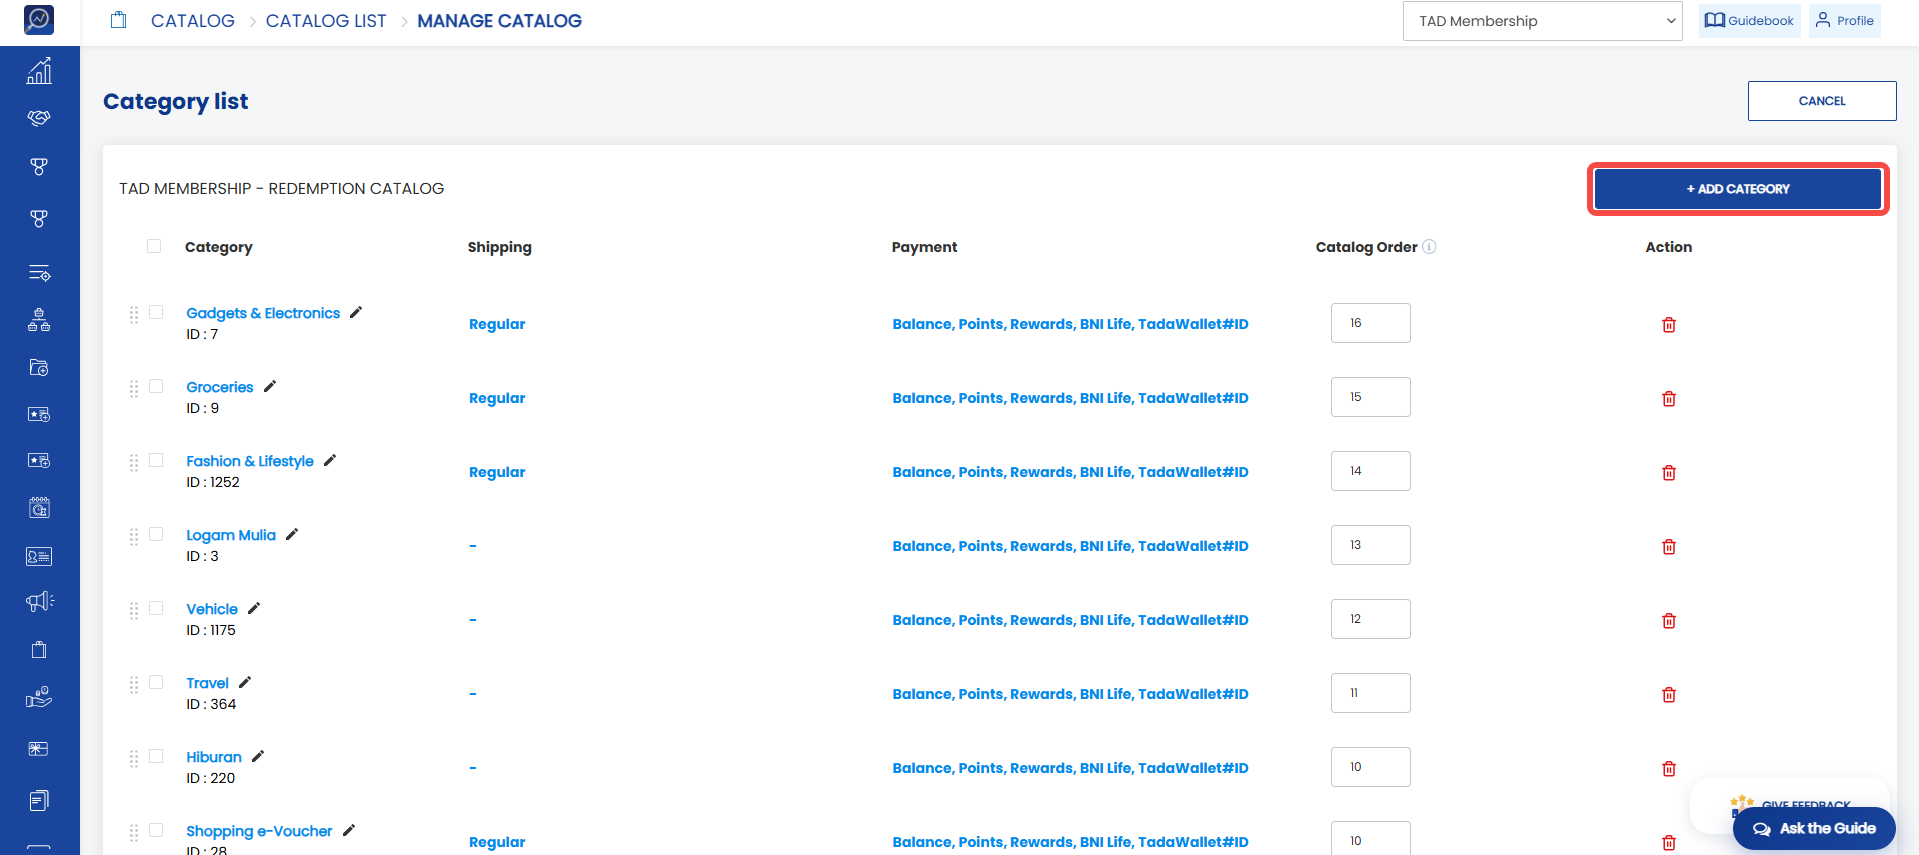 4. The system will display a popup menu. Select “Add New Category”.
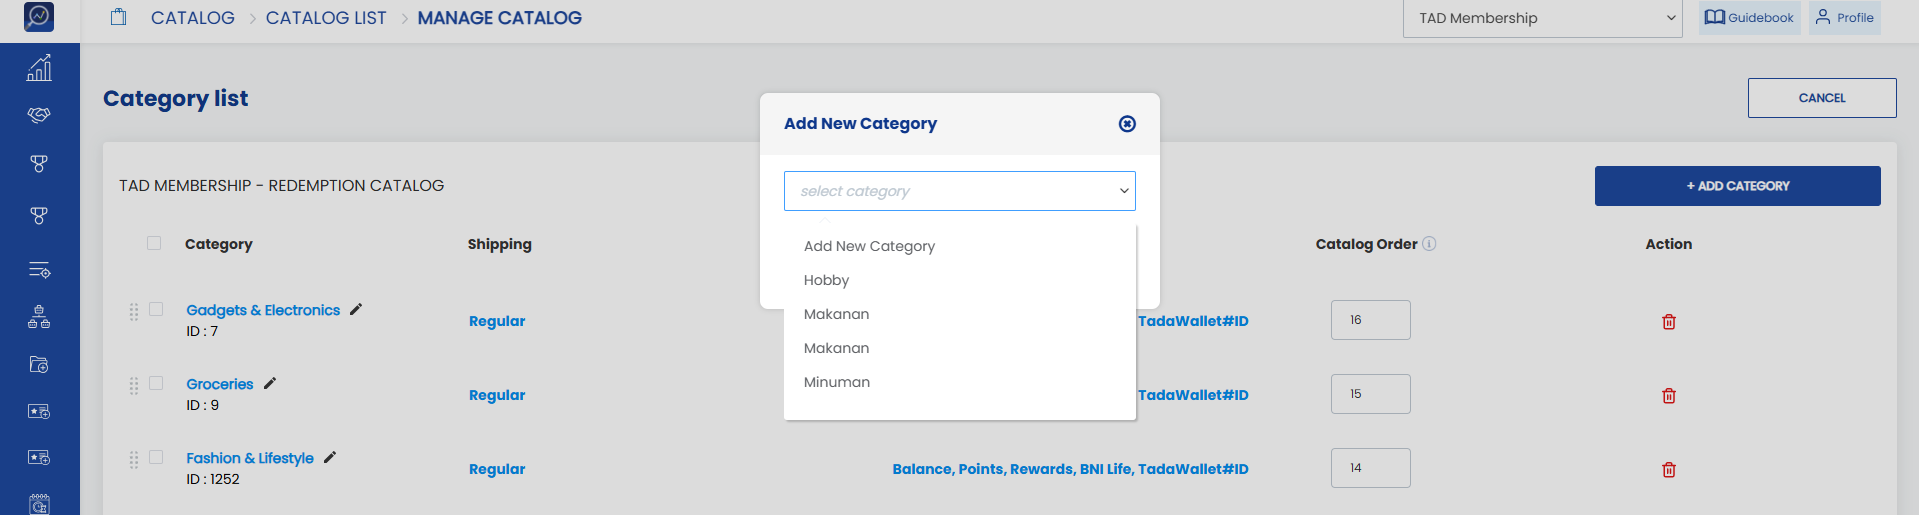 5. Enter the desired category name in the “New Category” field, then click “Add”. The new category will appear in the category list.
How to Rename a Category
1. Open the “Catalog” menu and click the “Catalog List” submenu.
2. Select the catalog containing the category you want to rename.
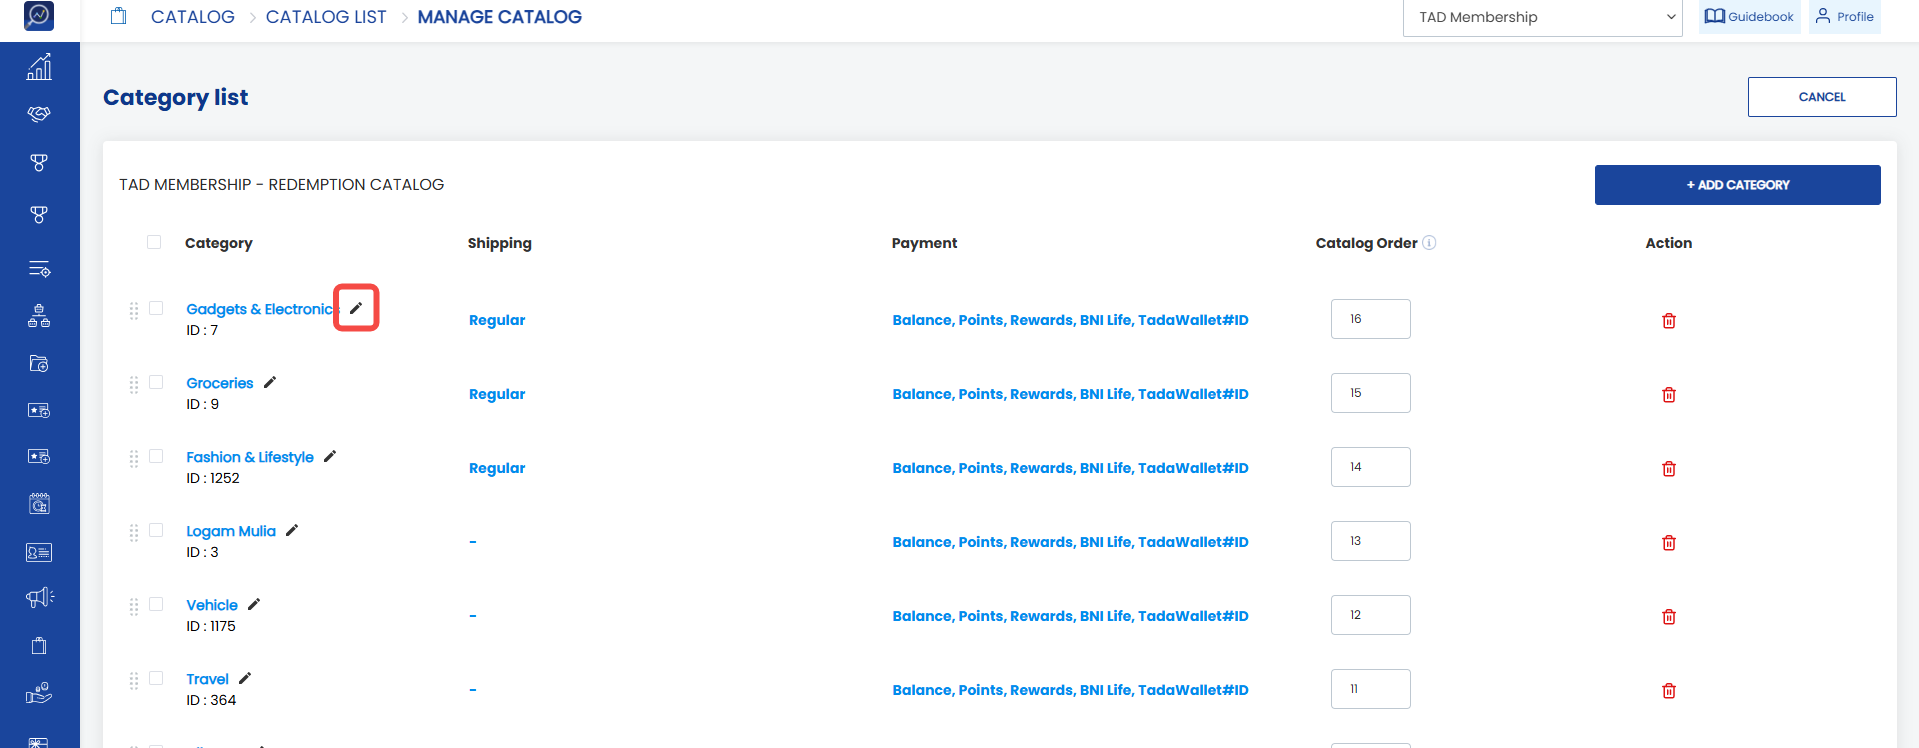
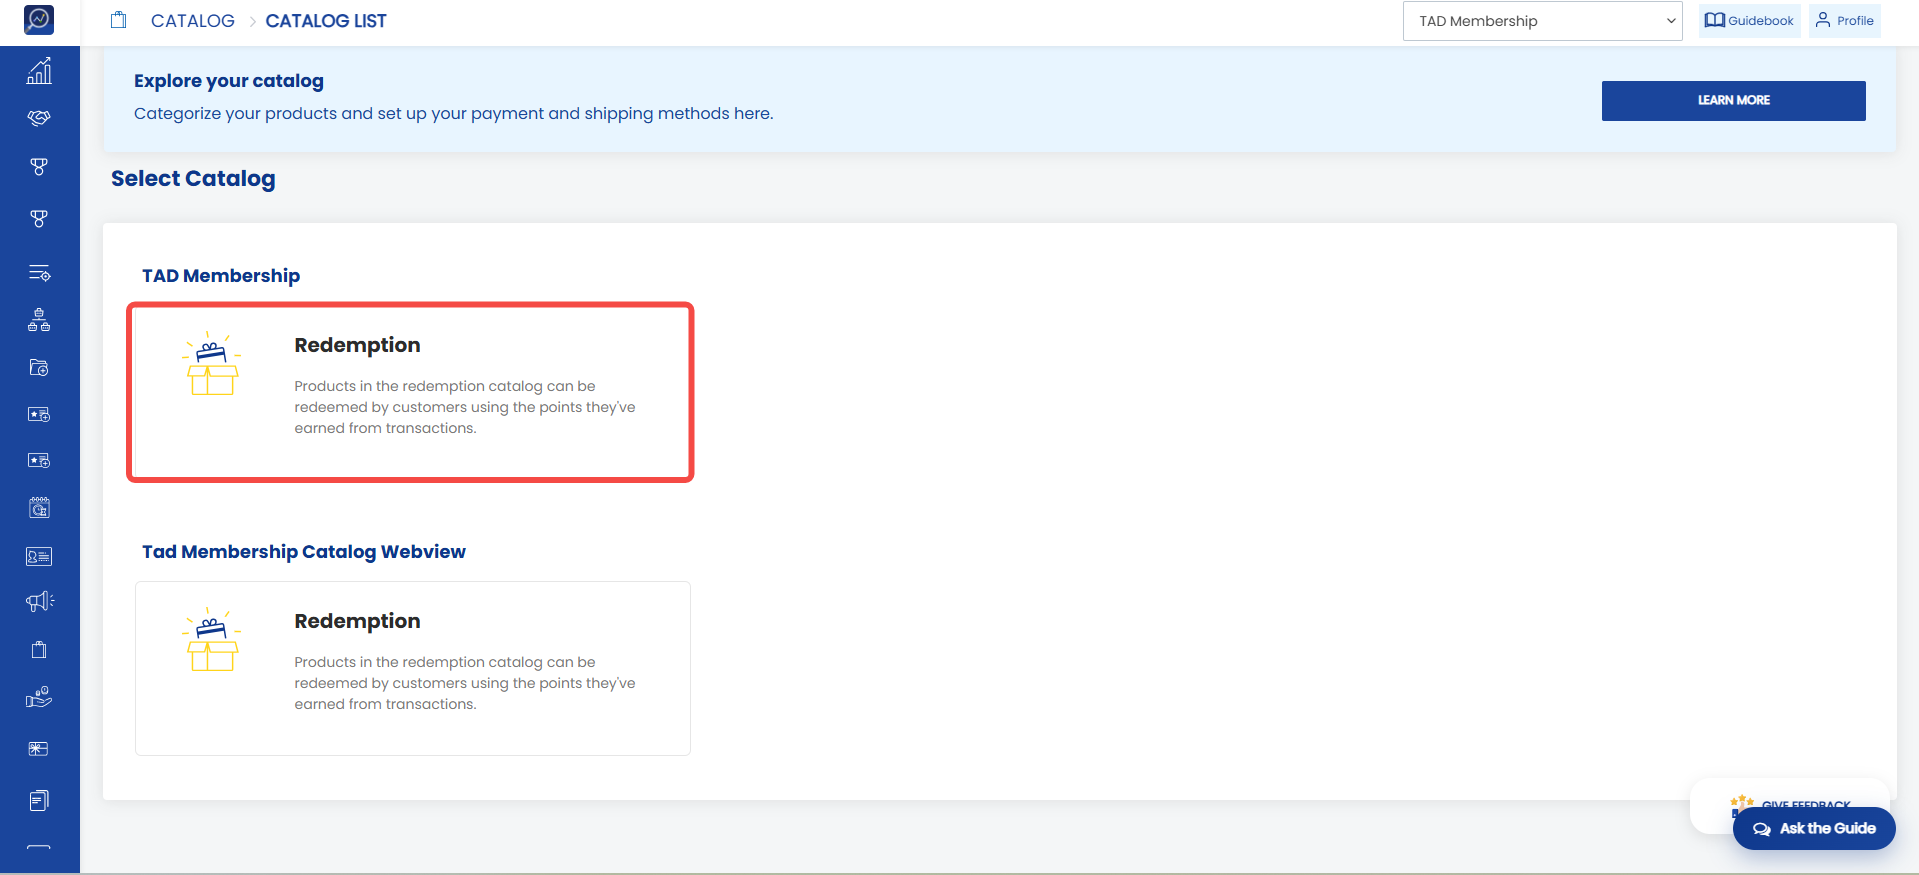 3. Click the pencil icon on the category you want to edit.
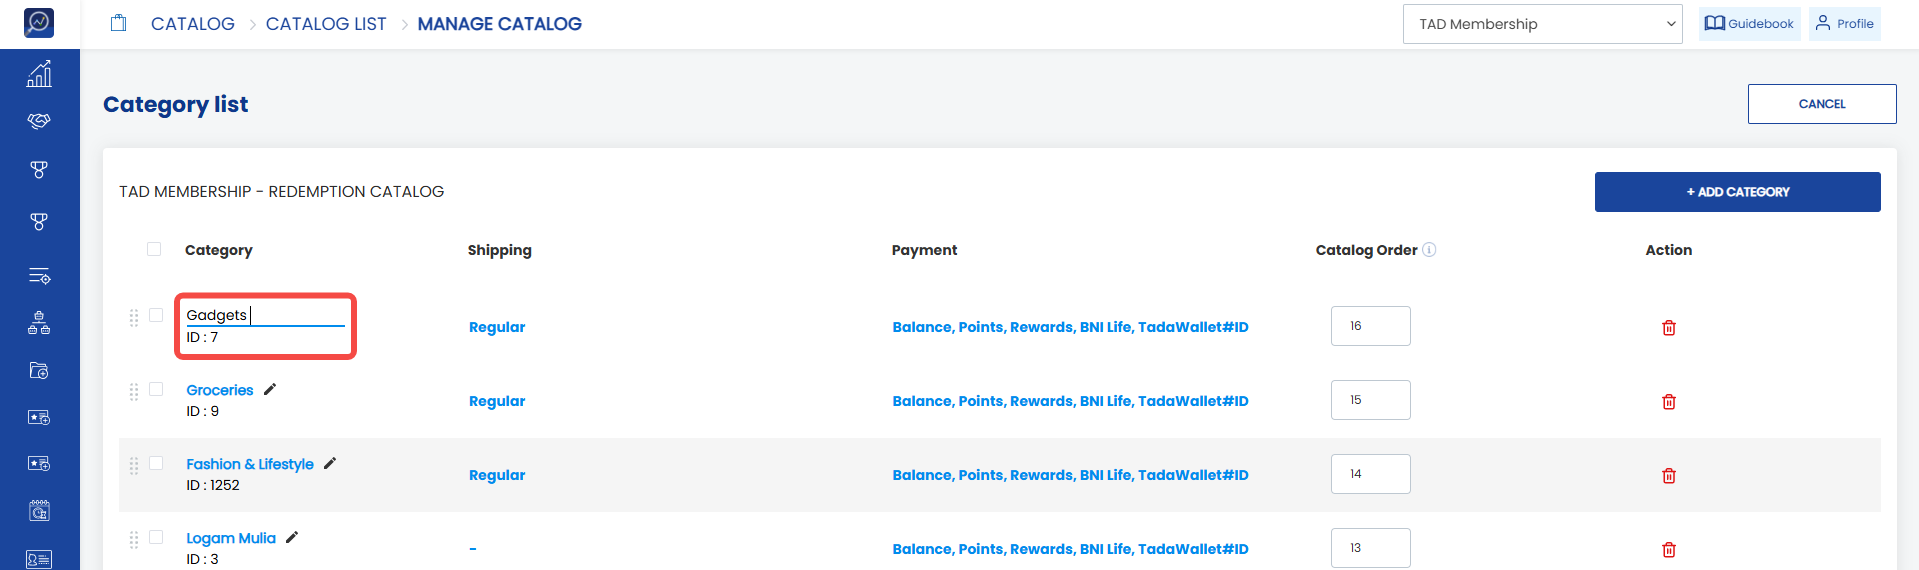
 4. Enter the new category name and press Enter.
 5. The category name will be updated successfully.
How to Change the Shipping Method
1. Open the “Catalog” menu and click the “Catalog List” submenu.
2. Select the catalog containing the category whose shipping method you want to change.
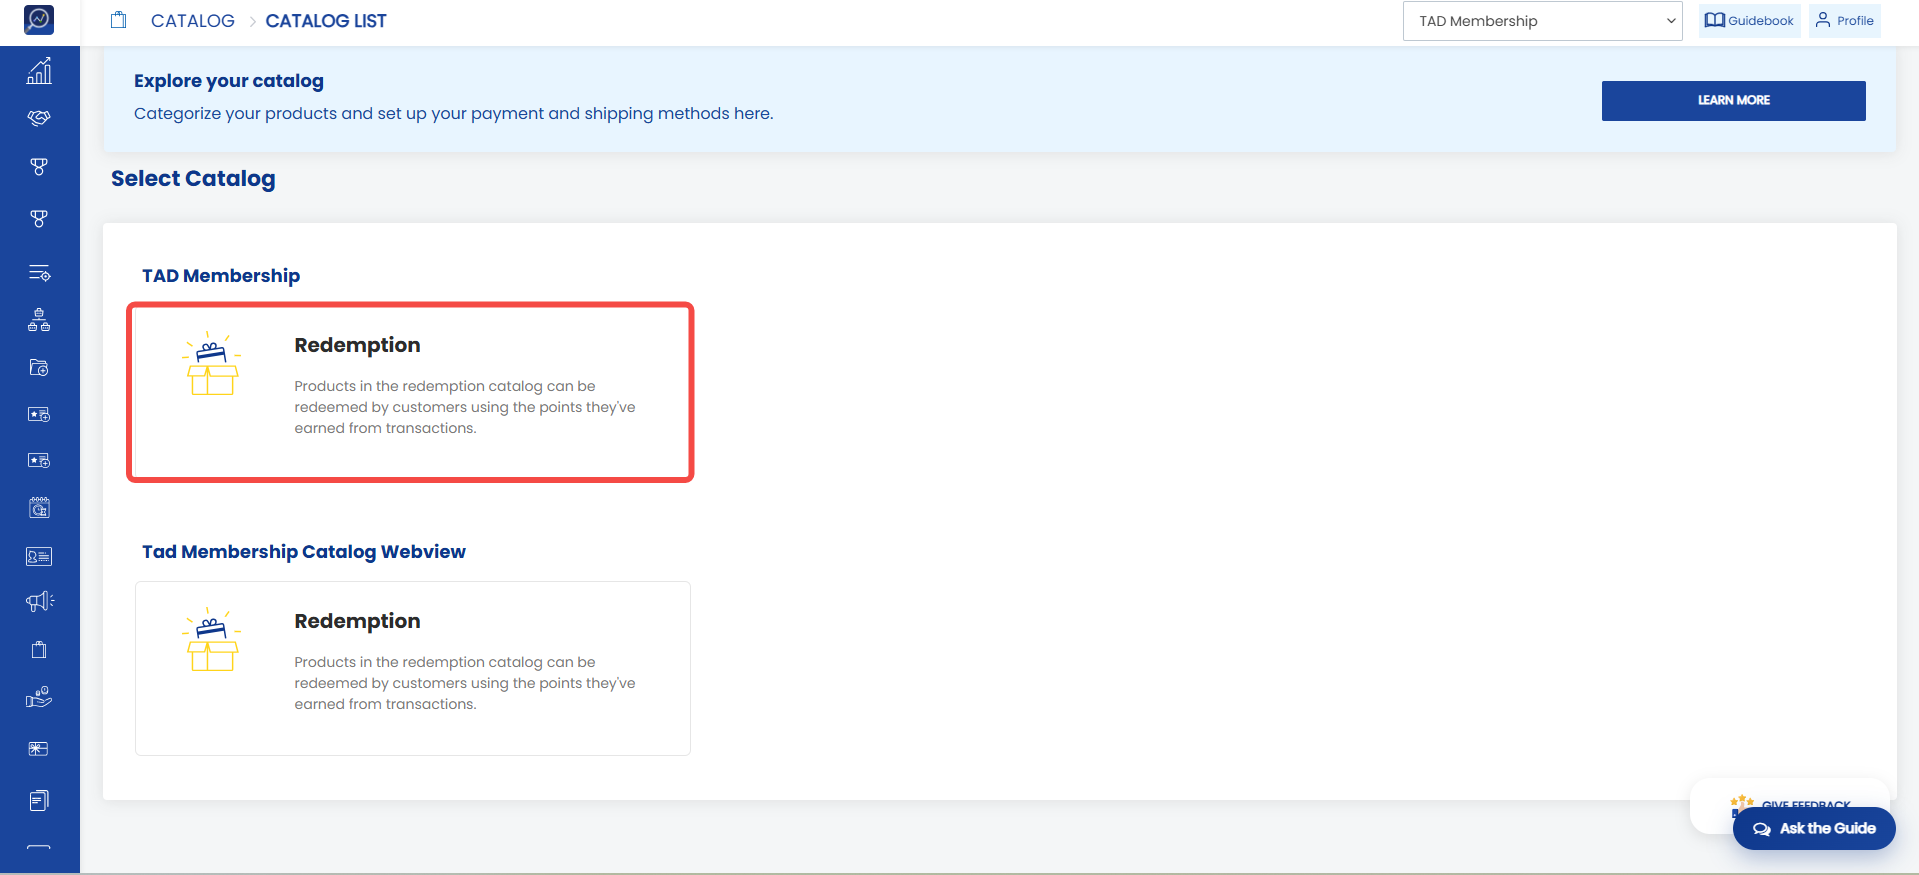 3. On the Catalog List page, check the “Shipping” column. Each category can have different shipping methods.
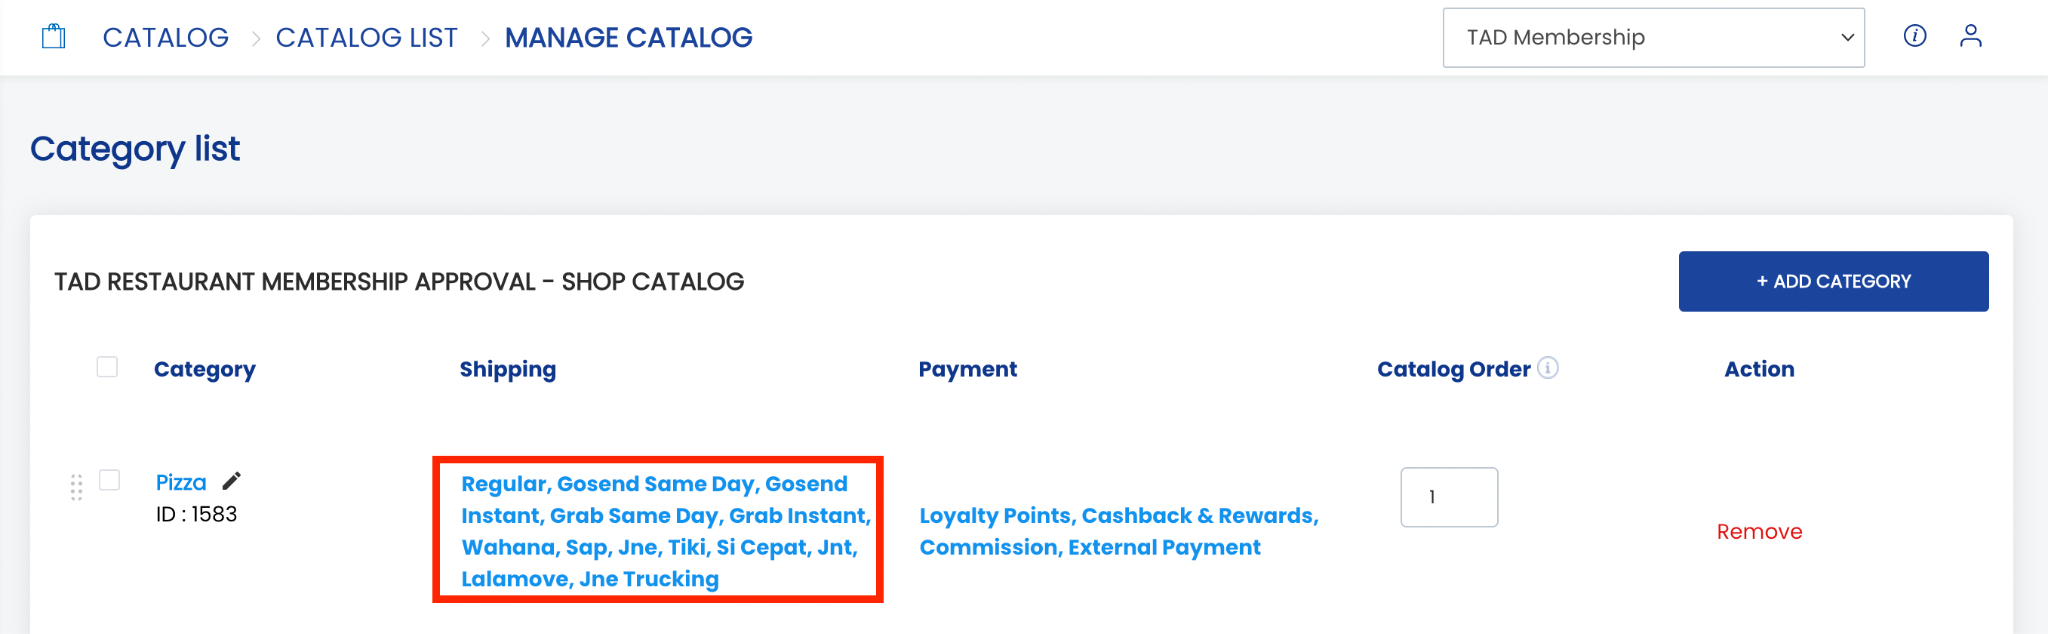 4. Click the shipping method you want to modify. The Select Shipping Method popup will appear.
Note:
- For Redemption Catalogs, only Regular Courier is available.
- For Shop Catalogs and Virtual Franchise Catalogs, there are 3 courier options: Regular, Internal, or Pick Up by Courier.
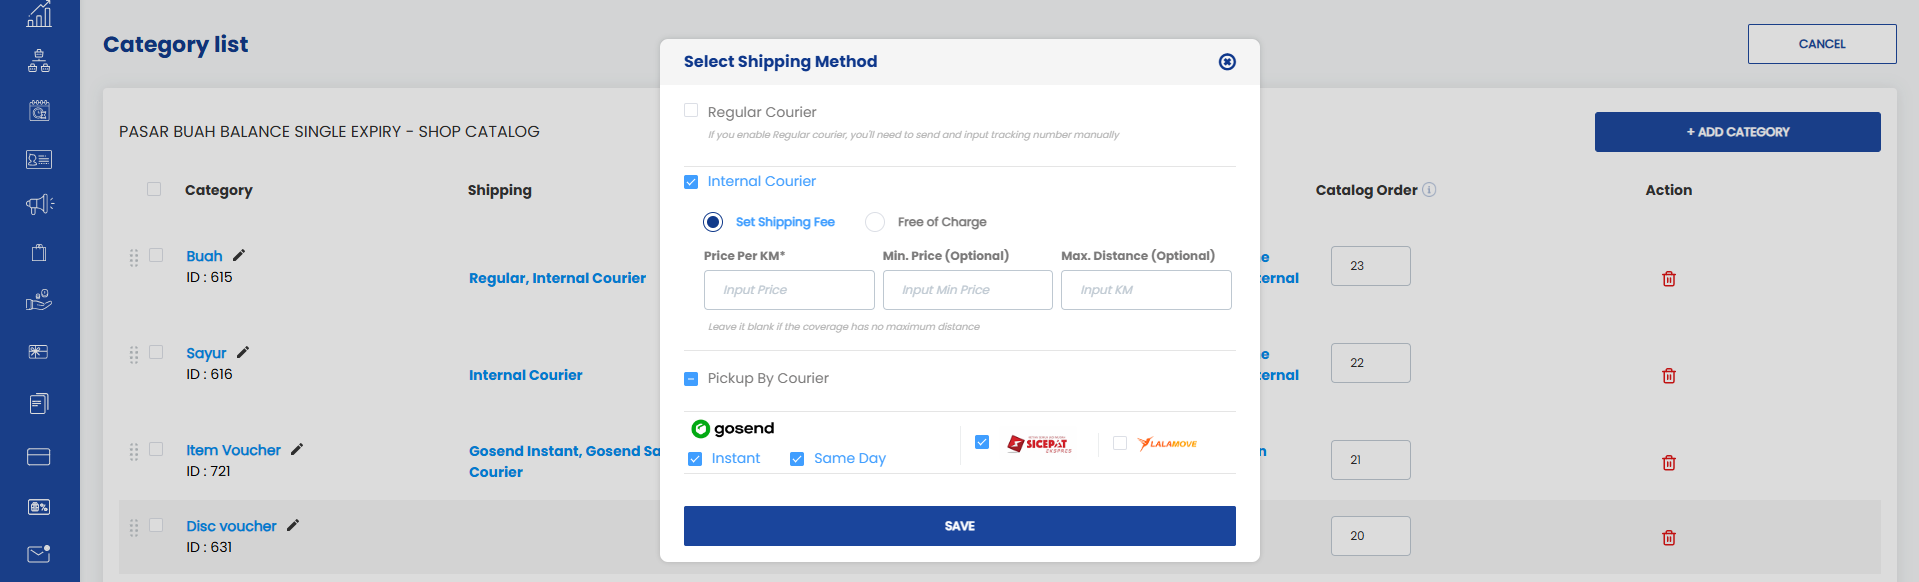 Description:
- Regular Courier: Uses courier settings managed by Tada.
- Internal Courier: Uses courier settings configured according to the brand’s needs, either free or paid. If free, click “Free of Charge”. If paid, click “Set Shipping Fee” and configure additional parameters such as: Price per km, Minimum price (optional), and Maximum distance (optional).
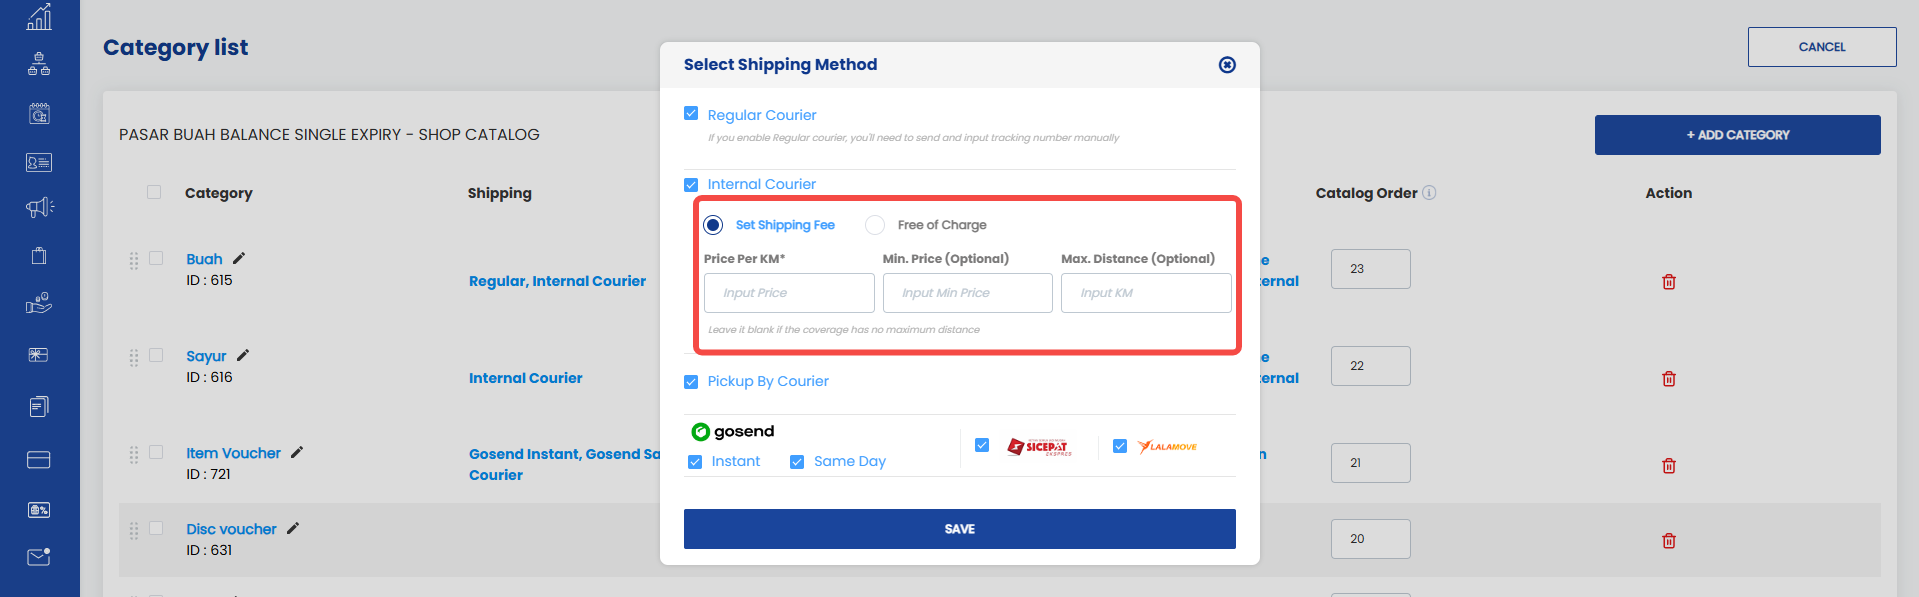
- Pickup By Courier: Uses courier services such as Gosend (Instant and Same Day), SiCepat, or Lalamove.
5. Users can enable more than one shipping method.
6. Click “Save” to save the changes.
How to Change the Payment Method
1. Open the “Catalog” menu and click the “Catalog List” submenu.
2. Select the catalog containing the category whose payment method you want to change.
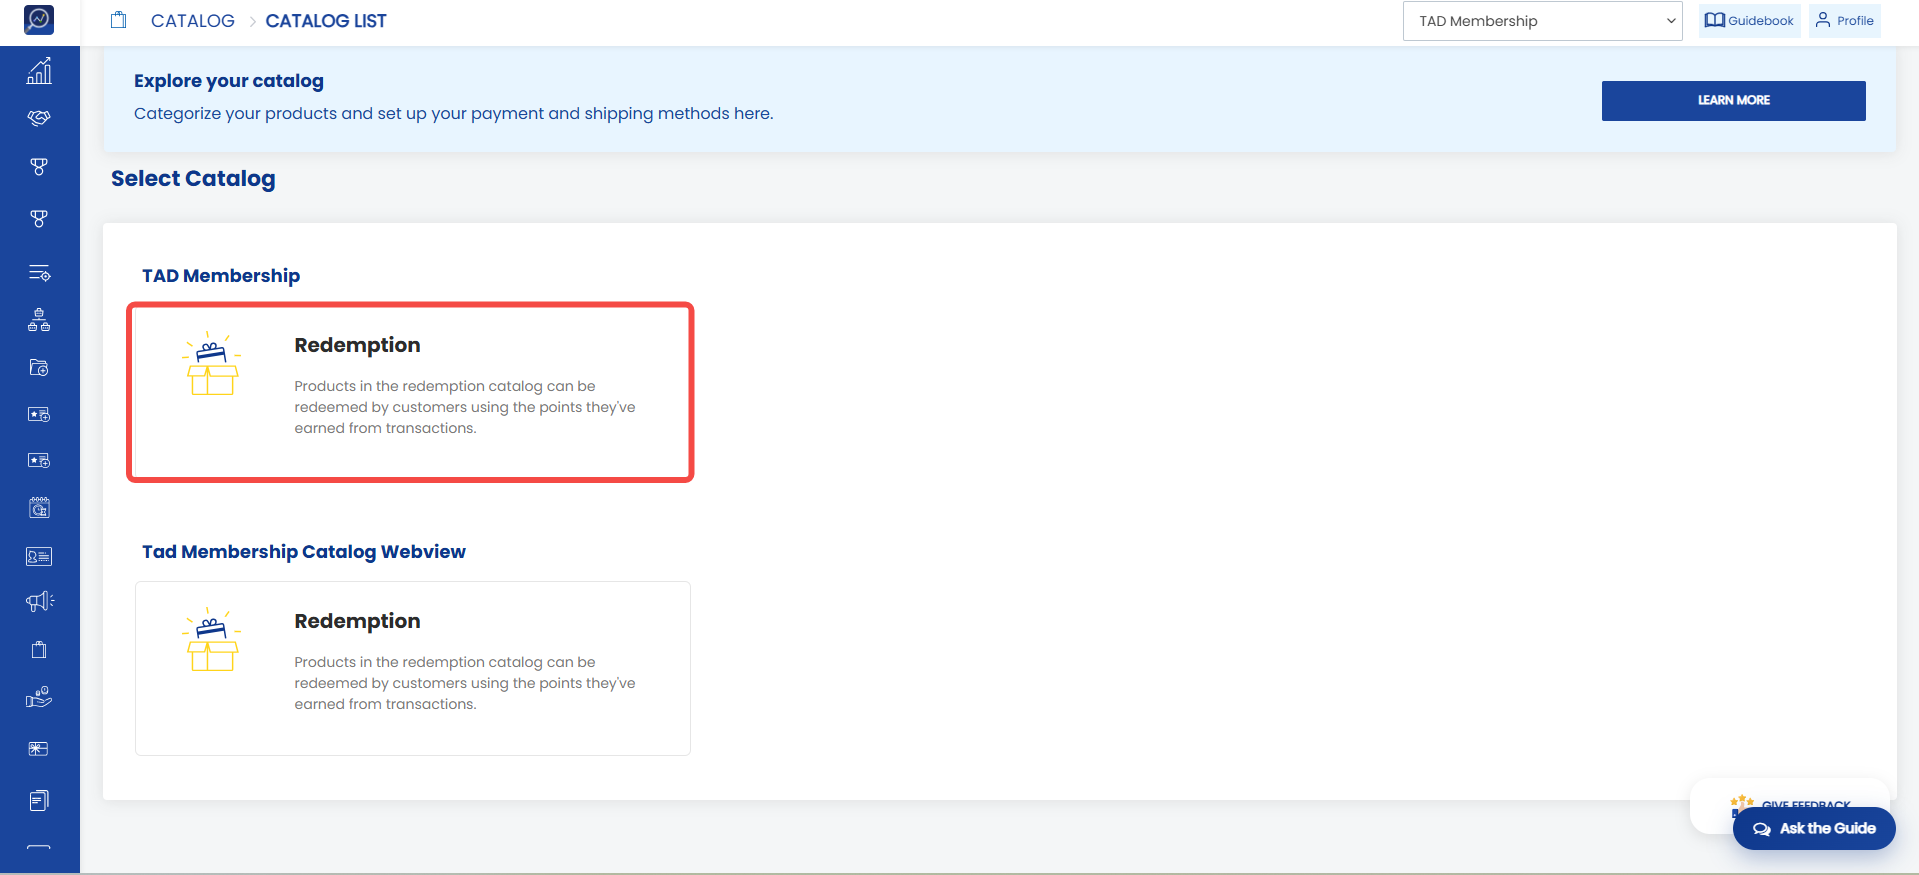 3. On the Catalog List page, check the “Payment” column. Each category can have different payment methods.
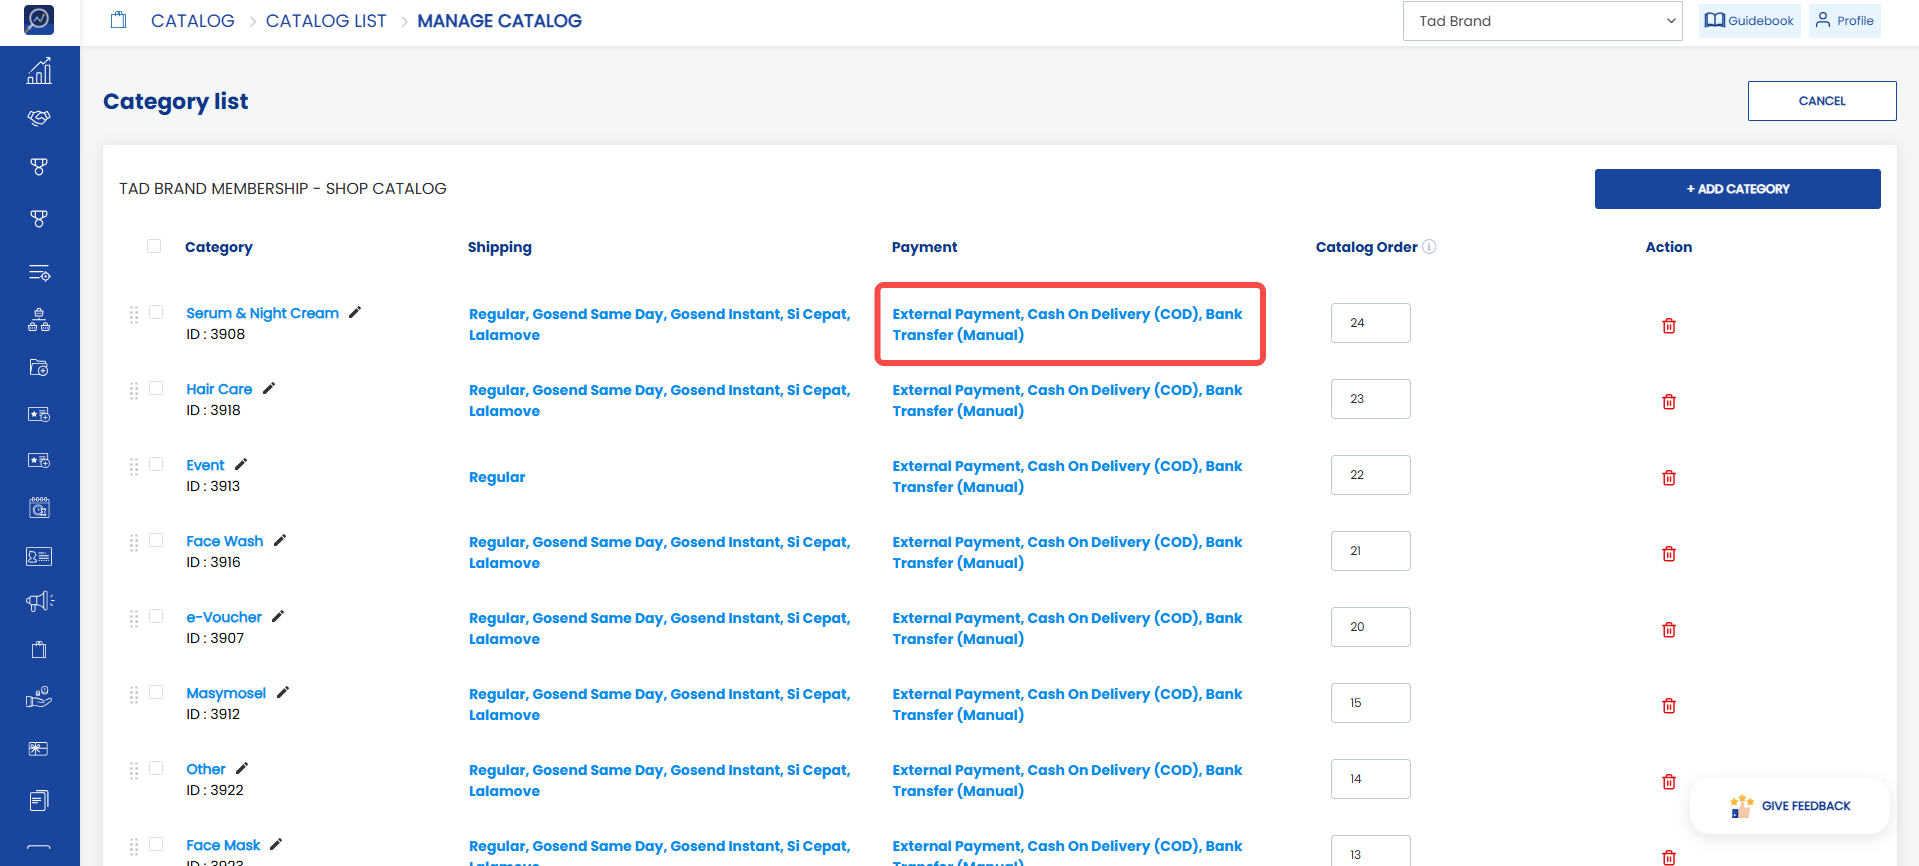 4. Click the payment method you want to modify. The Select Payment Method popup will appear.
Note:
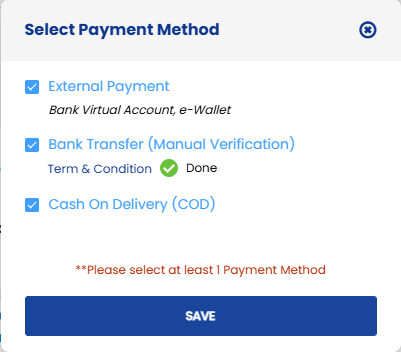
- Shop Catalog : Has 3 payment options: external payment, bank transfer, Cash On Delivery (COD).
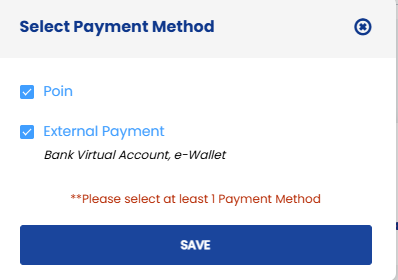
- Redemption Catalog : Has 2 payment options: wallet dan external payment.
 Description:
- Wallet: Payment using points owned by the member.
- External Payment: Payment using e-wallets or virtual accounts. Supported e-wallets include OVO, GoPay, Dana, and LinkAja. Available virtual accounts include BCA, BRI, BNI, Mandiri, and Permata.
- Cash On Delivery (COD): Payment is made directly upon delivery.
- Bank Transfer: Payment via bank transfer with manual verification and terms & conditions. If terms & conditions have not been configured, a popup will appear prompting the user to enter them.
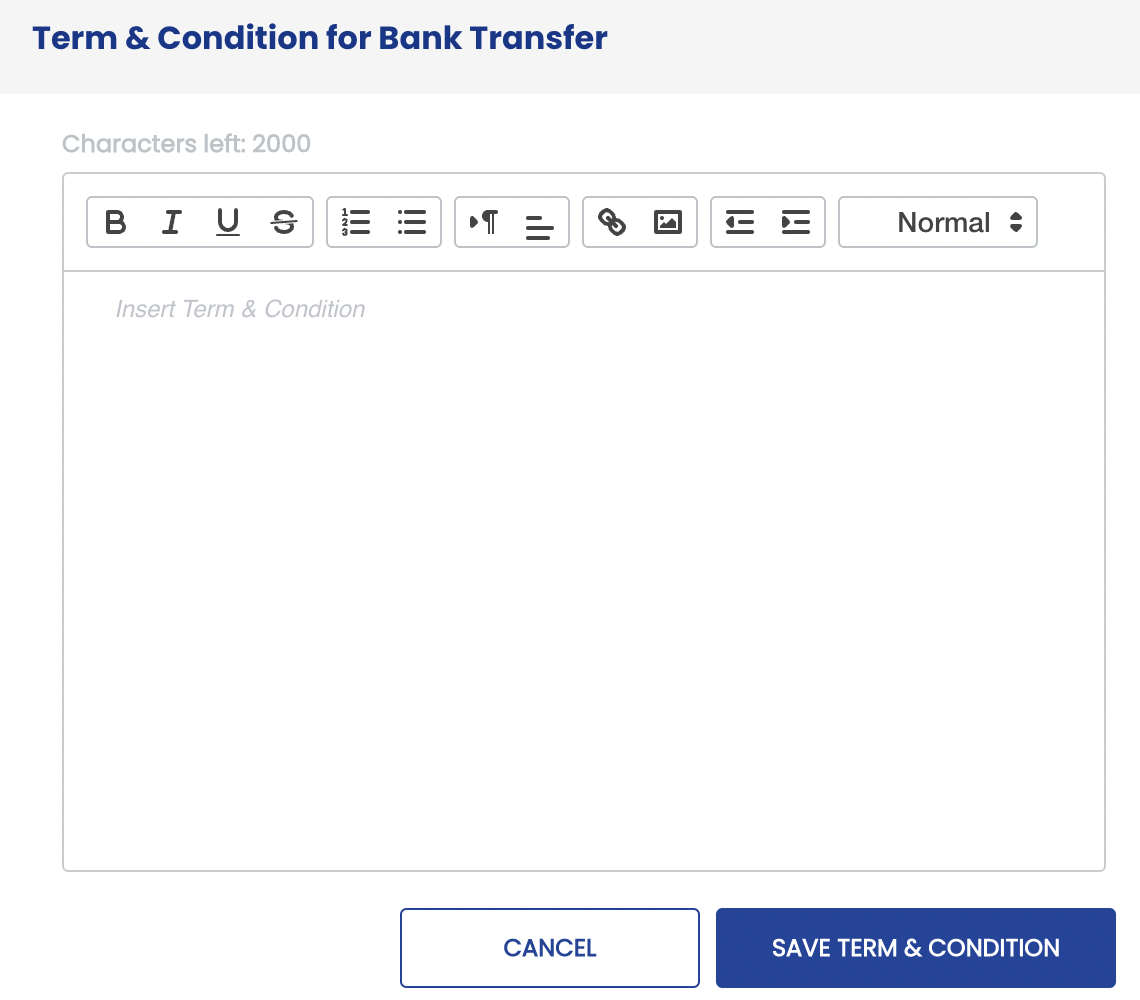
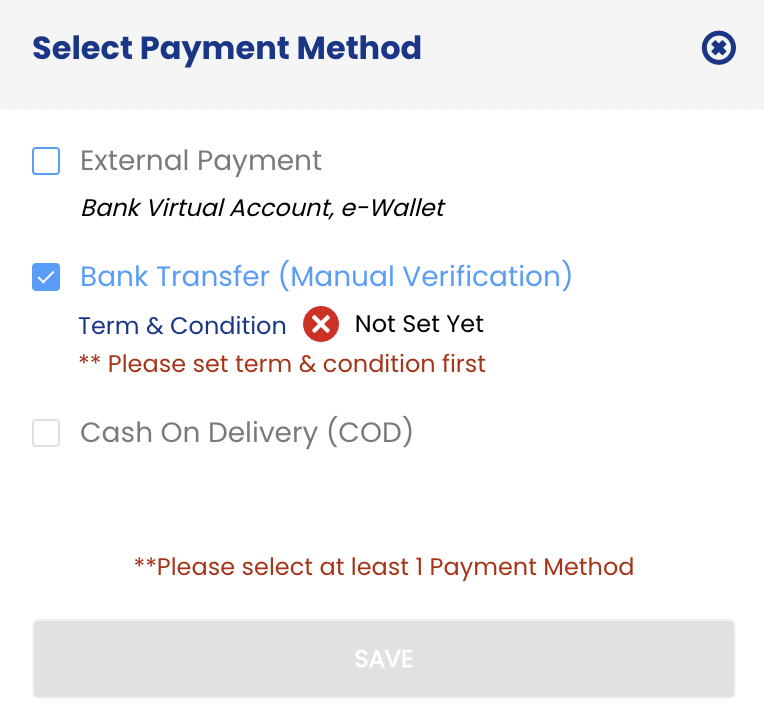 5. Click “Save” to save the changes.
How to Remove a Category from a Catalog
1. Open the “Catalog” menu and click the “Catalog List” submenu.
2. Select the catalog containing the category you want to remove.
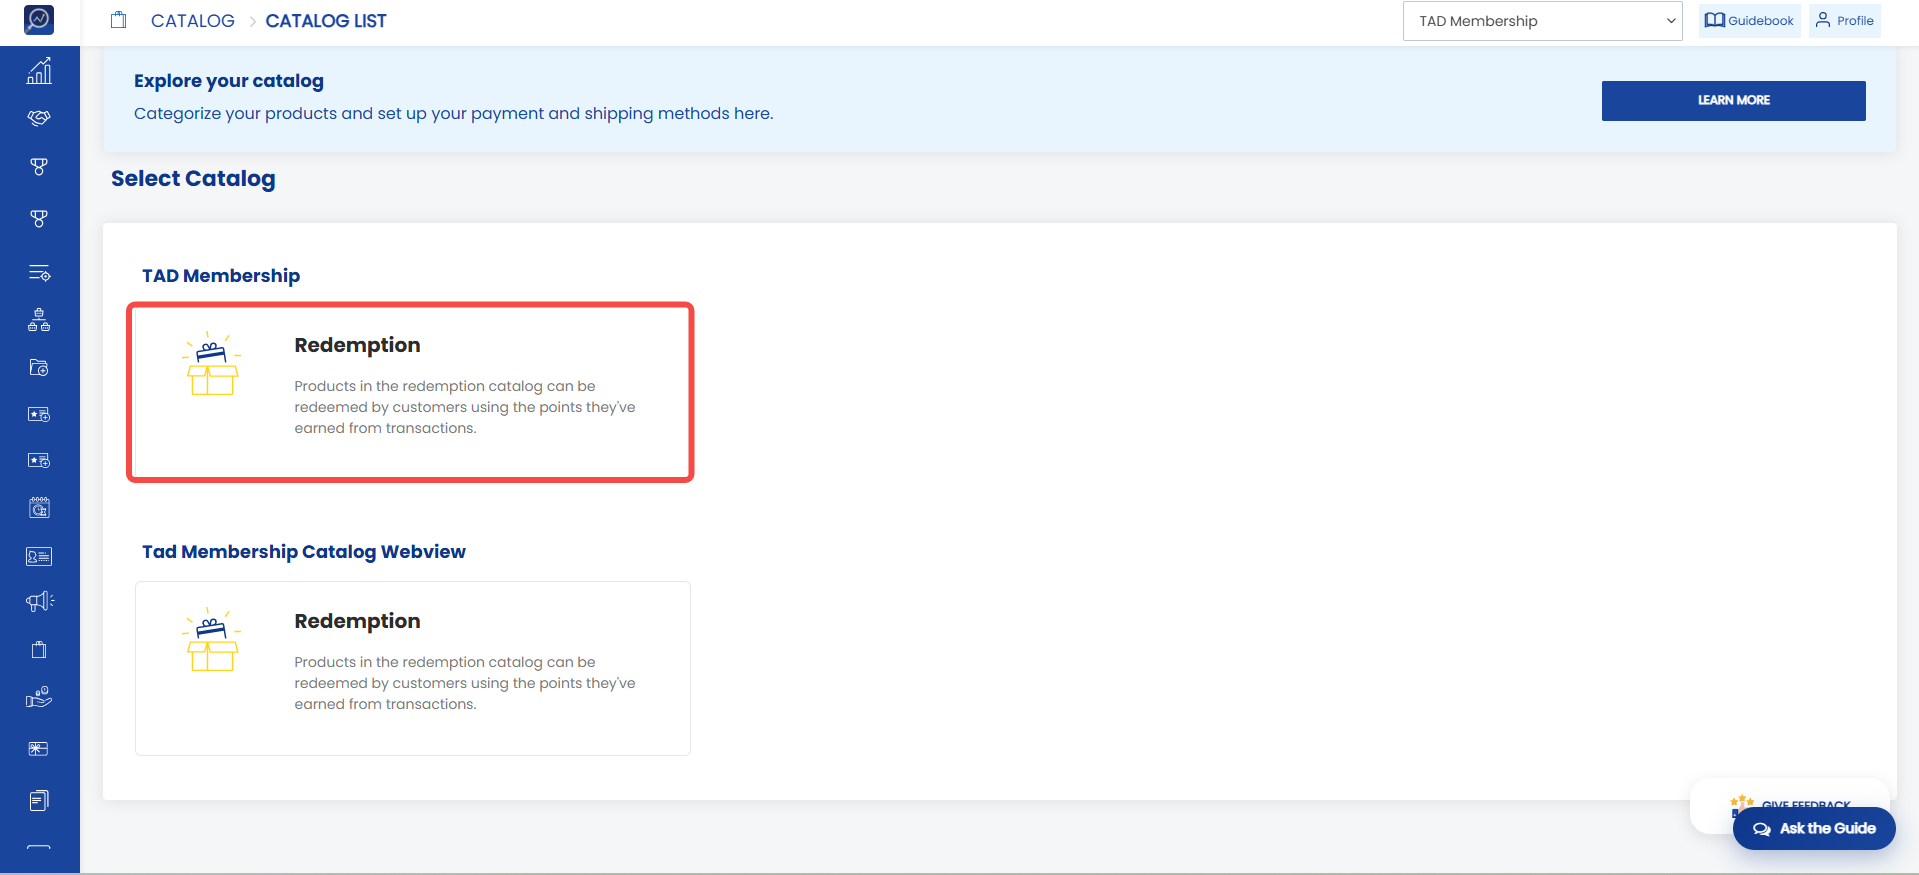 3. Click the trash bin icon on the category you want to delete.
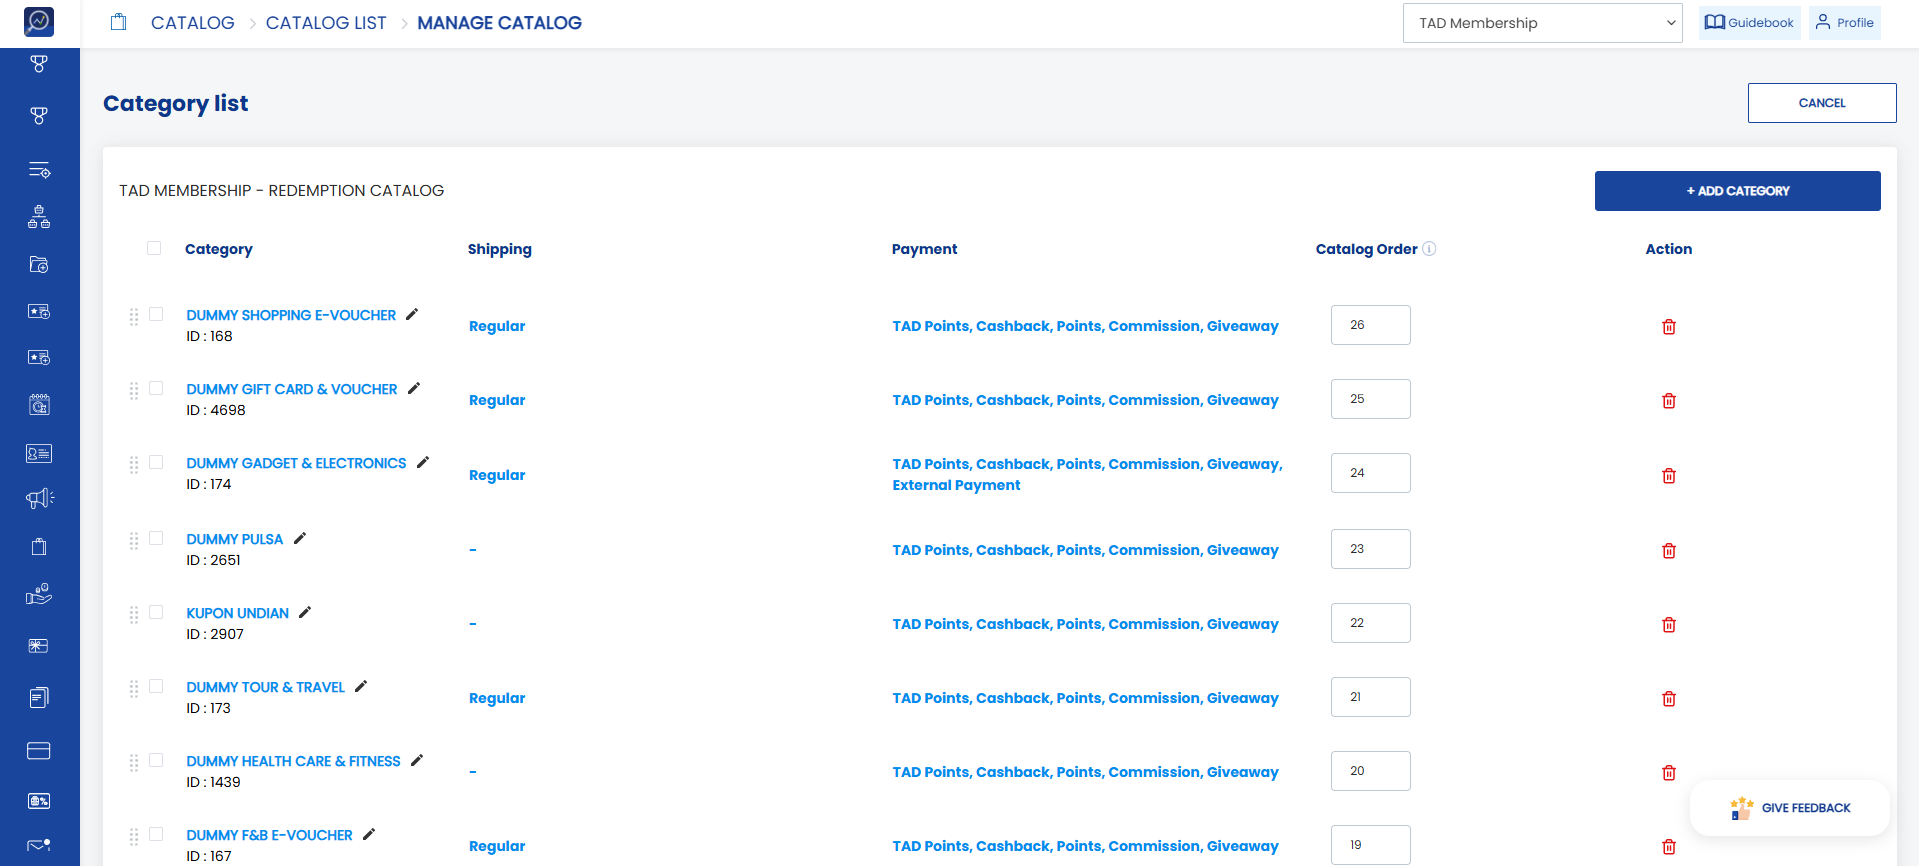 4. The system will display a confirmation popup. If you are sure, click “Remove”.
How to Manage Product Availability
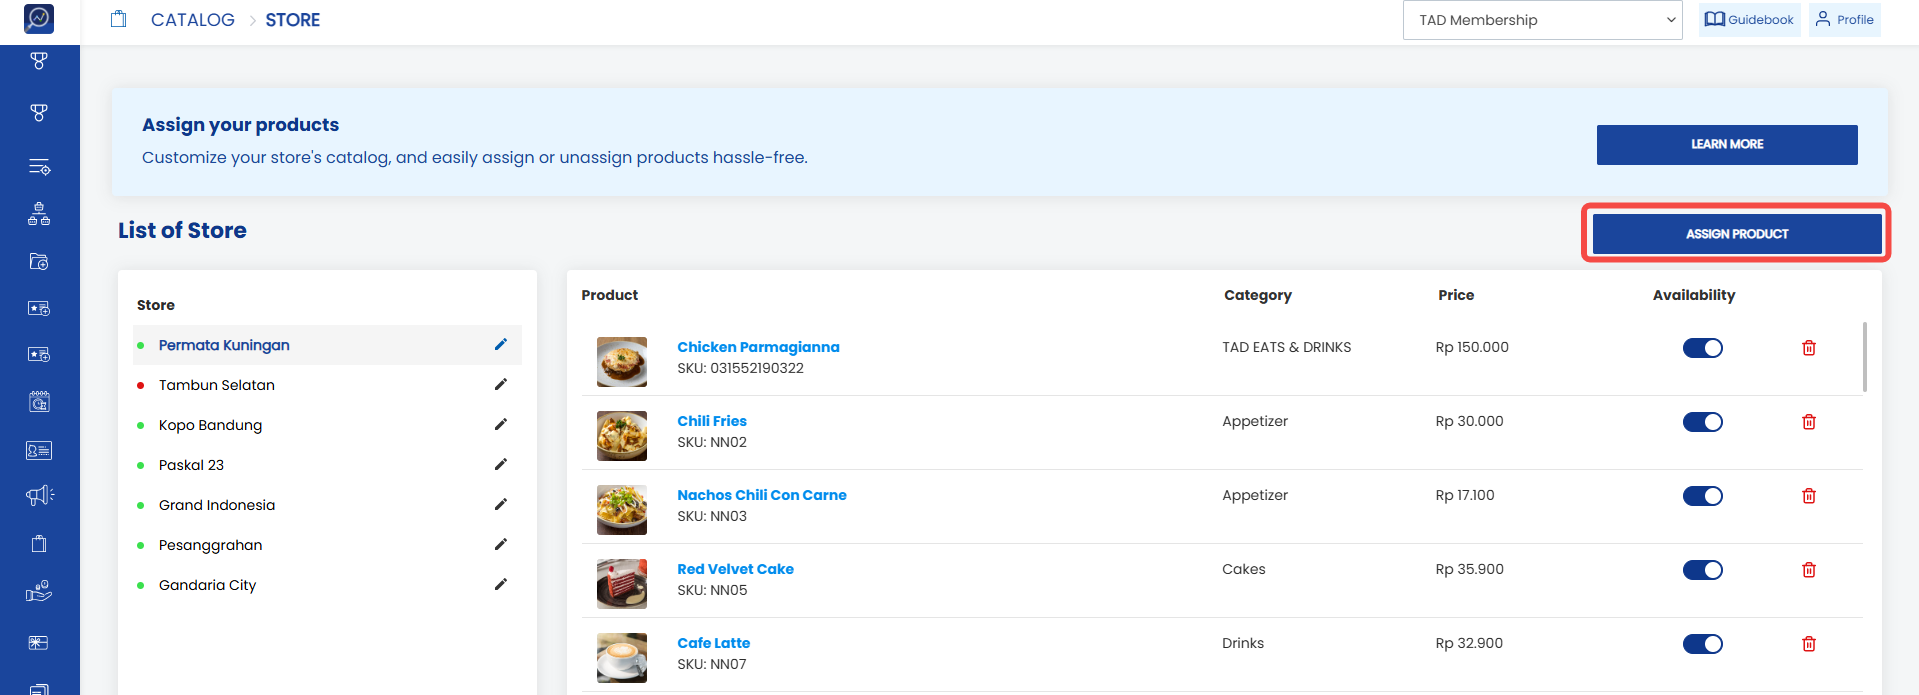
1. Open the “Catalog” menu and click the “Store” submenu.
2. Select one of the stores available in the list. Each store can have different product availability settings.
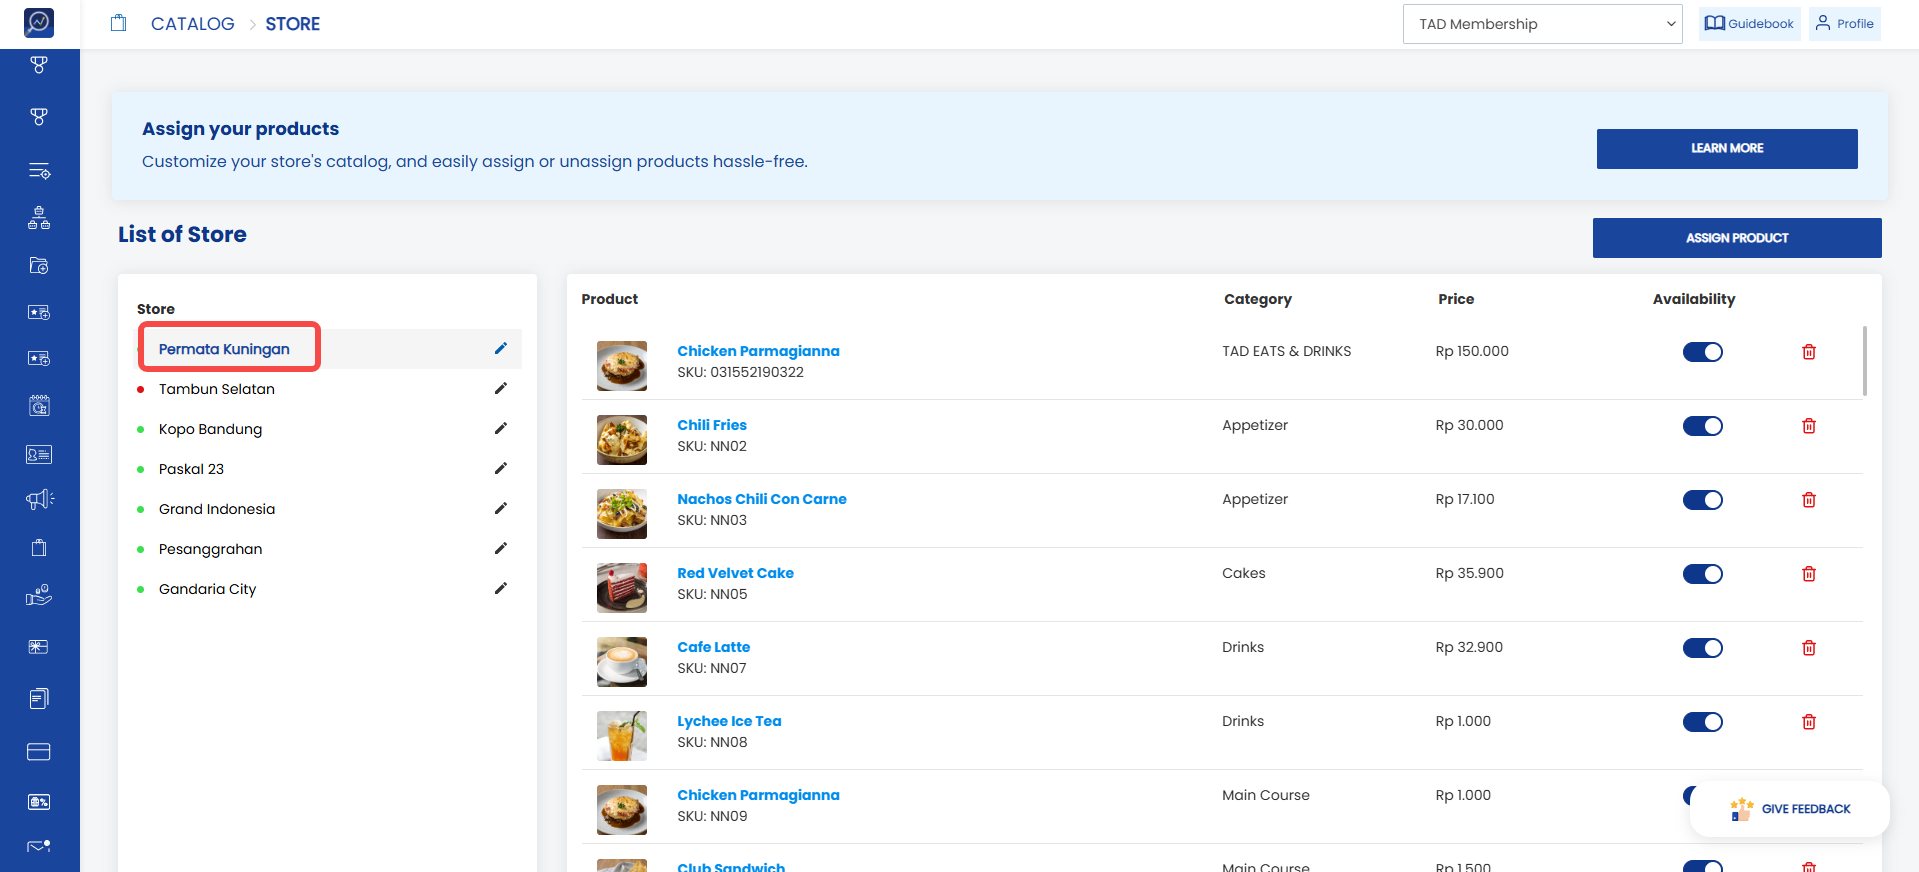 3. Find the product whose availability you want to manage and click the “Availability” toggle.
- If the toggle is Off, the product is unavailable in that store.
- If the toggle is On, the product is available in that store.
If a product is unavailable in a store, customers can still view the product in the application, but it will be labeled as “Out of Stock”.
How to Remove a Product from a Store
1. Open the “Catalog” menu and click the “Store” submenu.
2. Select one of the stores available in the list.
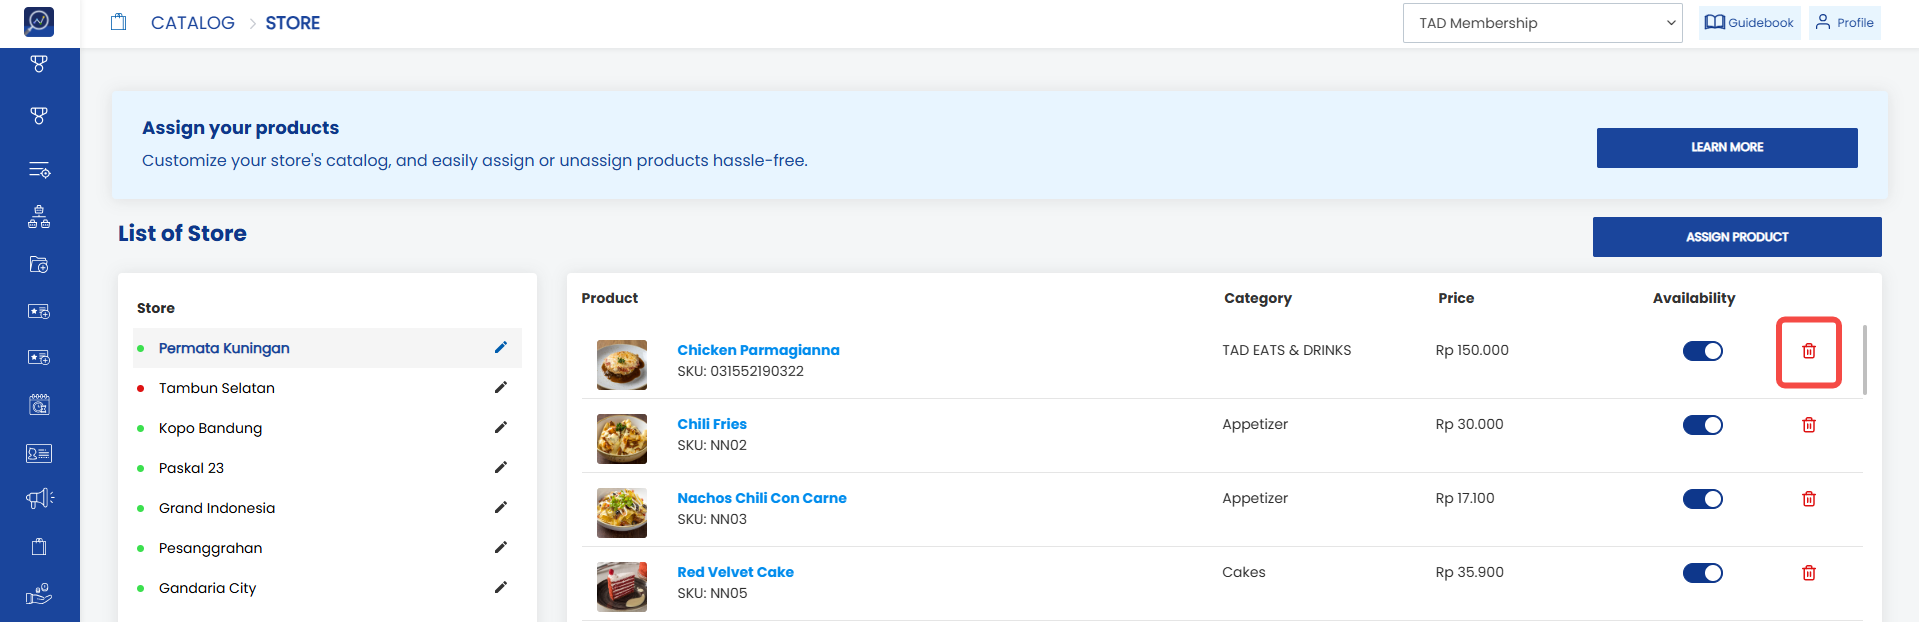
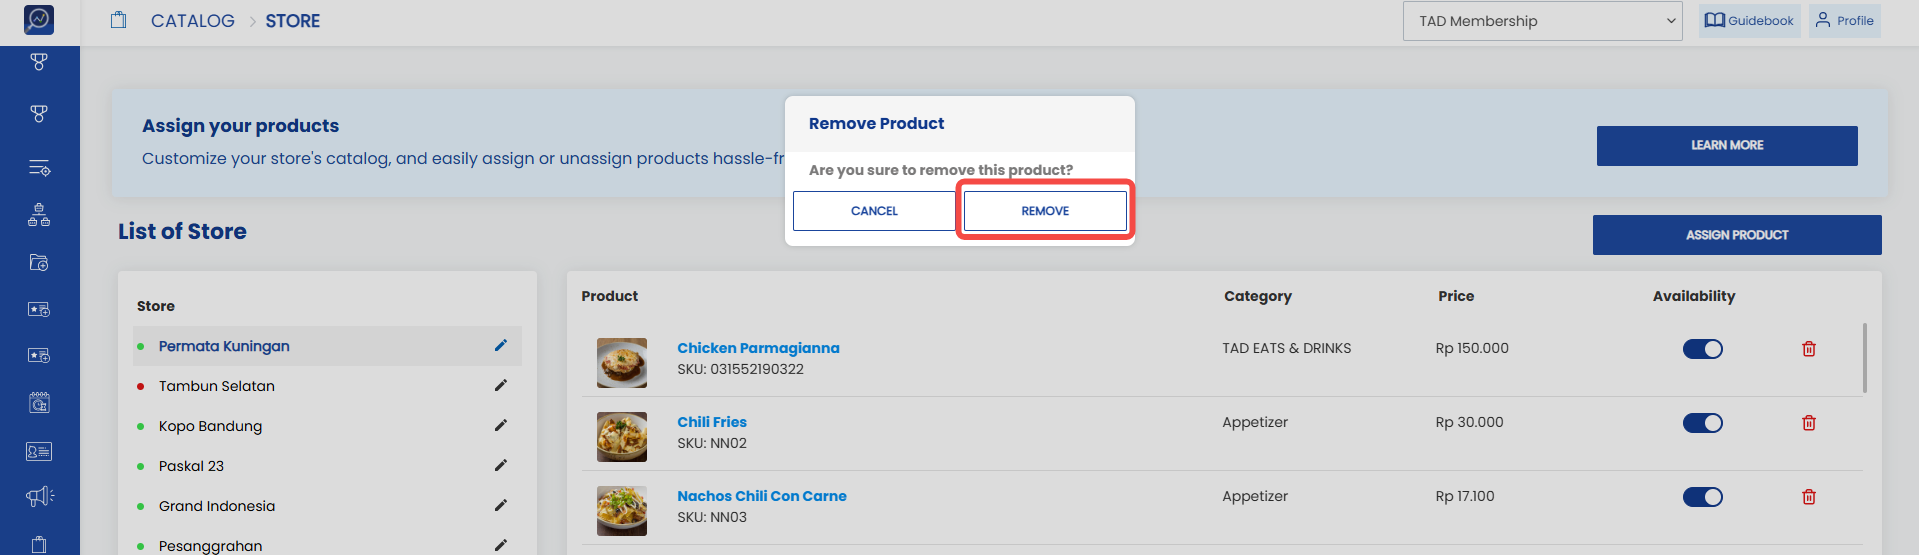
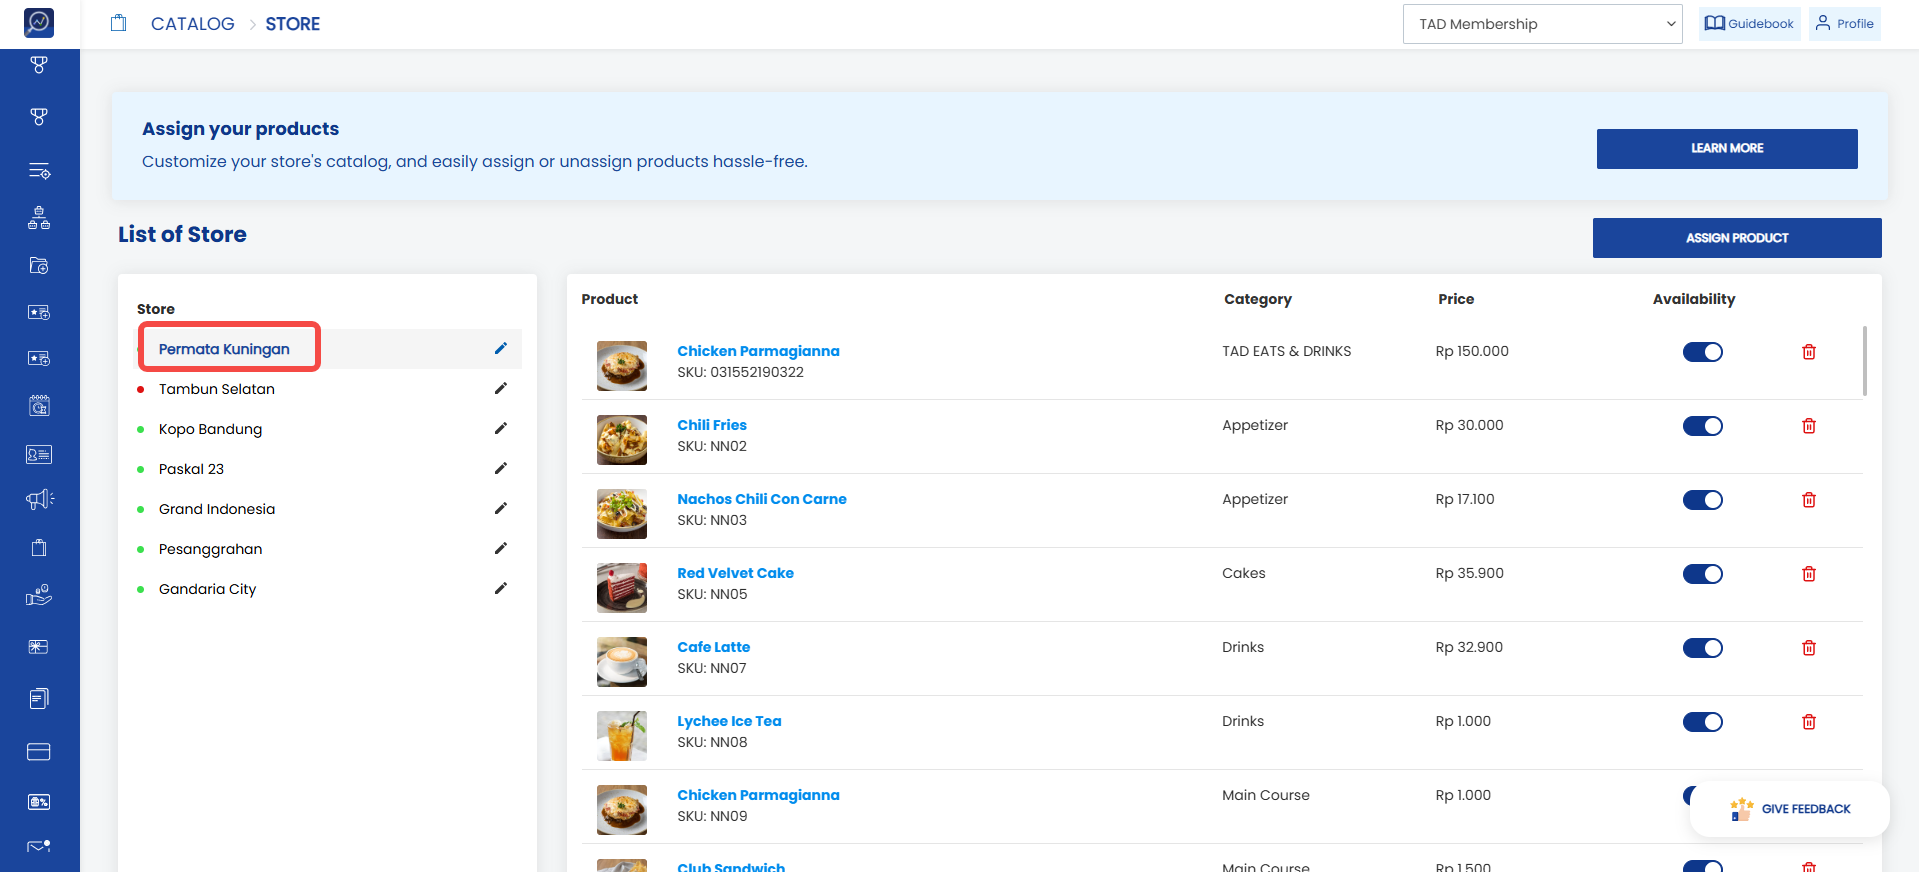 3. Click the trash bin icon to remove the product.
4. The system will display a confirmation popup. Click “Remove” if you want to remove the product from the store.
Note: If a product is removed from a store, customers will no longer be able to view that product in that specific store.
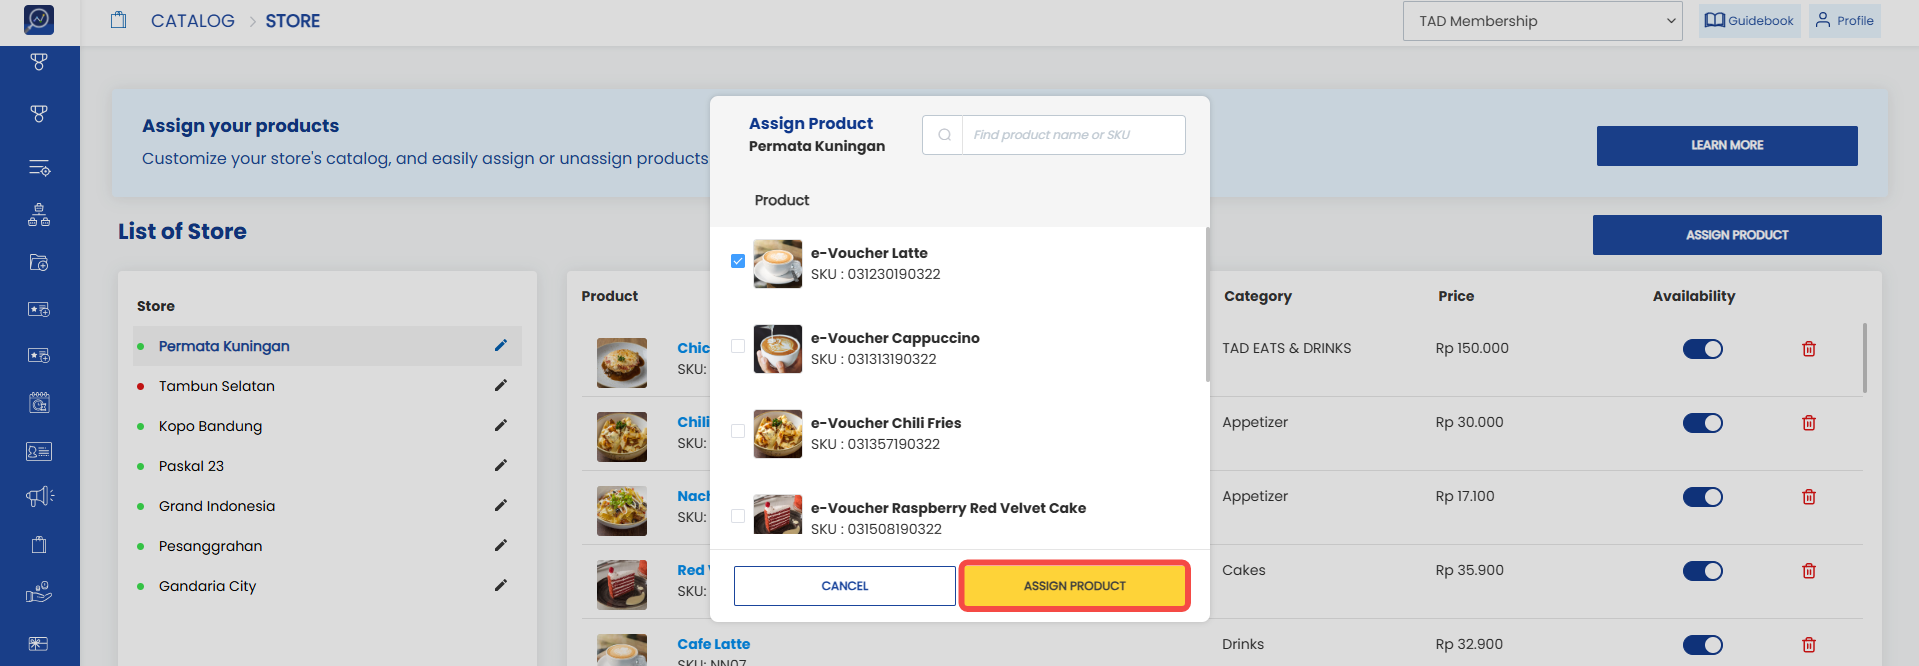
How to Assign a Product to a Store
1. Open the “Catalog” menu and click the “Store” submenu.
2. Select one of the stores available in the list.
3. Click “Assign Product” to assign a product to the selected store.
 4. A popup menu will appear. Select the product you want to add or type the product name in the search field.
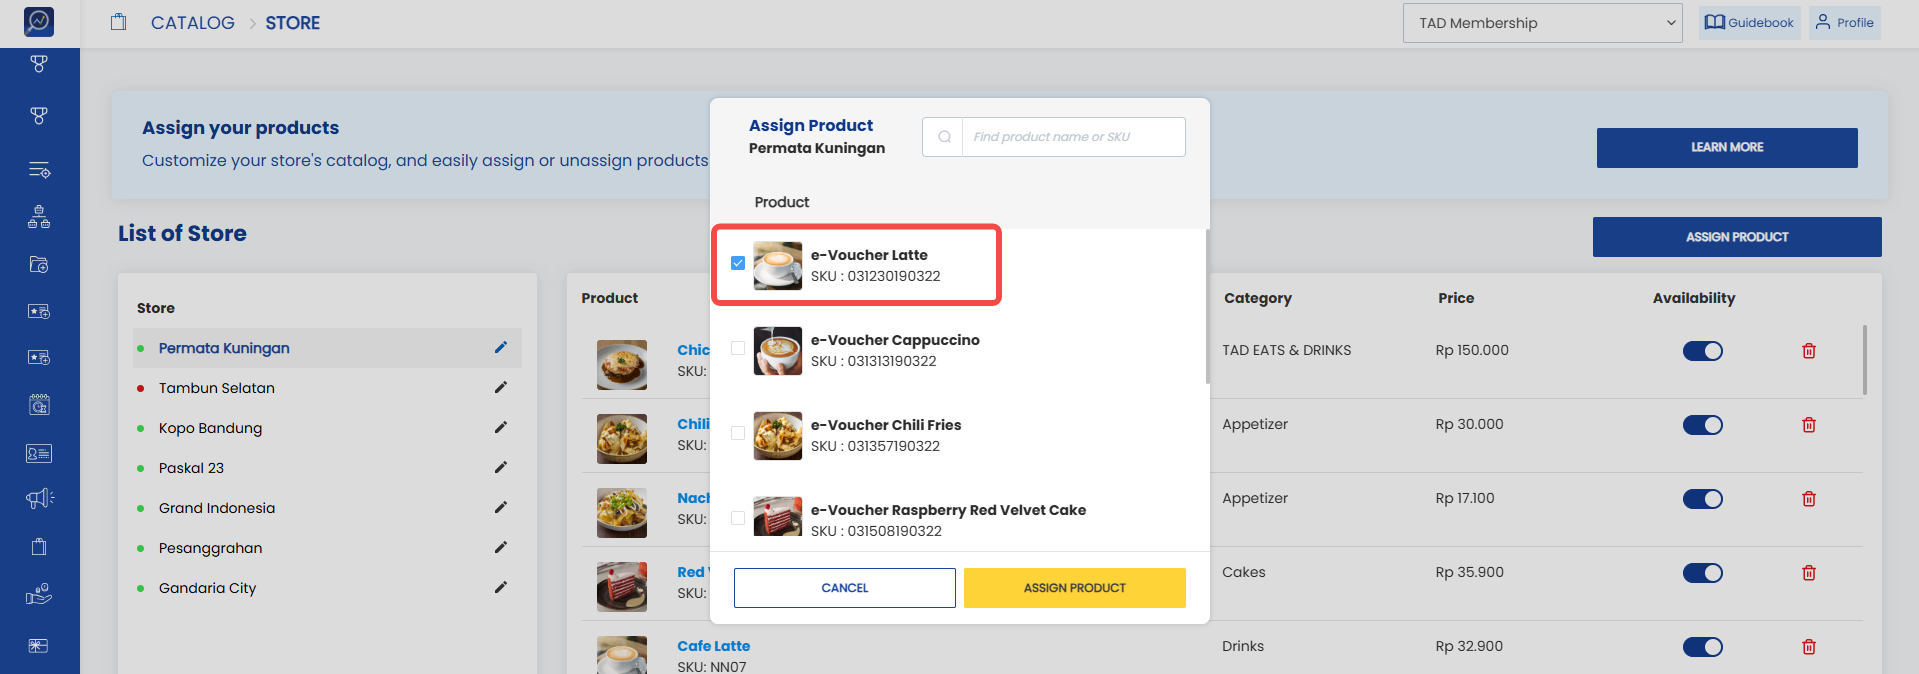 5. Click “Assign Product”.