
E-voucher
The E-Voucher menu is used to manage, distribute, and monitor e-voucher usage for members through the Tada Dashboard.
Brands can send e-vouchers through various channels such as SMS, WhatsApp, Email, and Push Notification. The types of e-vouchers that can be distributed are single e-voucher (one voucher type) or various e-voucher (multiple voucher types in a single distribution).
In addition to voucher distribution, this menu also allows brands to:
- Create new e-vouchers
- Suspend, extend, unsuspend, or void vouchers
- View voucher delivery history
- Monitor voucher performance and status
The following e-voucher statuses can be monitored in the E-Voucher menu:
- Generated: Voucher has been successfully created
- Activated: Voucher is active and can be used
- Used: Voucher has already been redeemed
- Expired: Voucher has passed its validity period
How to Send a Specific e-Voucher
The Send Specific E-Voucher feature is used to send a single voucher type to one or multiple members at once.
1. Open the “E-Voucher” menu and select “Send Specific E-Voucher”.
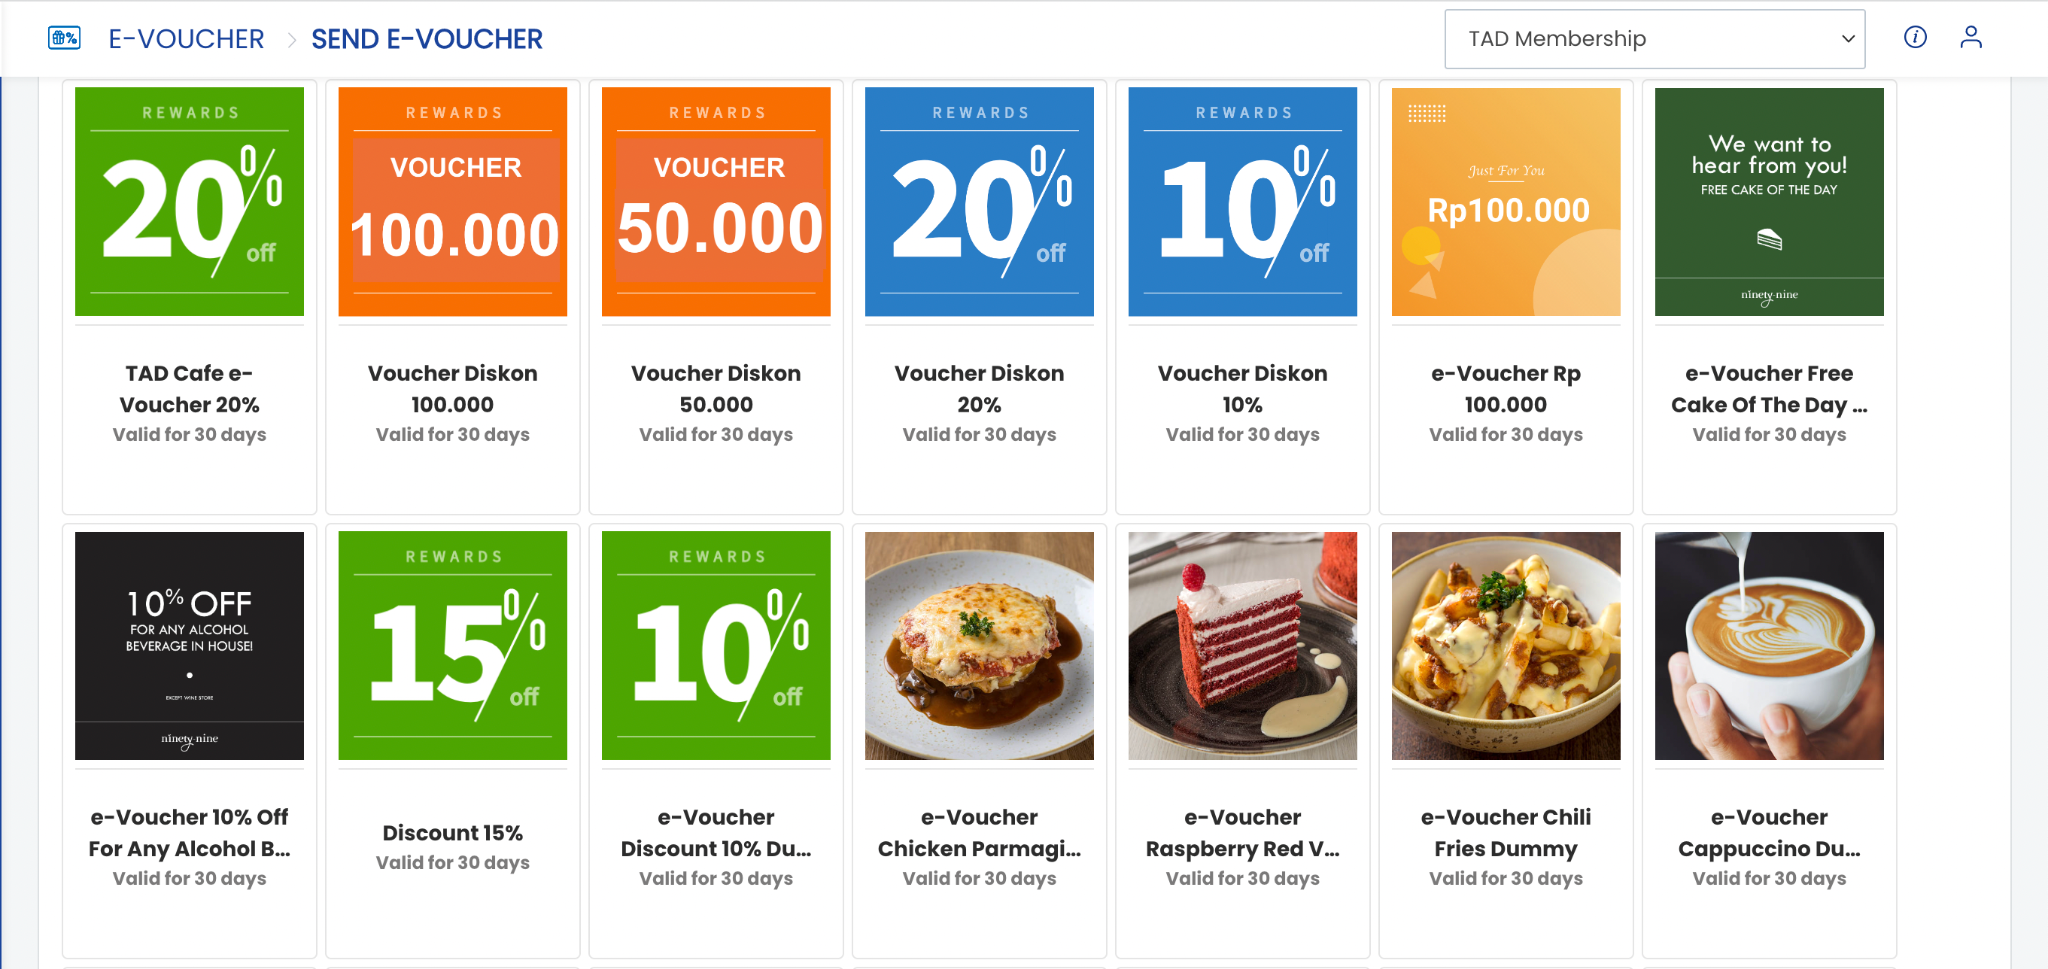
2. Select the voucher you want to send from the voucher list.
 3. Enter a reference number for the voucher delivery in the “Reference” field. Note: The reference number must be unique and cannot be reused.
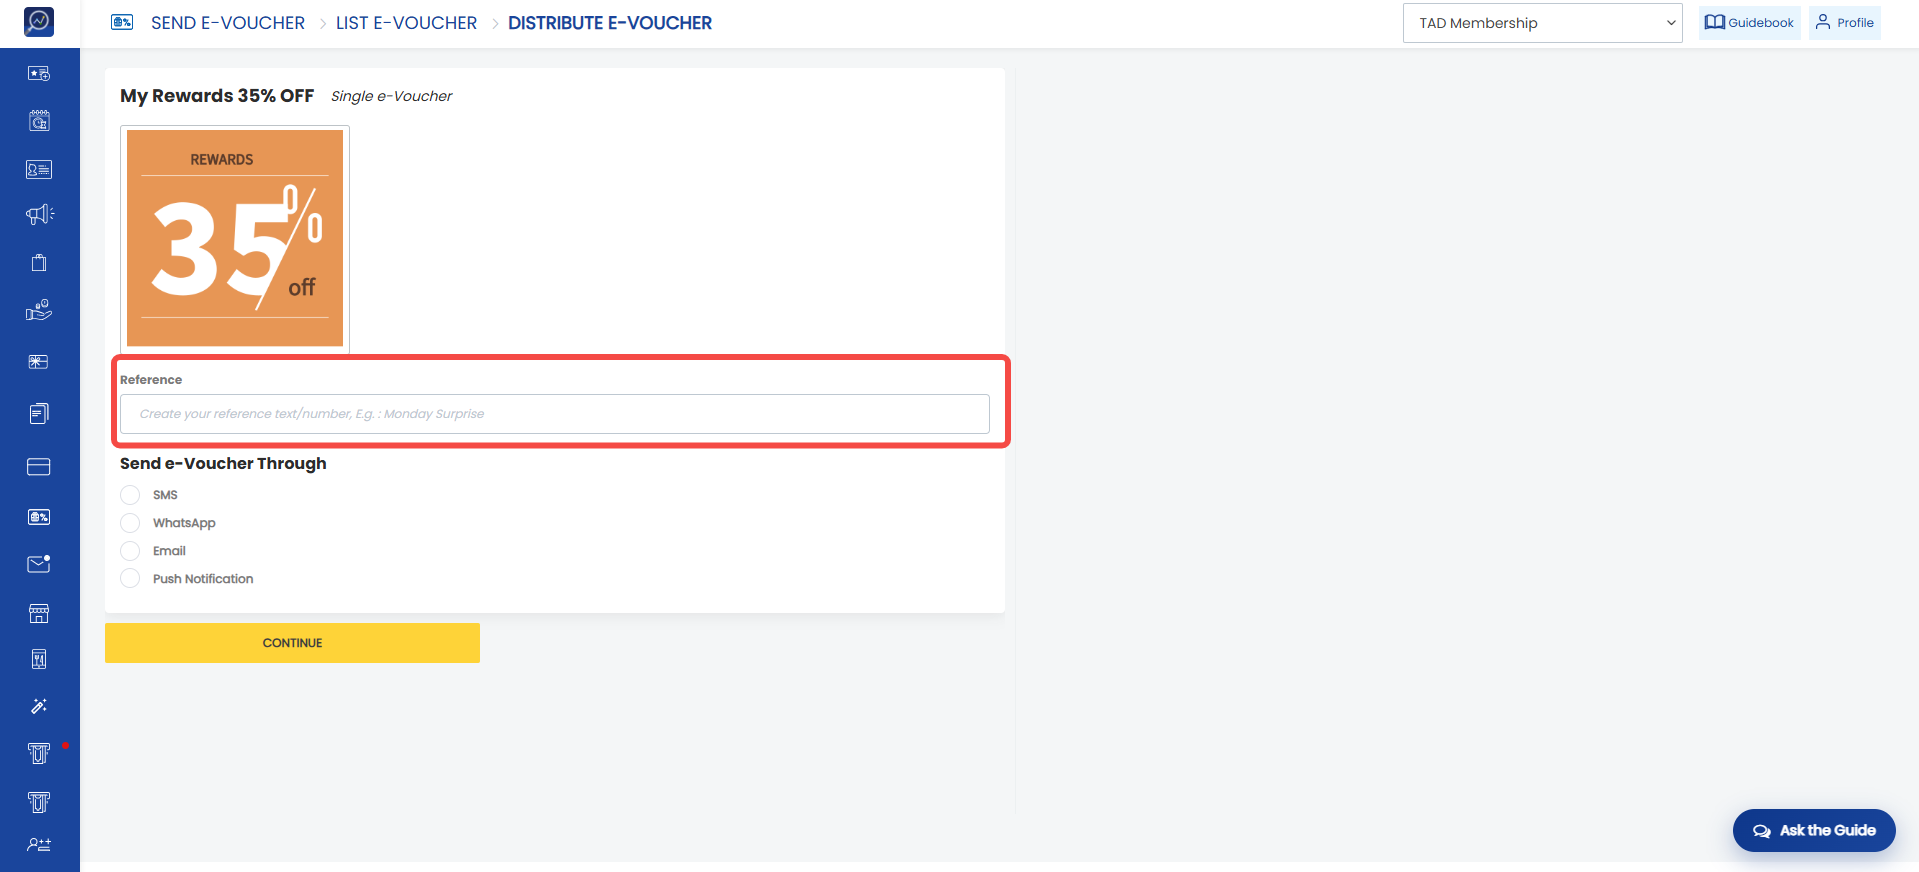 4. Select the delivery channel. There are four available options:
- SMS: The voucher will be sent via SMS.
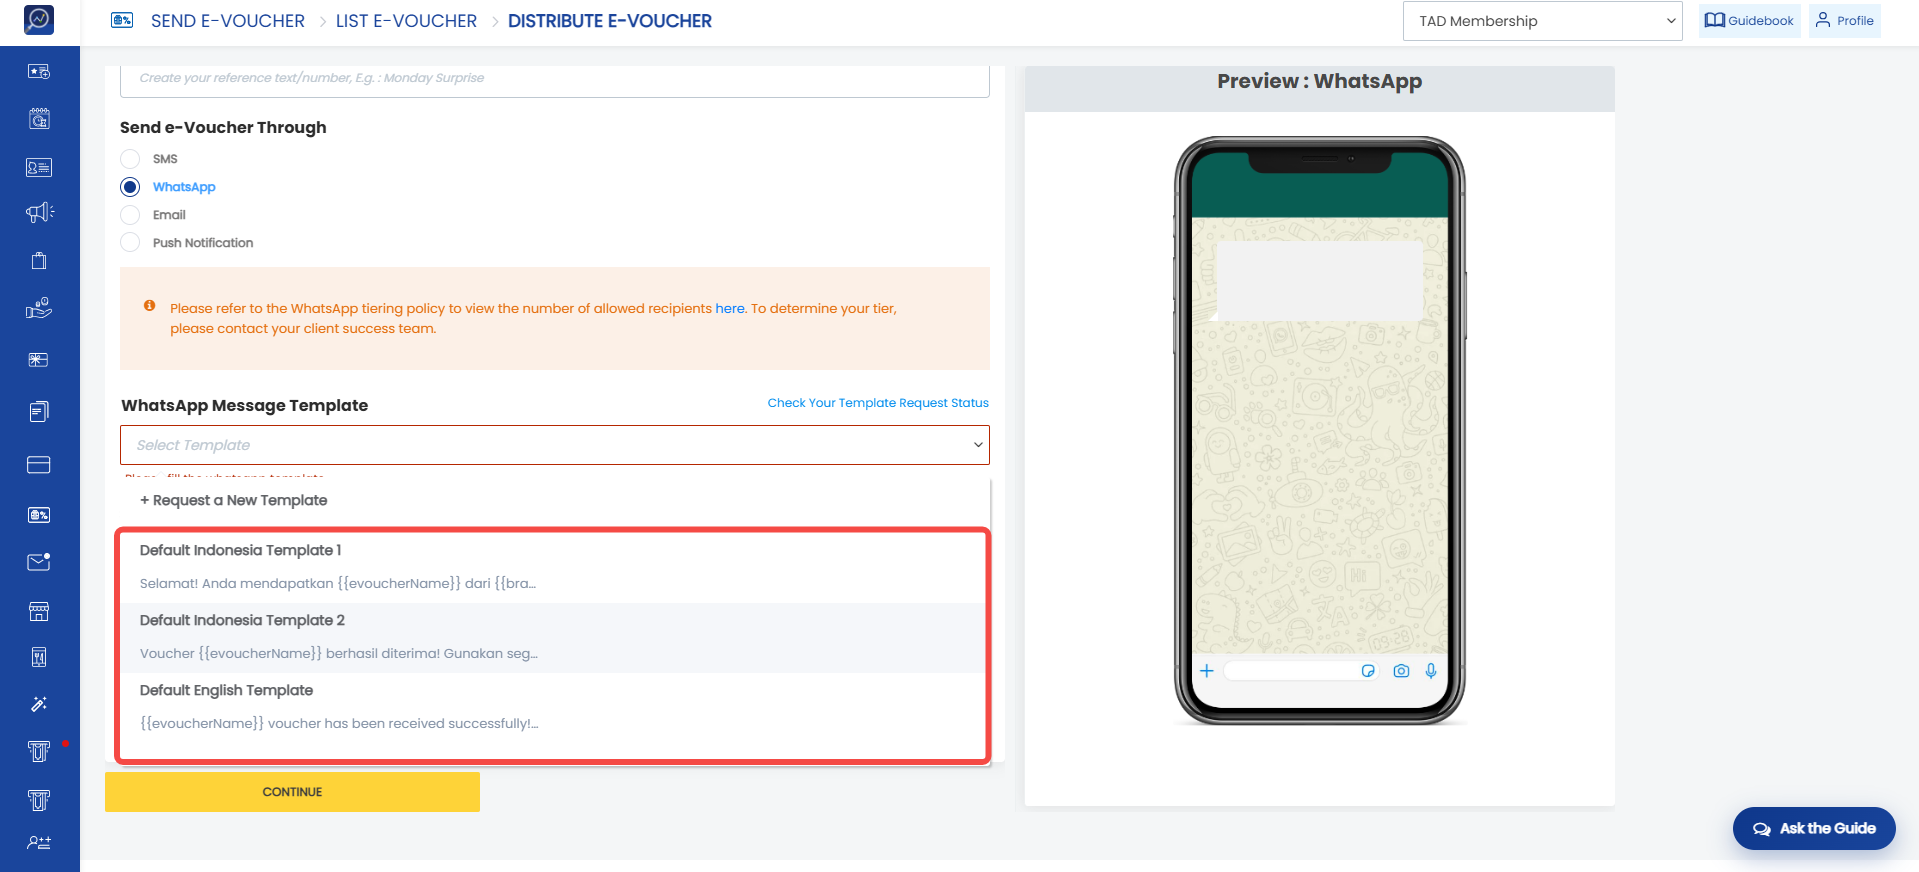
- WhatsApp: The voucher will be sent via WhatsApp. Users must prepare a WhatsApp template before sending the e-voucher (Chapter 5.7: How to Create a WhatsApp Template).
- Email: The voucher will be sent via email.
- Push Notification: The voucher will be sent via push notification.
SMS Delivery
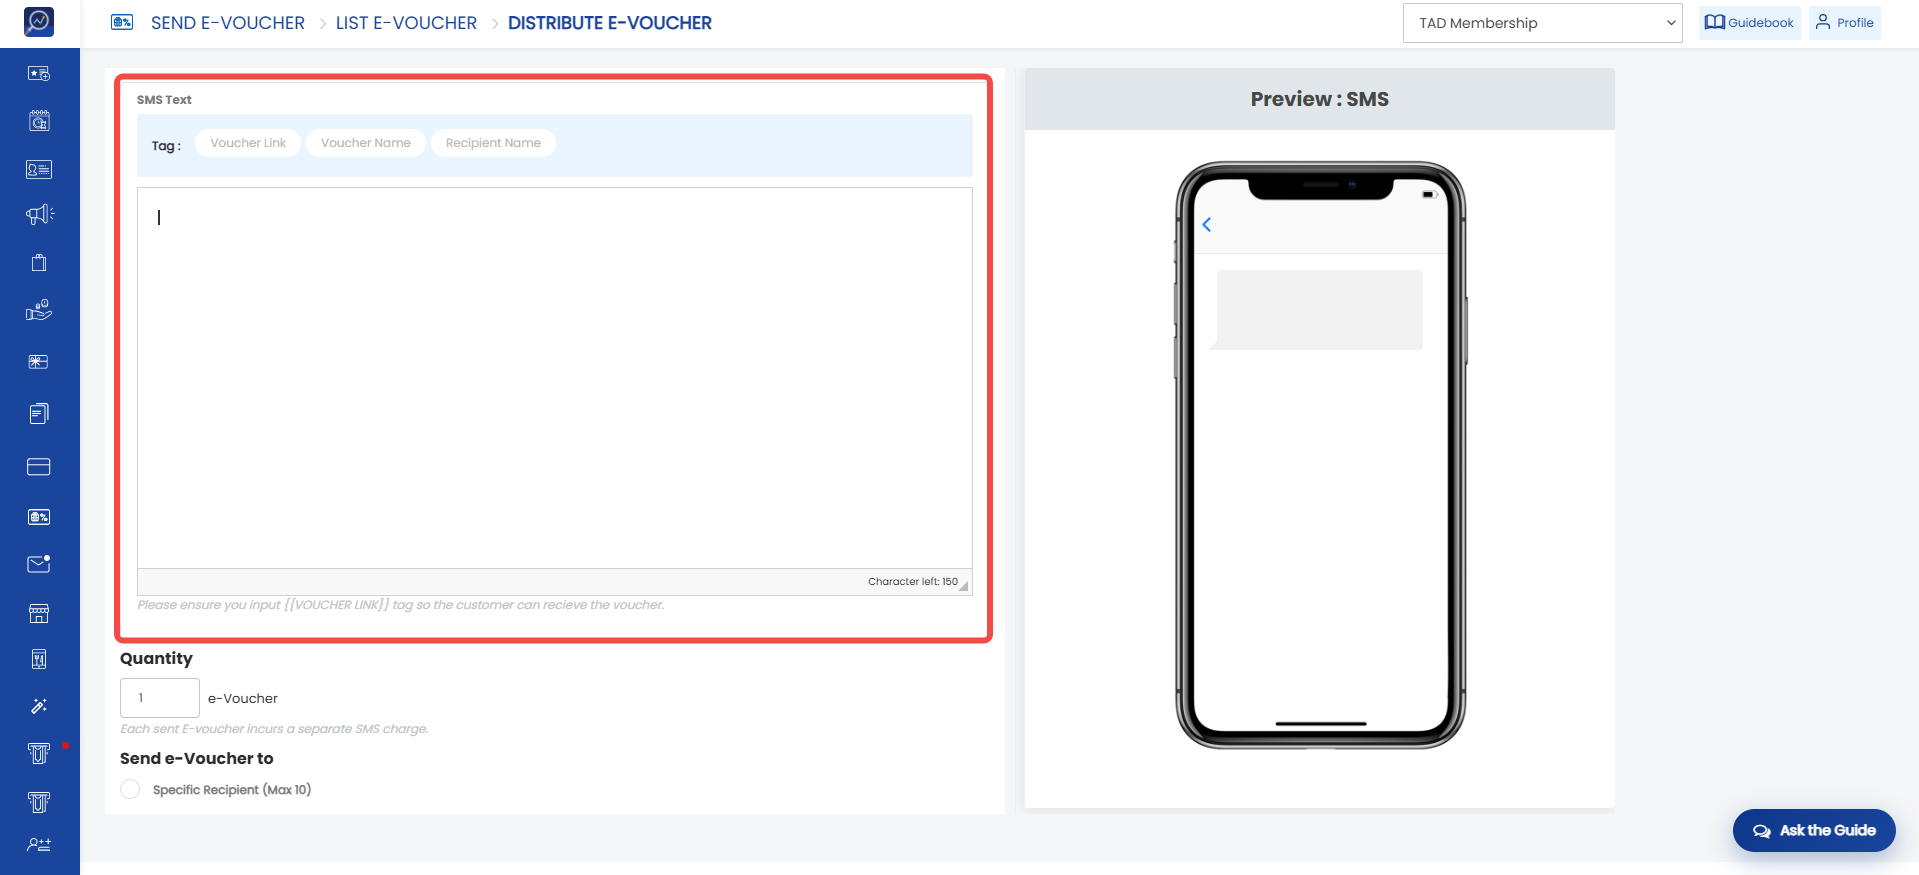
1. Complete the SMS content to be sent.
Make sure to use the Voucher Link tag so members can access the voucher. Additional tags such as Voucher Name or Recipient Name can also be used if needed. The maximum allowed length is 150 characters.
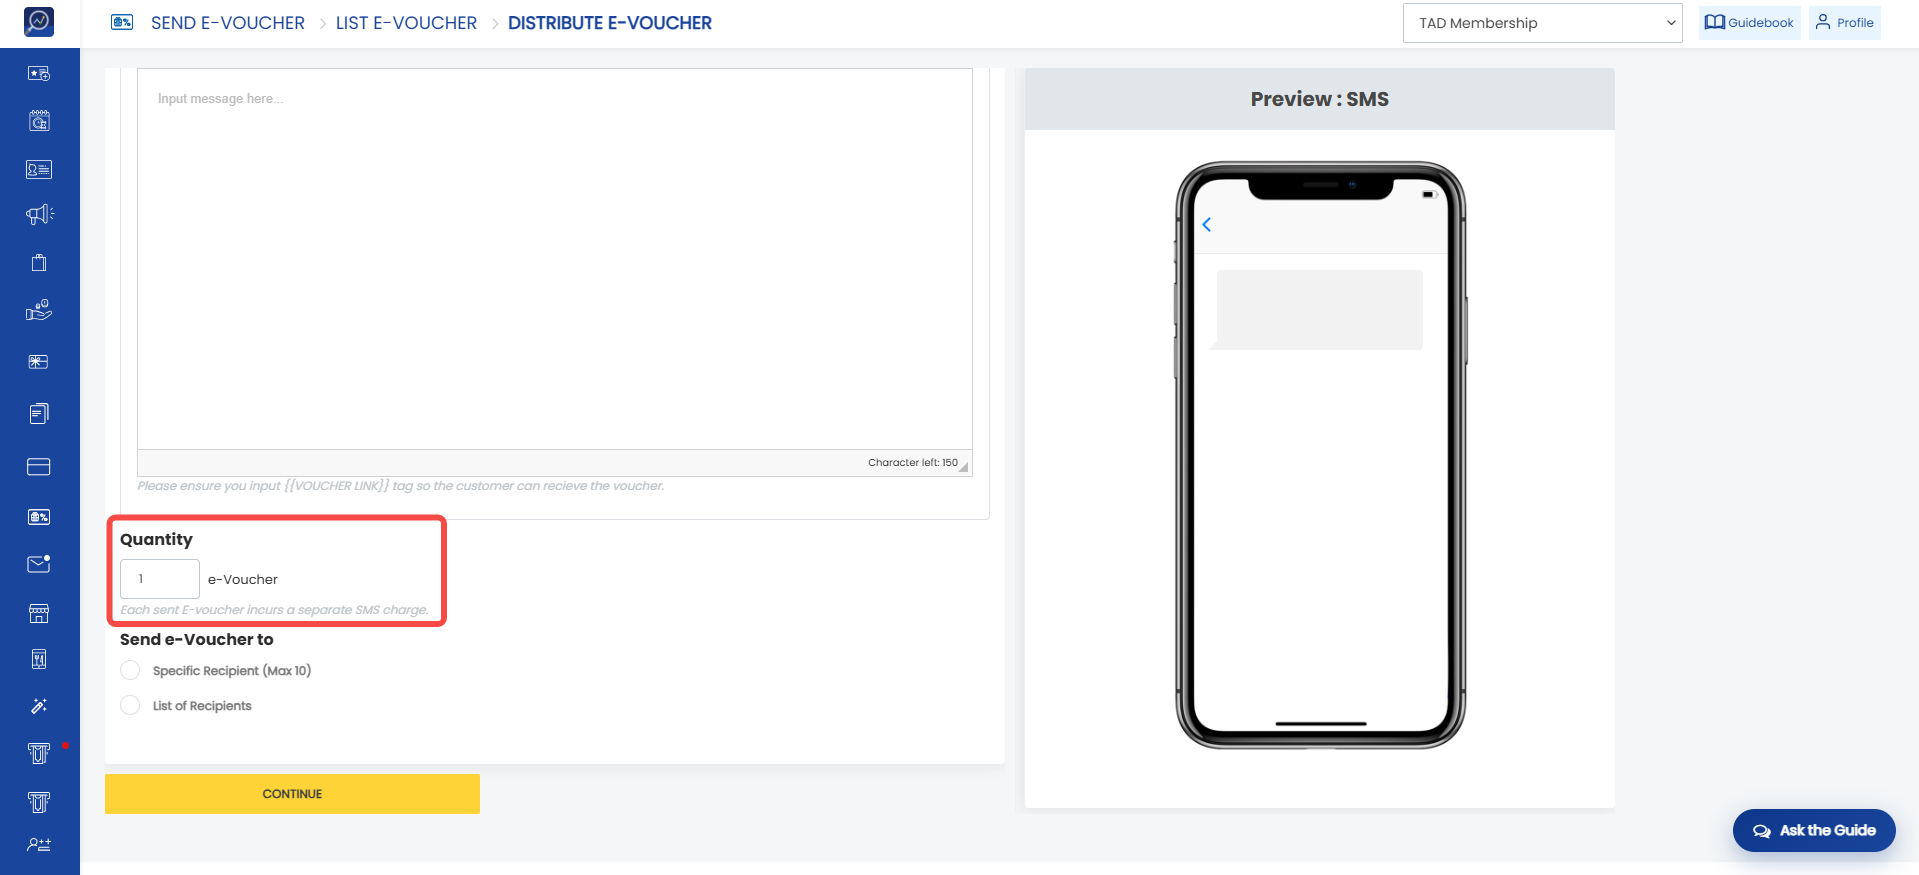
 2. Specify the number of vouchers to send by filling in the “Quantity” field. The system will send vouchers according to the quantity entered.
WhatsApp Delivery
1. Select the WhatsApp template to be used.
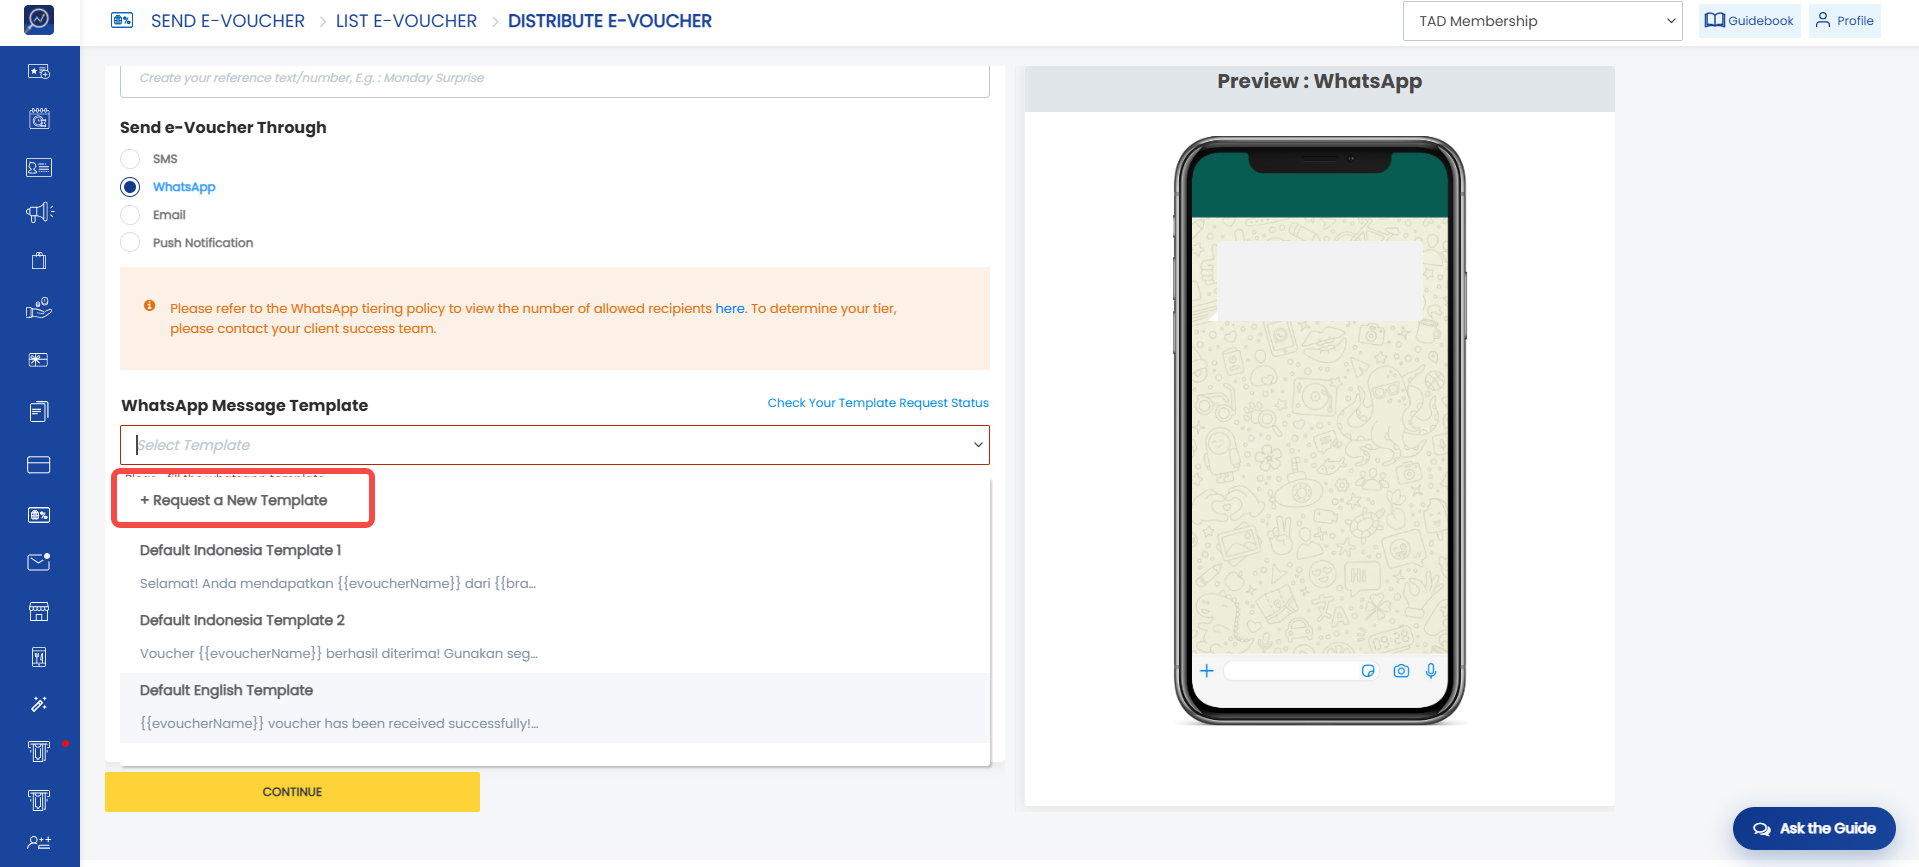
 2. Click “Request a New Template” if there is no available WhatsApp template.
Email Delivery
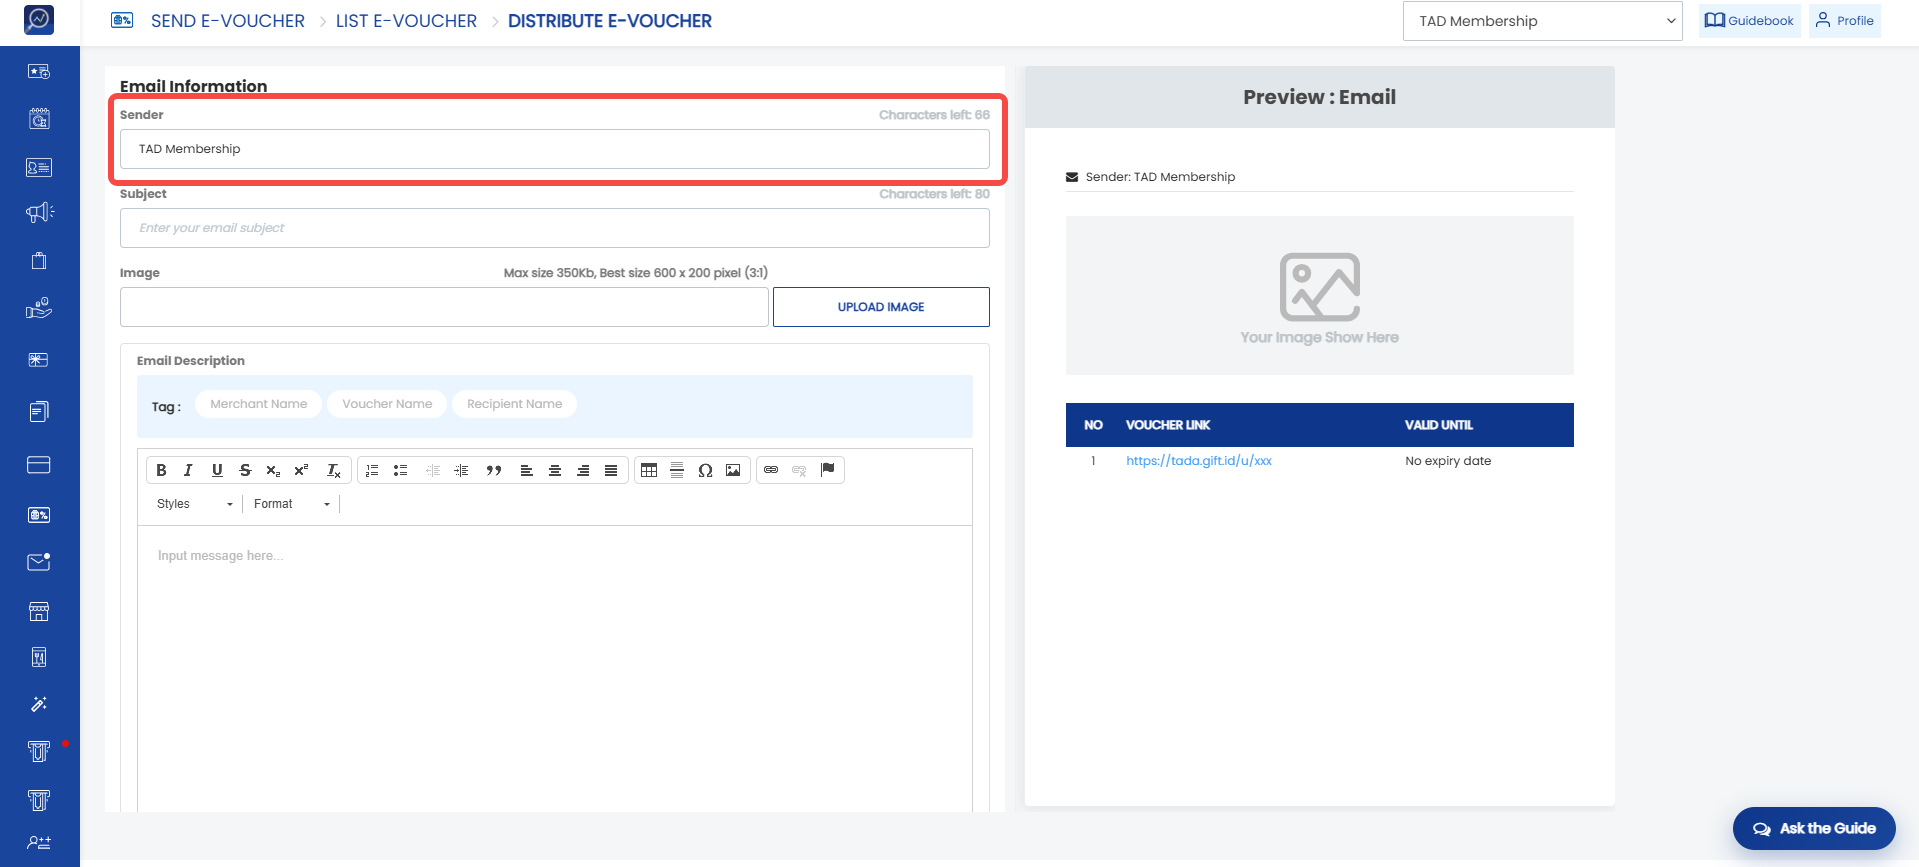
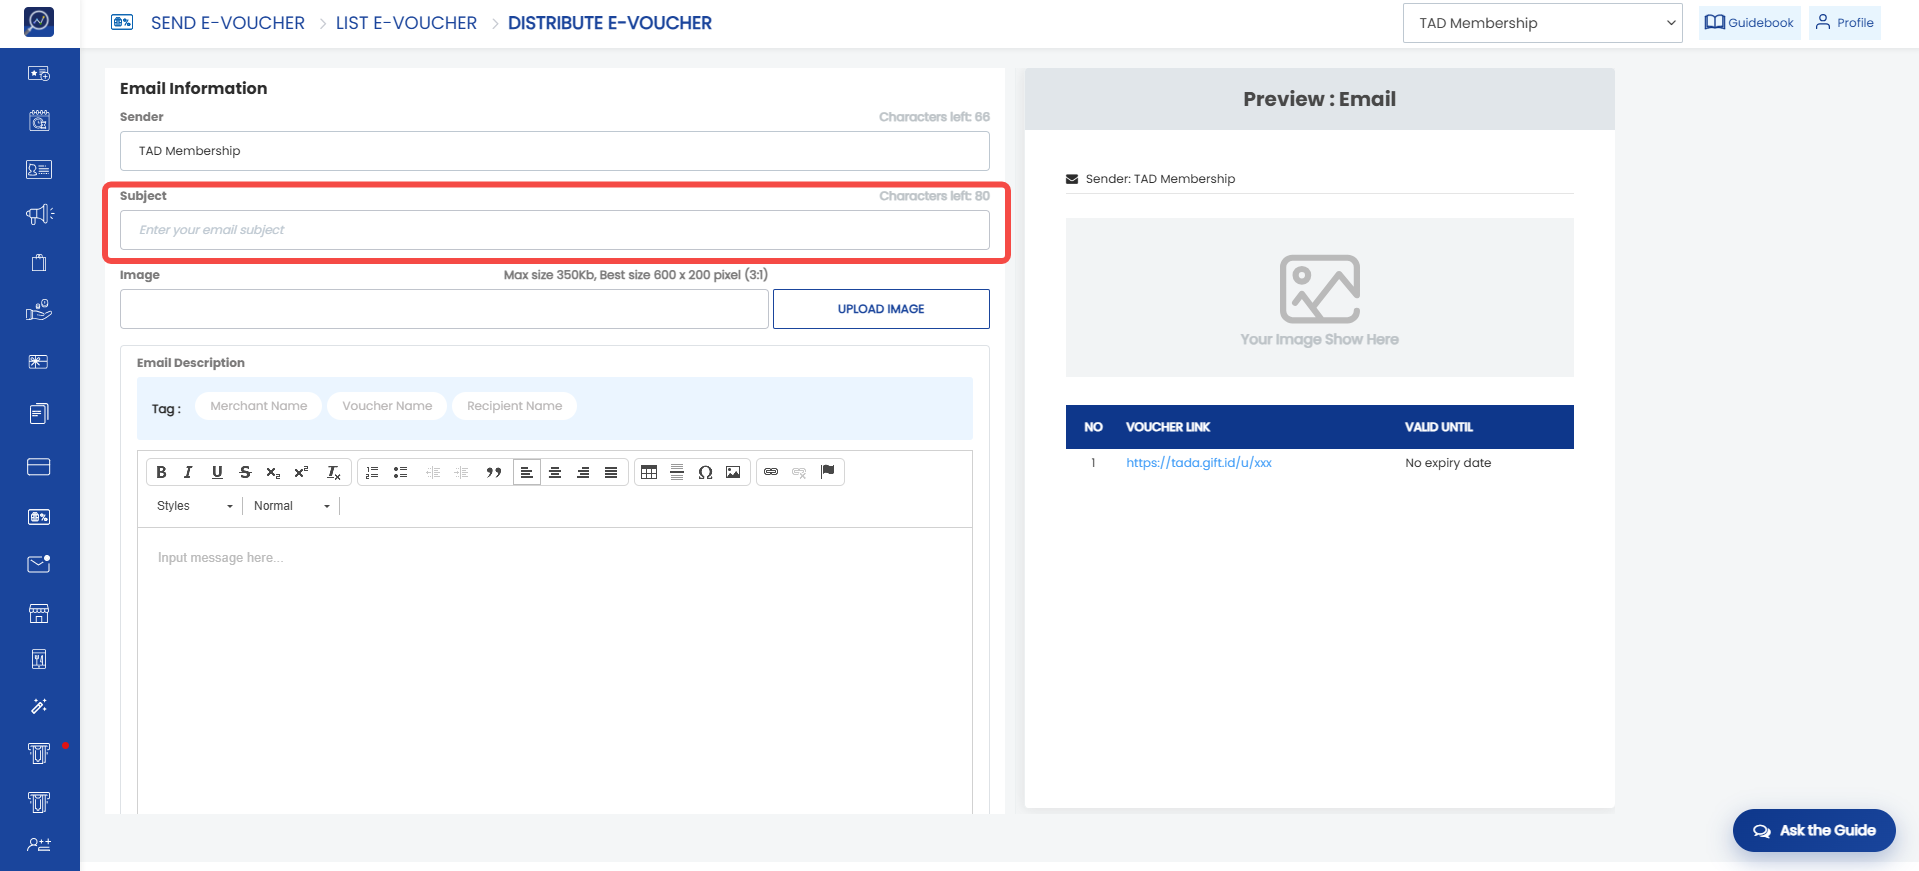
1. Specify the “Sender” name that members will see as the email sender. Maximum 80 characters.
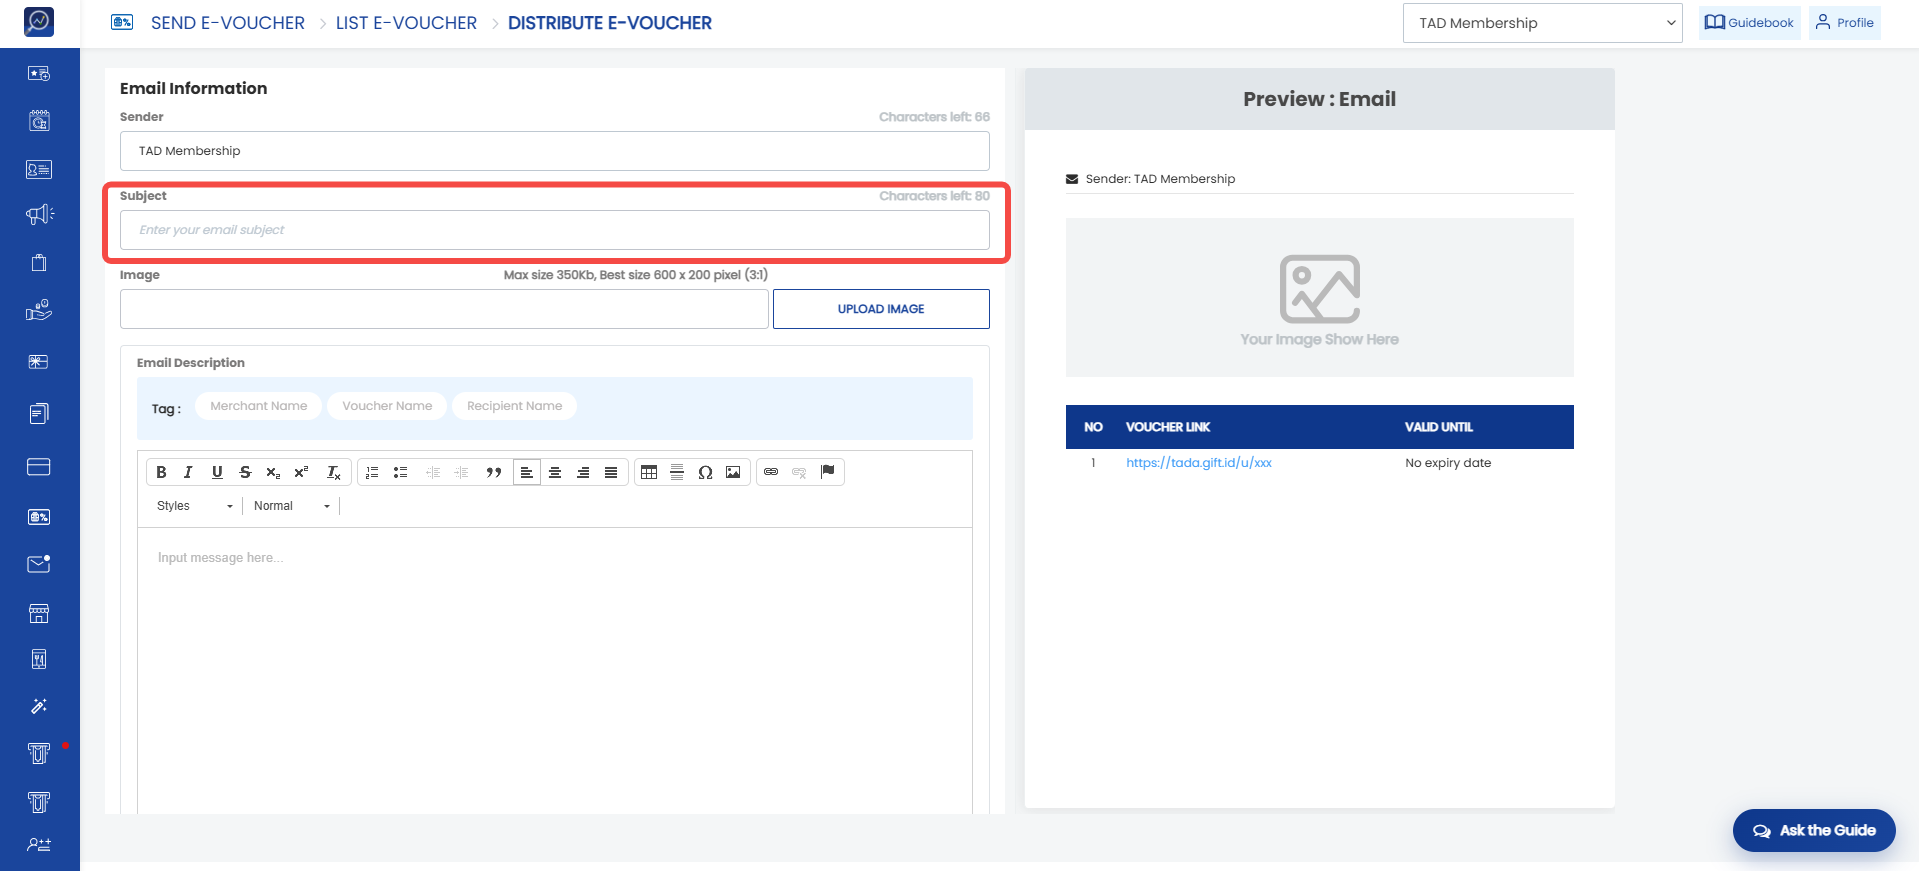
 2. Enter the email subject in the “Subject” field. Maximum 80 characters.
 3. Add an image if required. The recommended size is 600 x 200 px (3:1) with a maximum file size of 350 KB.
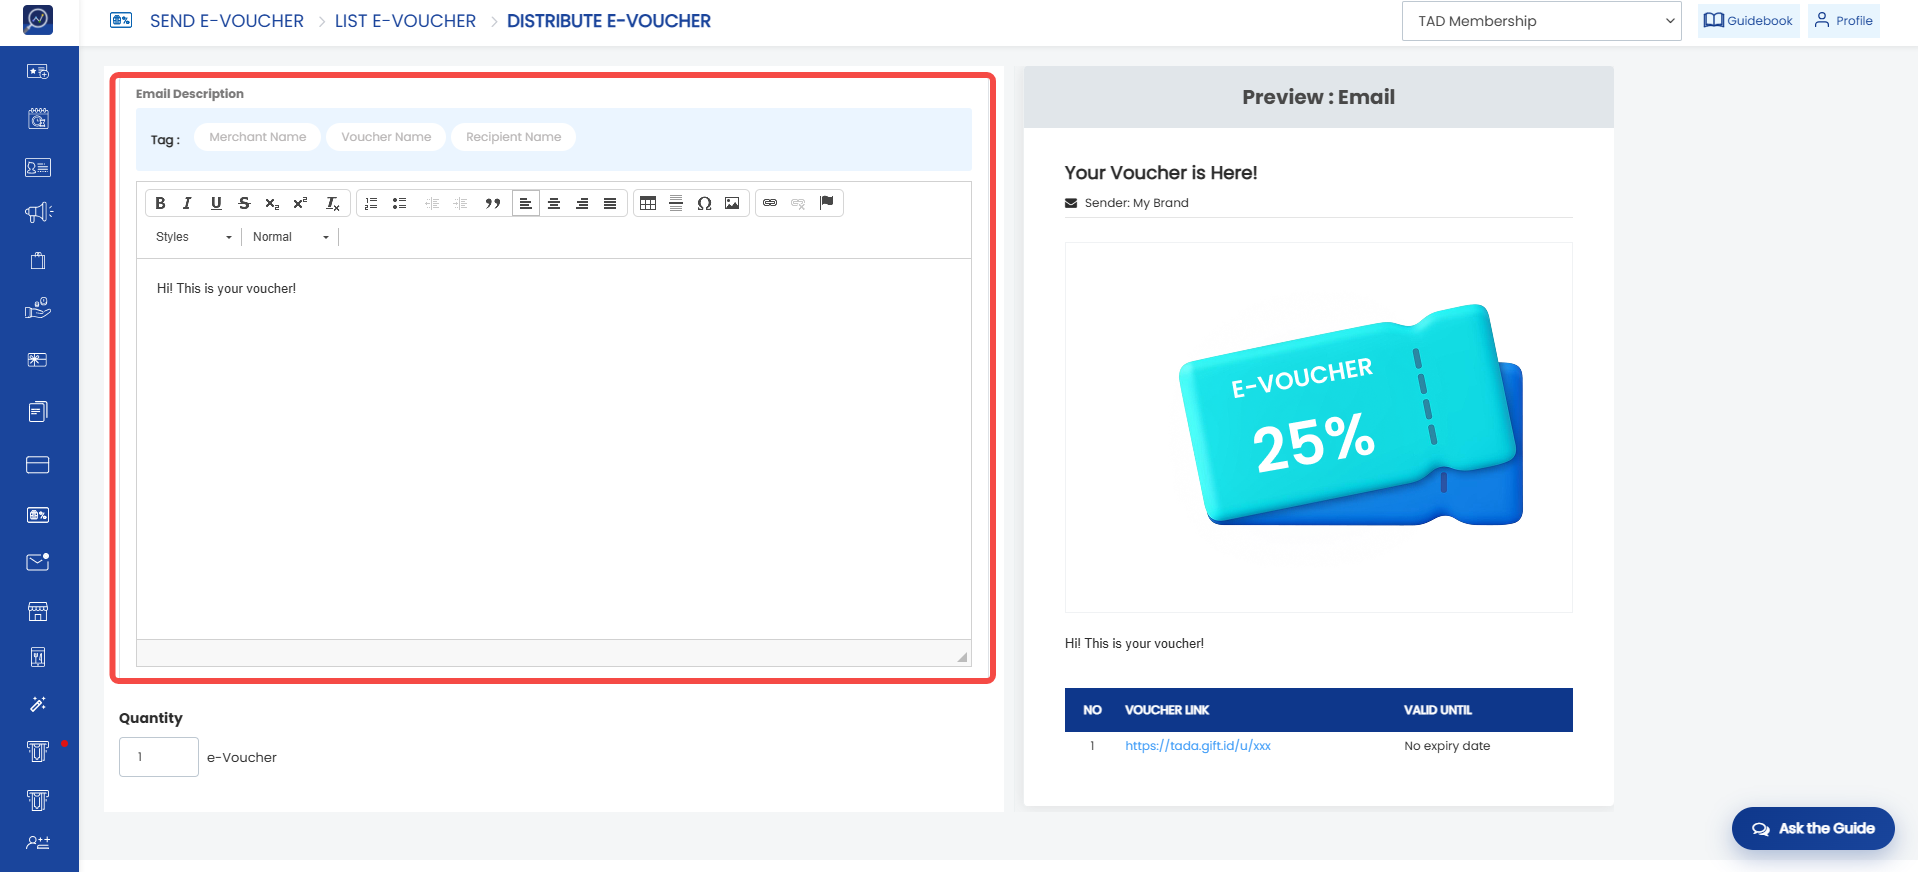
 4. Complete the email content in the “Email Description” field. Use tags such as Merchant Name, Voucher Name, or Recipient Name if needed.
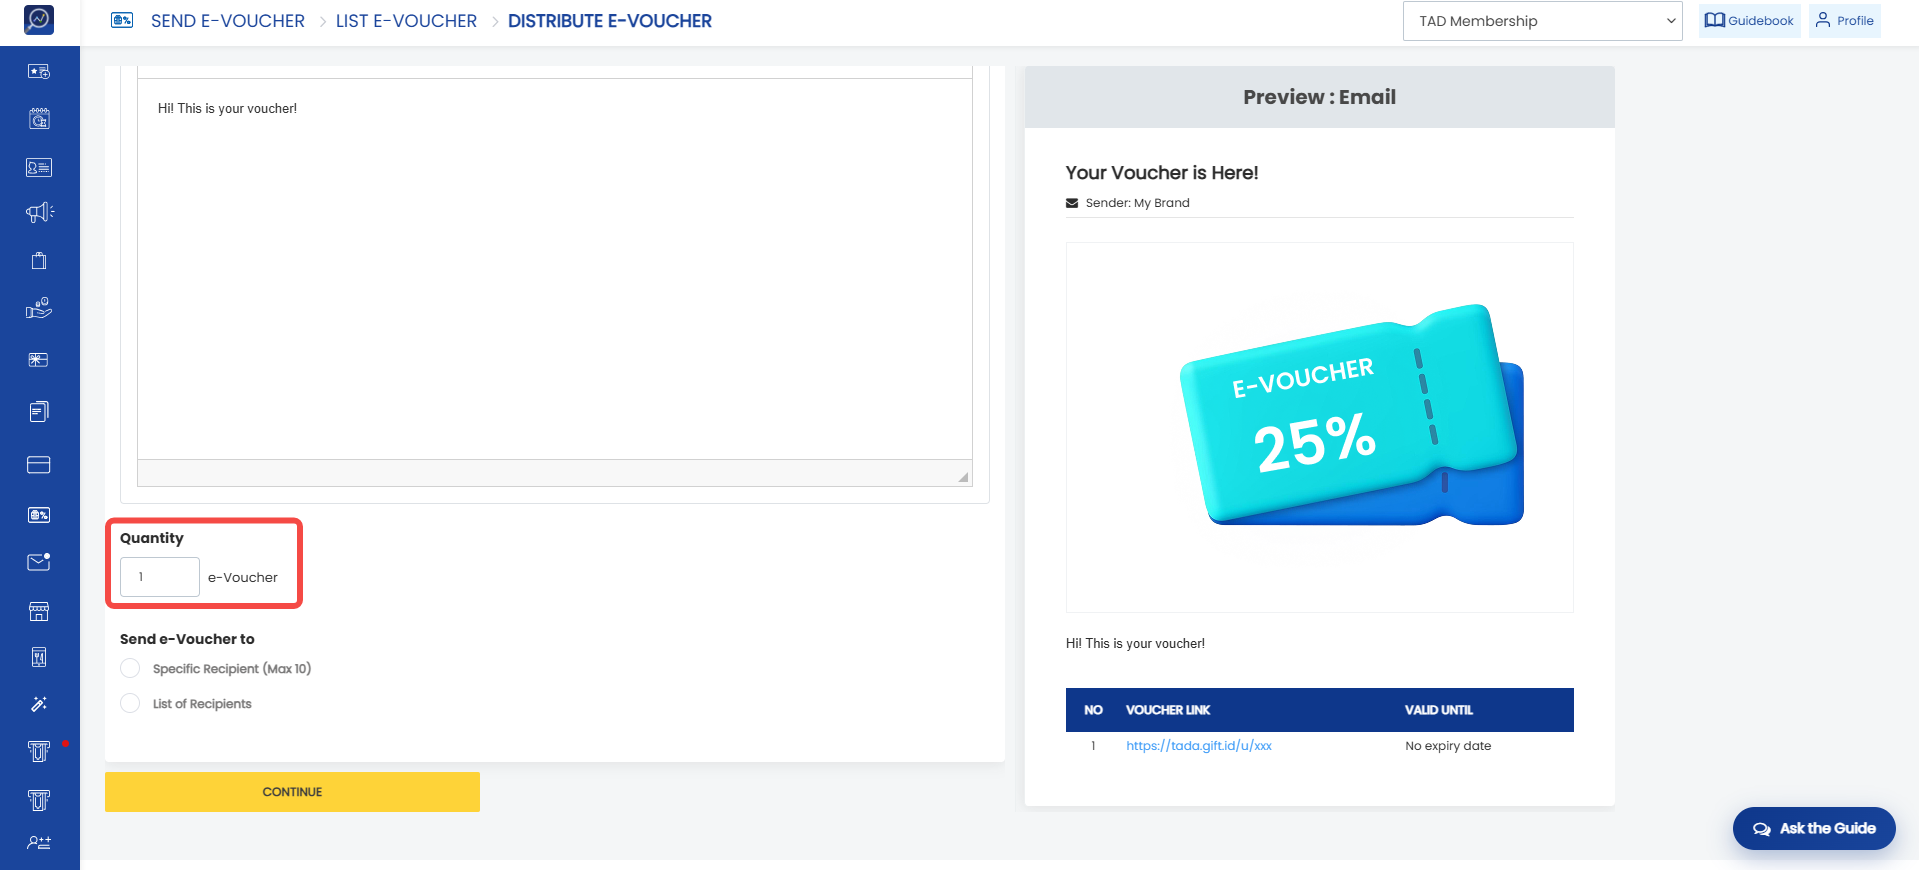
 5. Specify the number of vouchers to send by filling in the “Quantity” field. The system will send vouchers according to the quantity entered.
Push Notification Delivery
1. Complete the push notification content in the “Message” field with a maximum of 100 characters.Use the Name and Voucher Name tags if required.
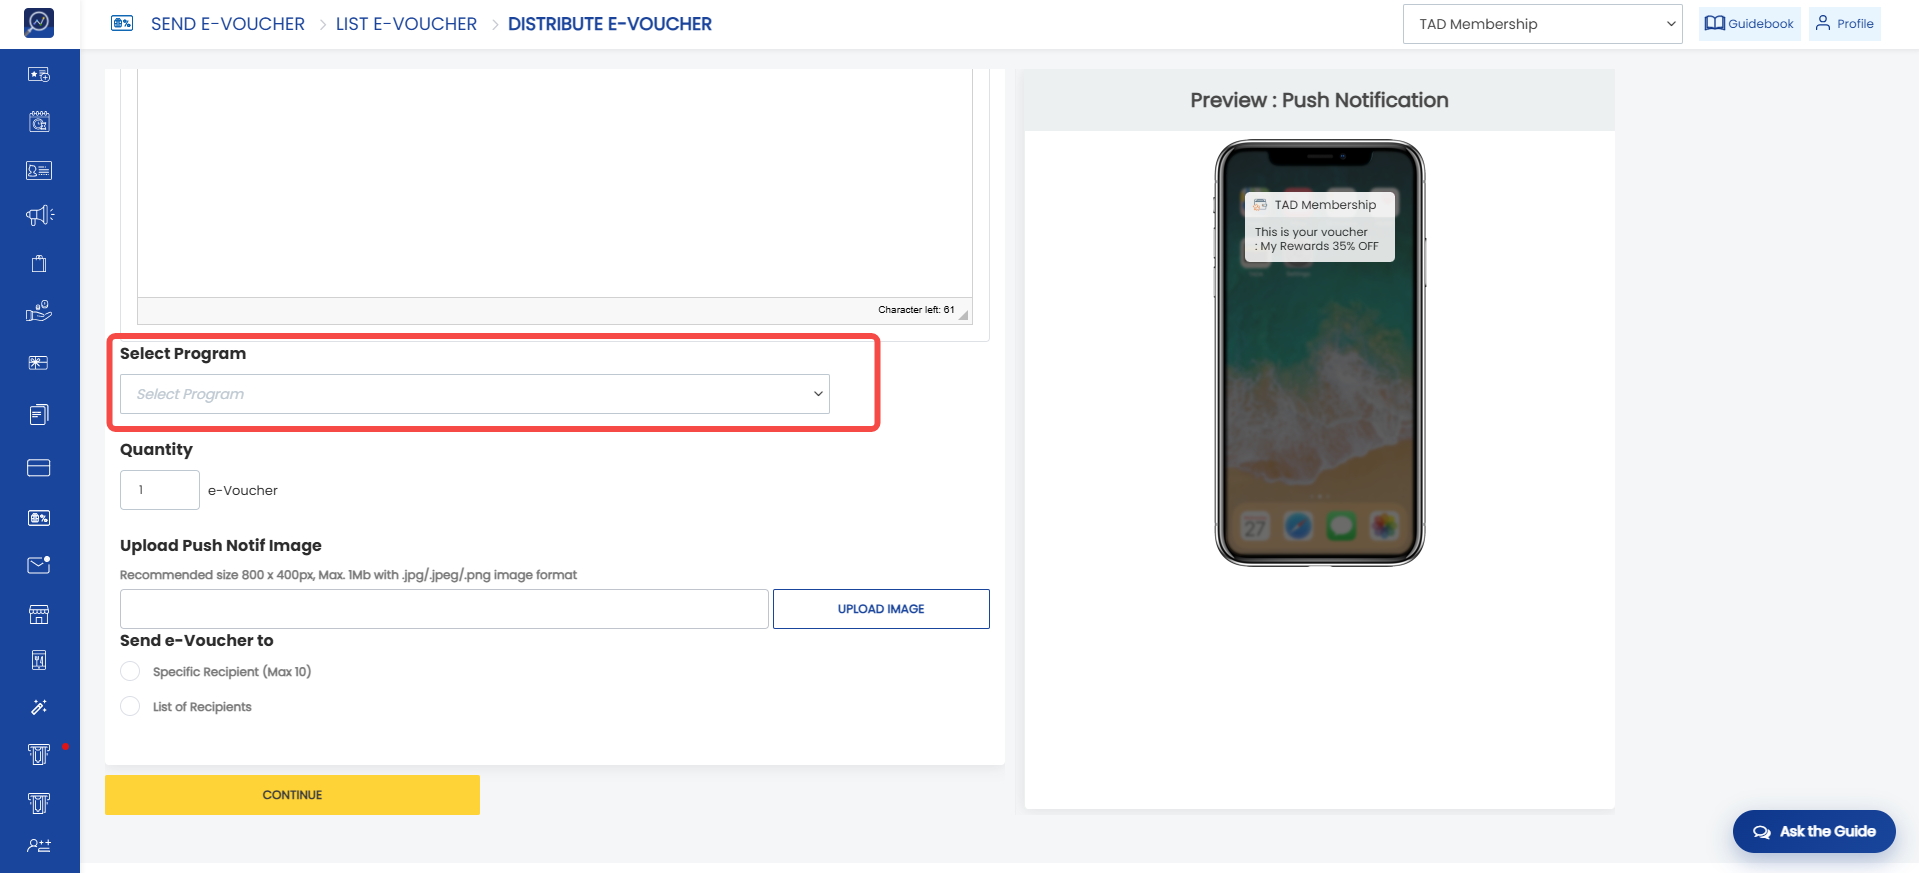
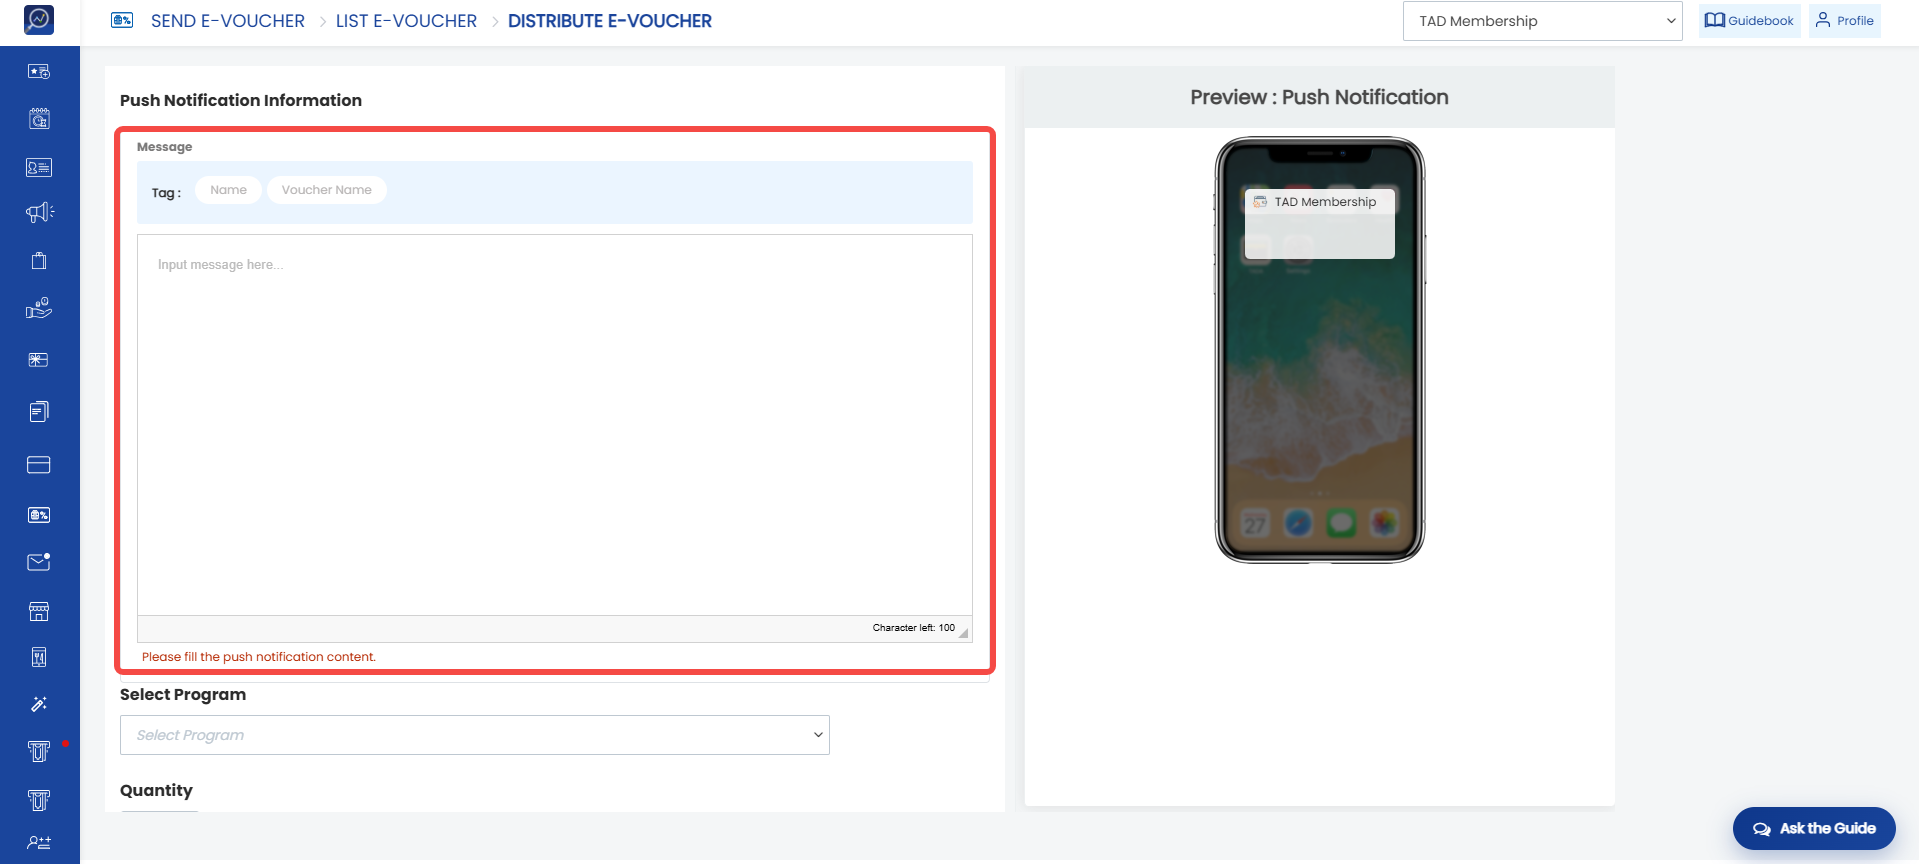 2. Select the destination program in the “Select Program” field.
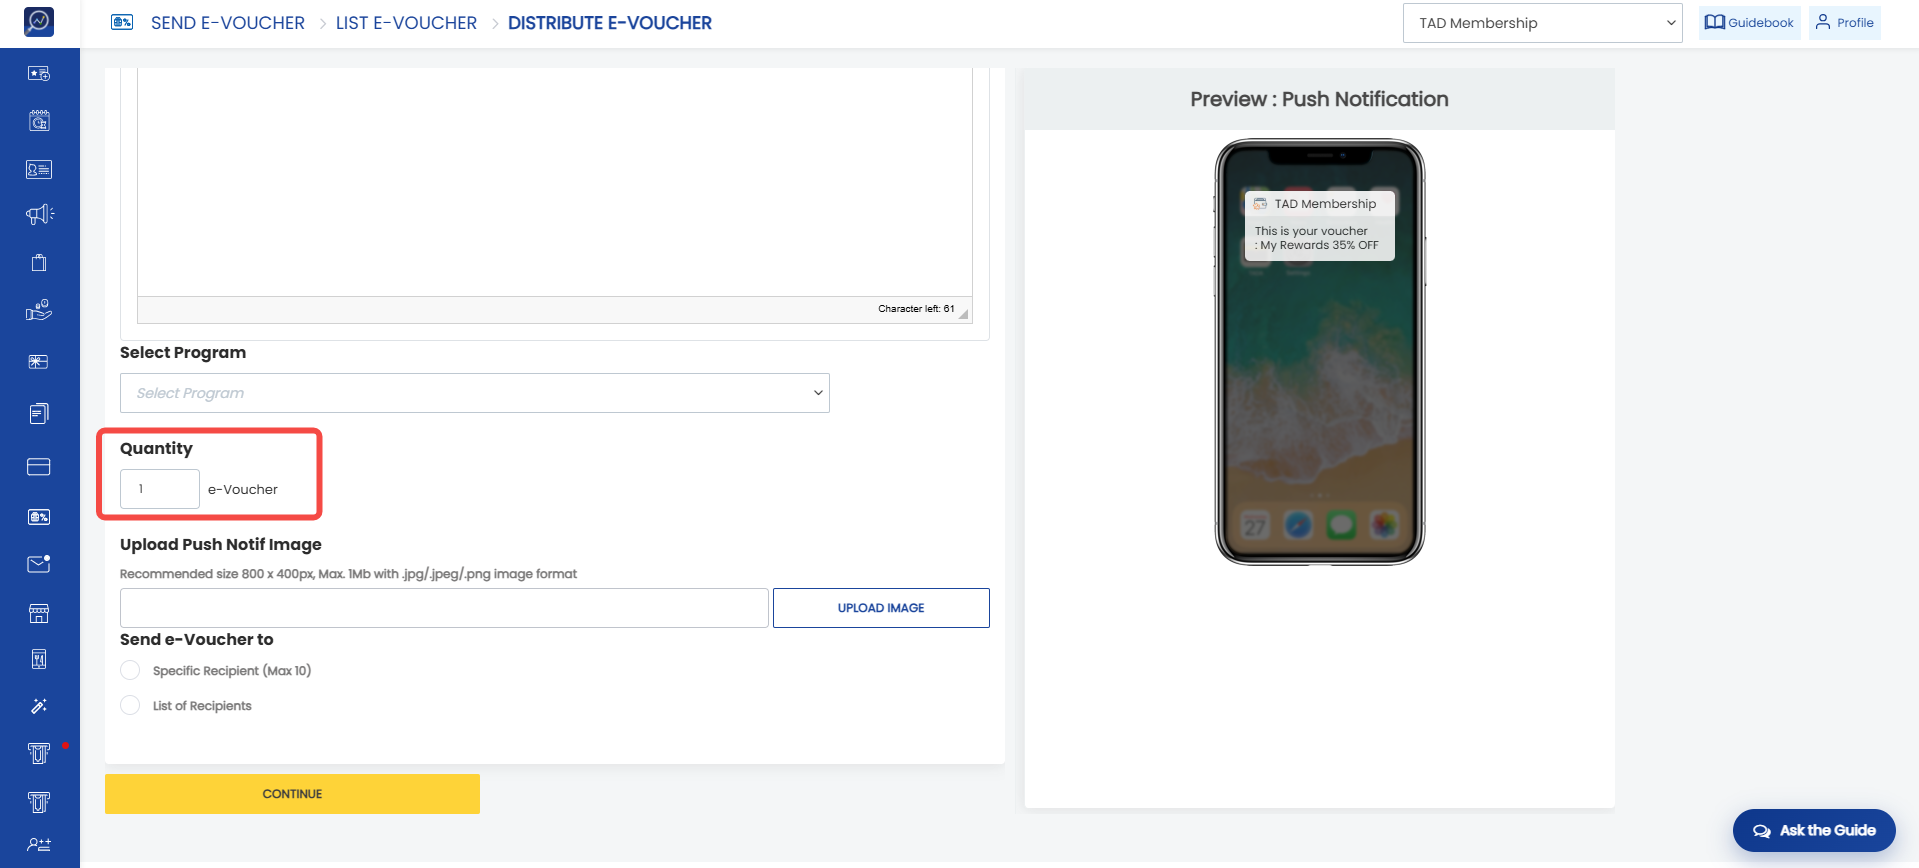
 3. Specify the number of vouchers to send by filling in the “Quantity” field. The system will send vouchers according to the quantity entered.
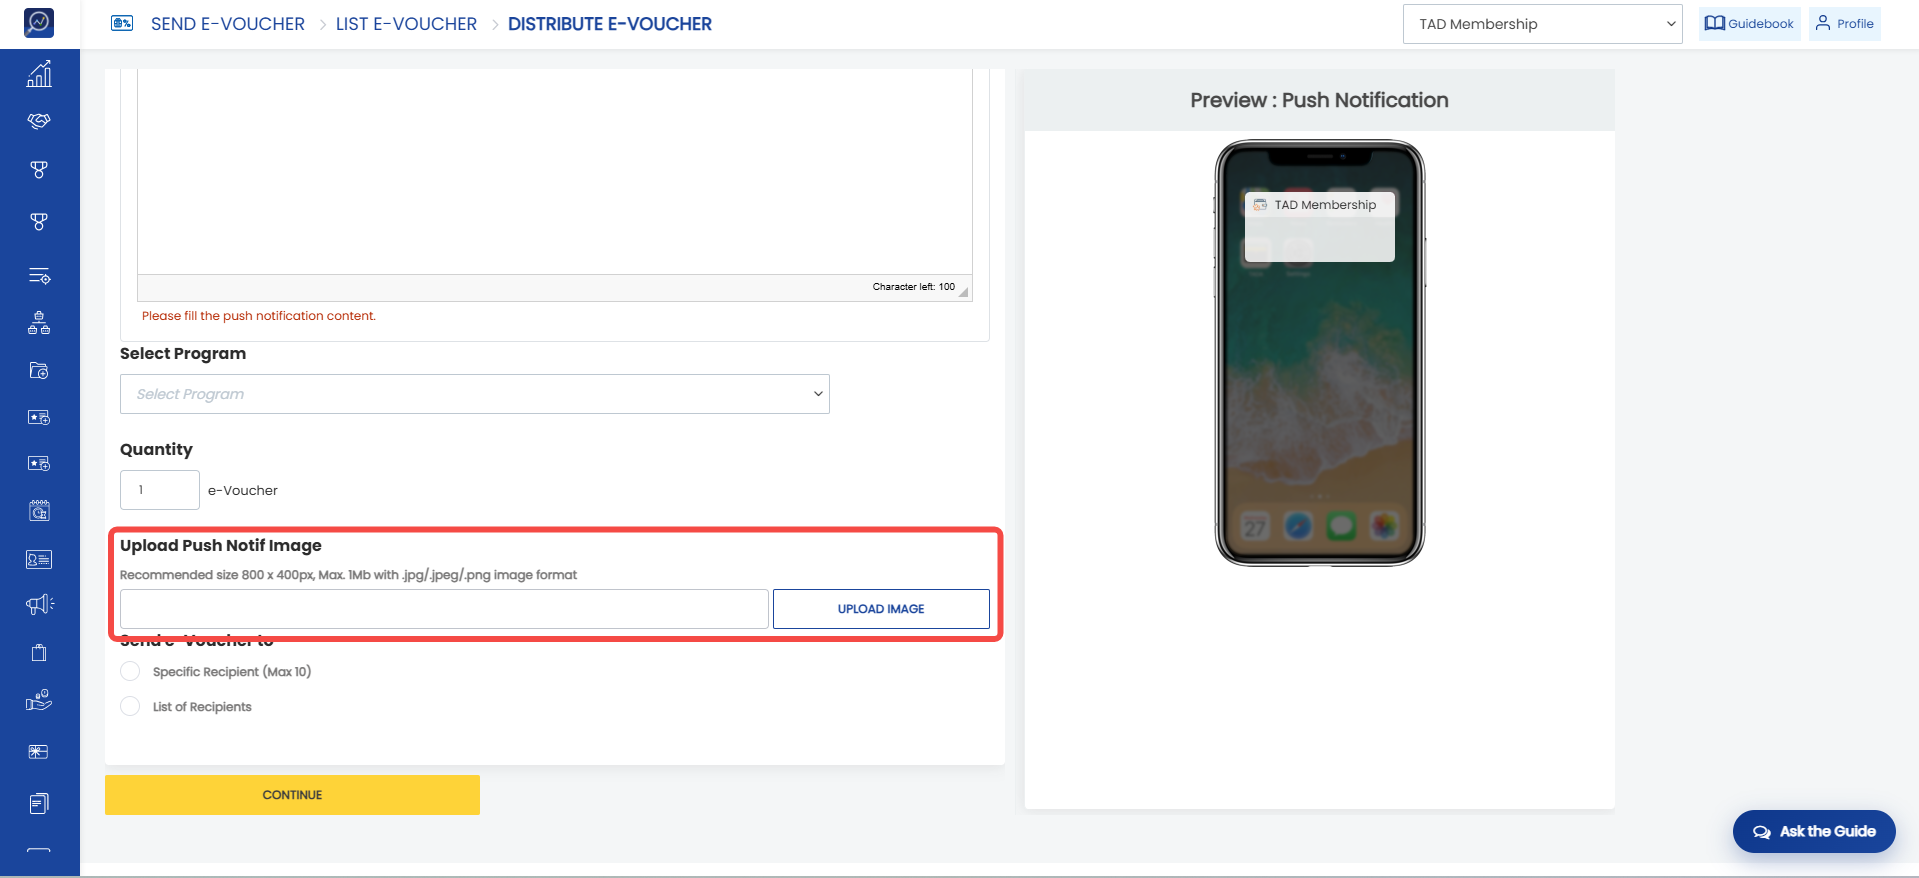
 4. Upload an image if needed in the “Upload Push Notif Image” field. The recommended size is 800 x 400 px with a maximum file size of 1 MB in .jpg/.jpeg/.png format.
 5. Specify the voucher recipients in the “Send e-Voucher To” field.
There are two methods for defining recipients:
a. Specific recipient: Enter recipient details in the provided fields.
- For SMS, WhatsApp, and Push Notification delivery: enter the phone number.
- For Email delivery: enter the email address.
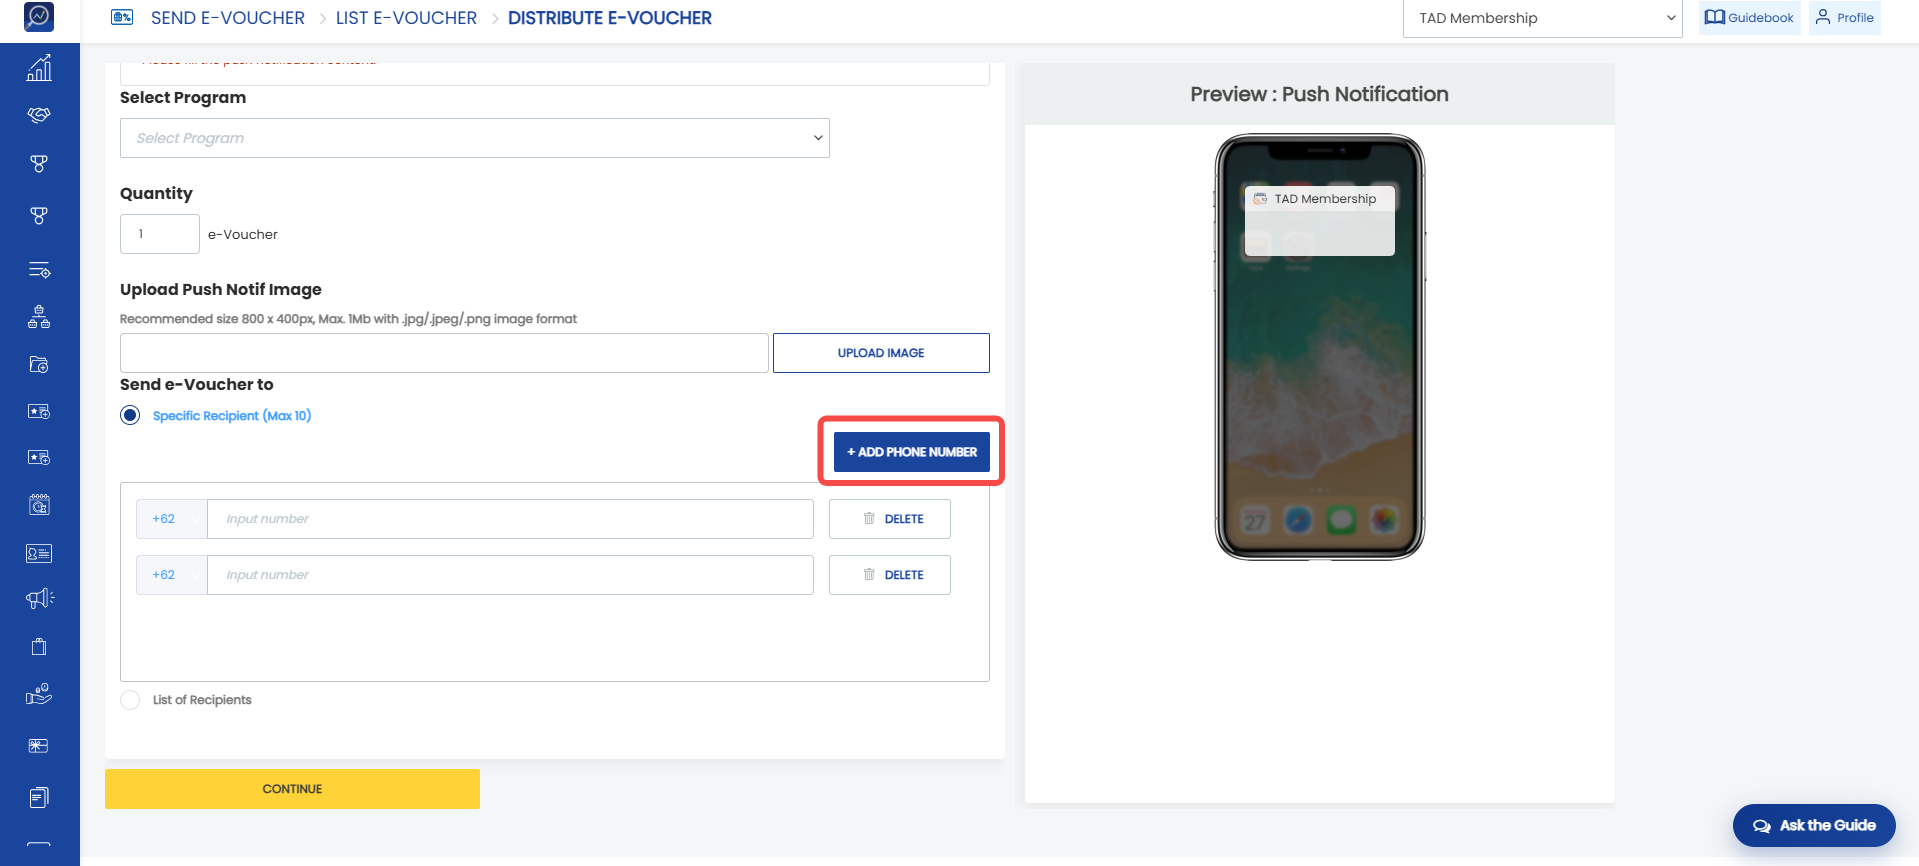
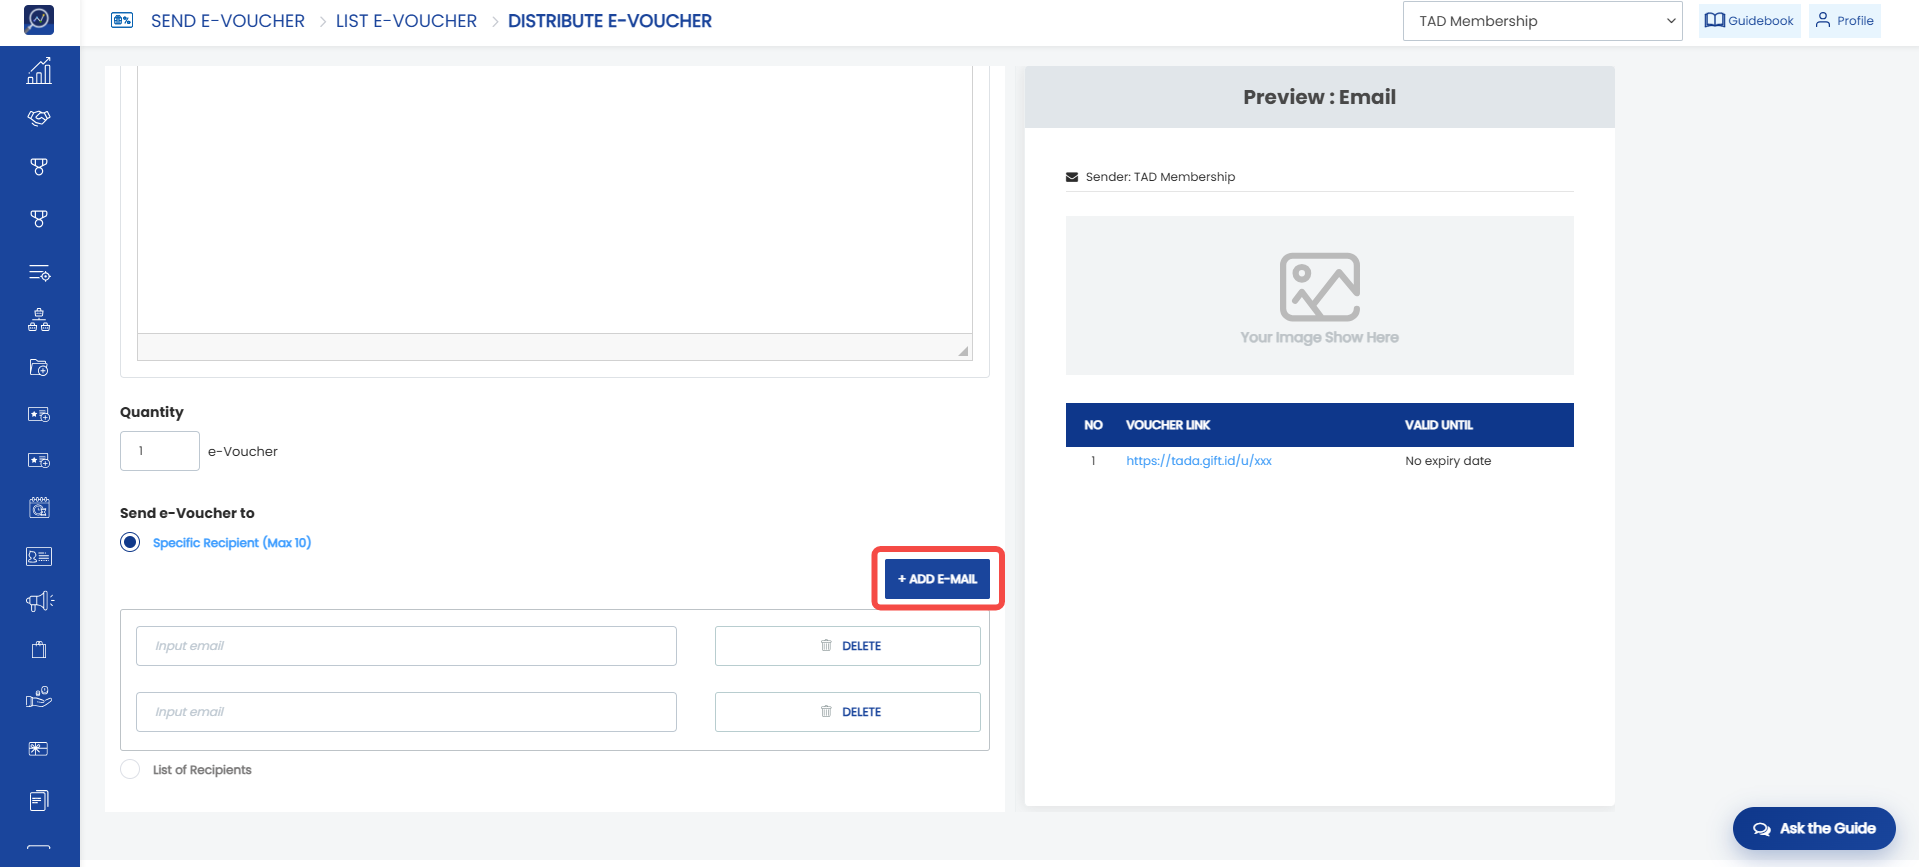
Users can add more recipients by clicking “Add Phone Number” for SMS, WhatsApp, or Push Notification delivery.
 Click “Add Email” for Email delivery.
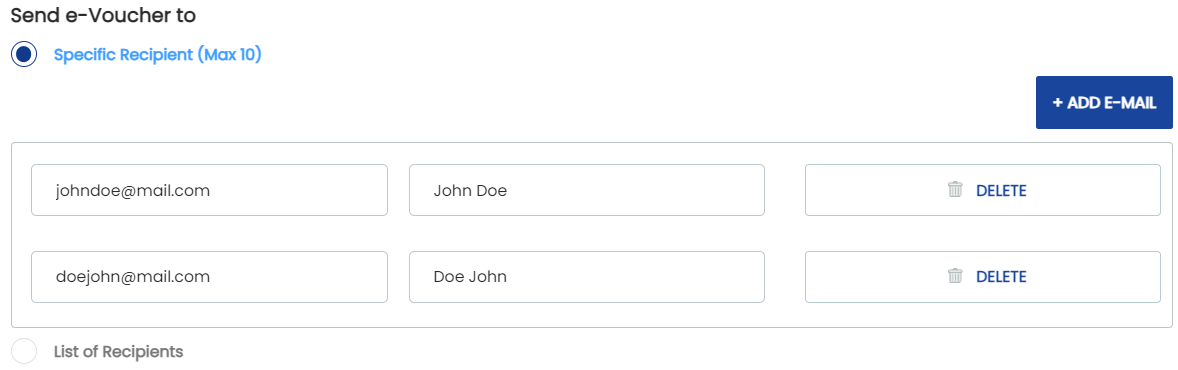
 If the email content uses the “Recipient Name” tag, brands can configure recipient names to create a more personalized message.
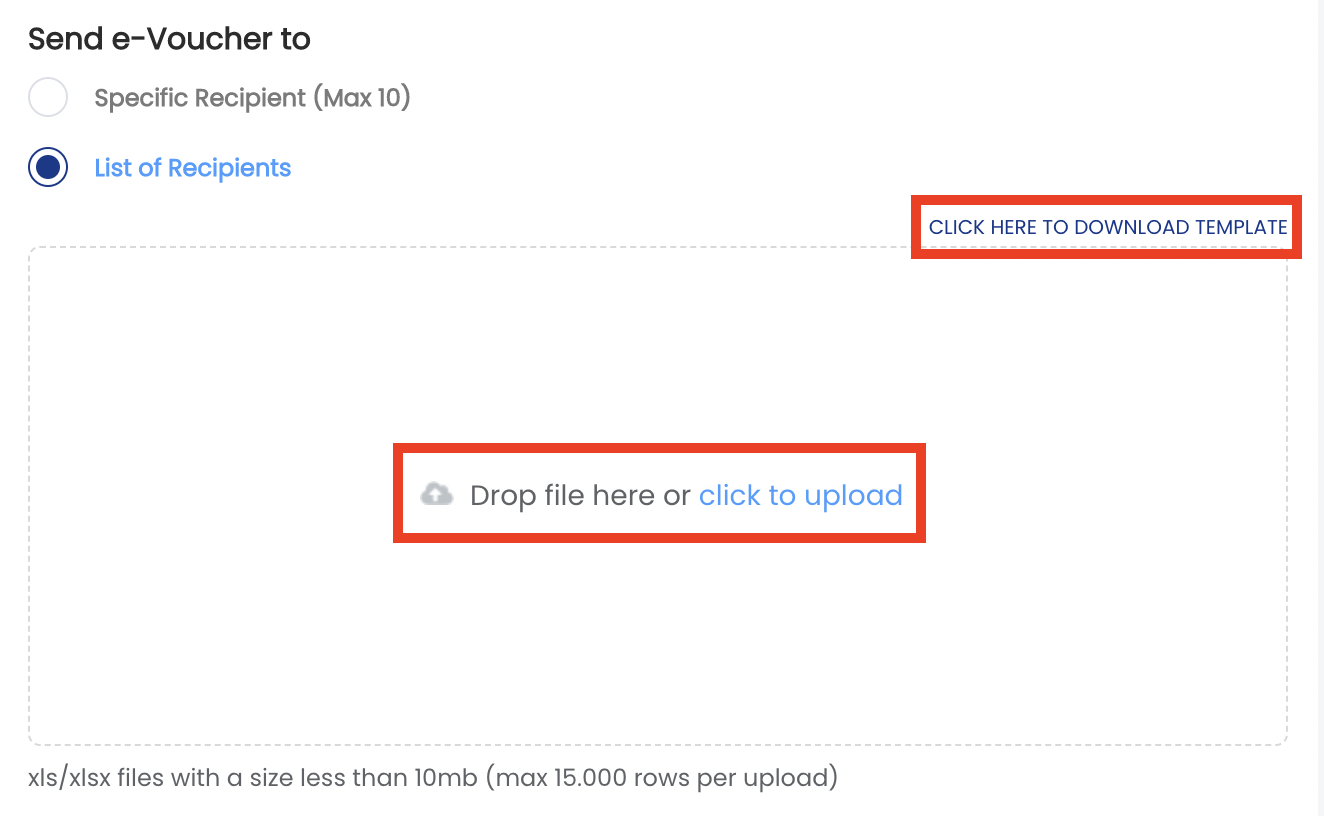
b. List of recipient: Send vouchers to all recipients included in an uploaded file. Click “Click Here to Download Template”, complete the recipient list, and upload the file in the provided field.
- For SMS, WhatsApp, or Push Notification delivery, the file must contain phone numbers.
- For Email delivery, the file must contain email addresses..
 6. After completing all required information, click “Continue” to send the voucher.
How to Send Various e-Vouchers
The Send Various e-Voucher feature allows users to send multiple voucher types in a single delivery.
1. Open the “E-Voucher” menu and select “Send Various Voucher”.
2. Enter a unique reference number in the “Reference Number” field.
Note: The reference number must be unique and cannot be reused.
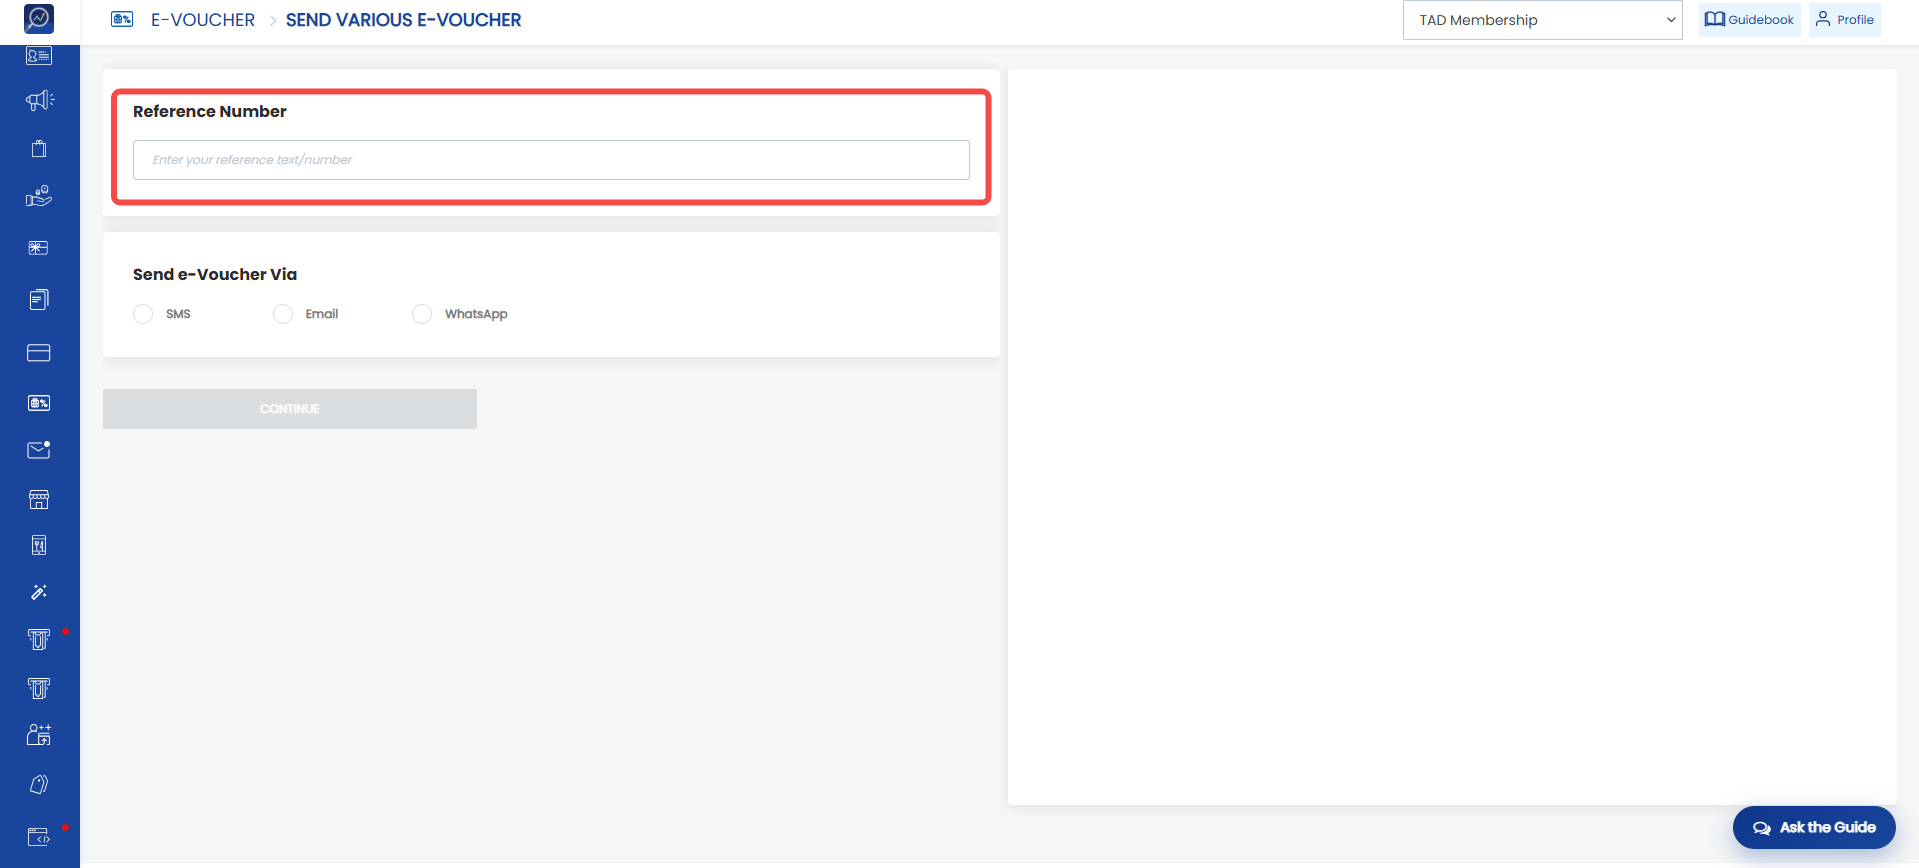 3. Select the delivery channel. Available options include:
- SMS: The voucher will be sent via SMS.
- WhatsApp: The voucher will be sent via WhatsApp. Users must prepare a WhatsApp template before sending the e-voucher (Chapter 5.7: How to Create a WhatsApp Template).
- Email: The voucher will be sent via email.
4. Configure the message content based on the selected channel.
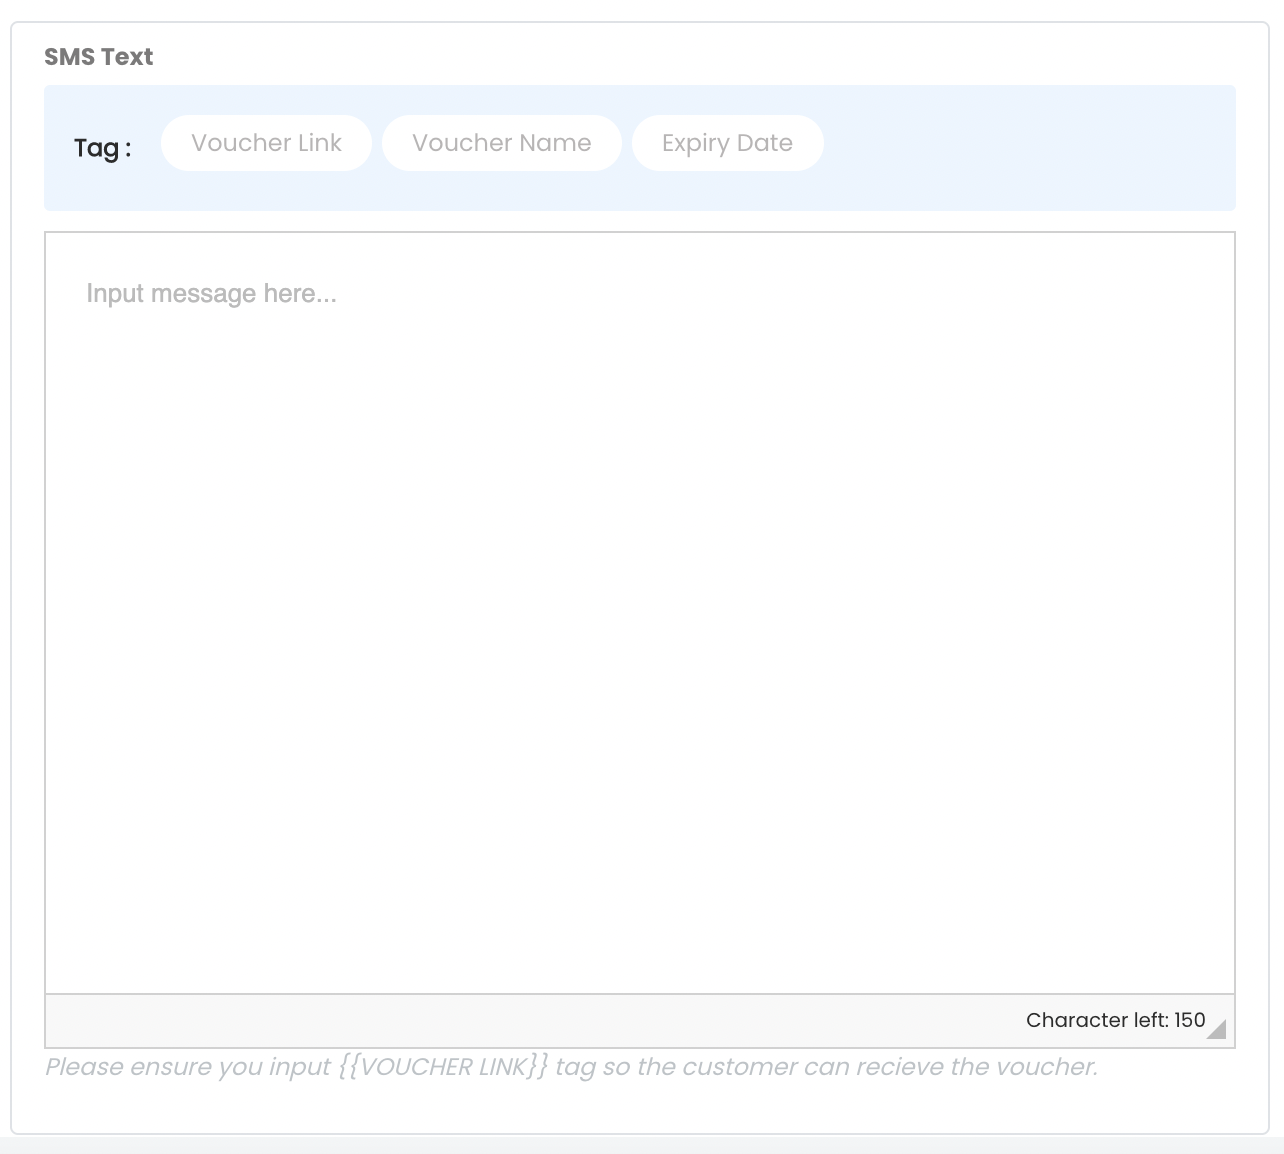
- SMS: Use available tags such as Voucher Link, Voucher Name, and Expiry Date. Make sure the Voucher Link tag is included in every SMS content. Maximum content length is 150 characters.
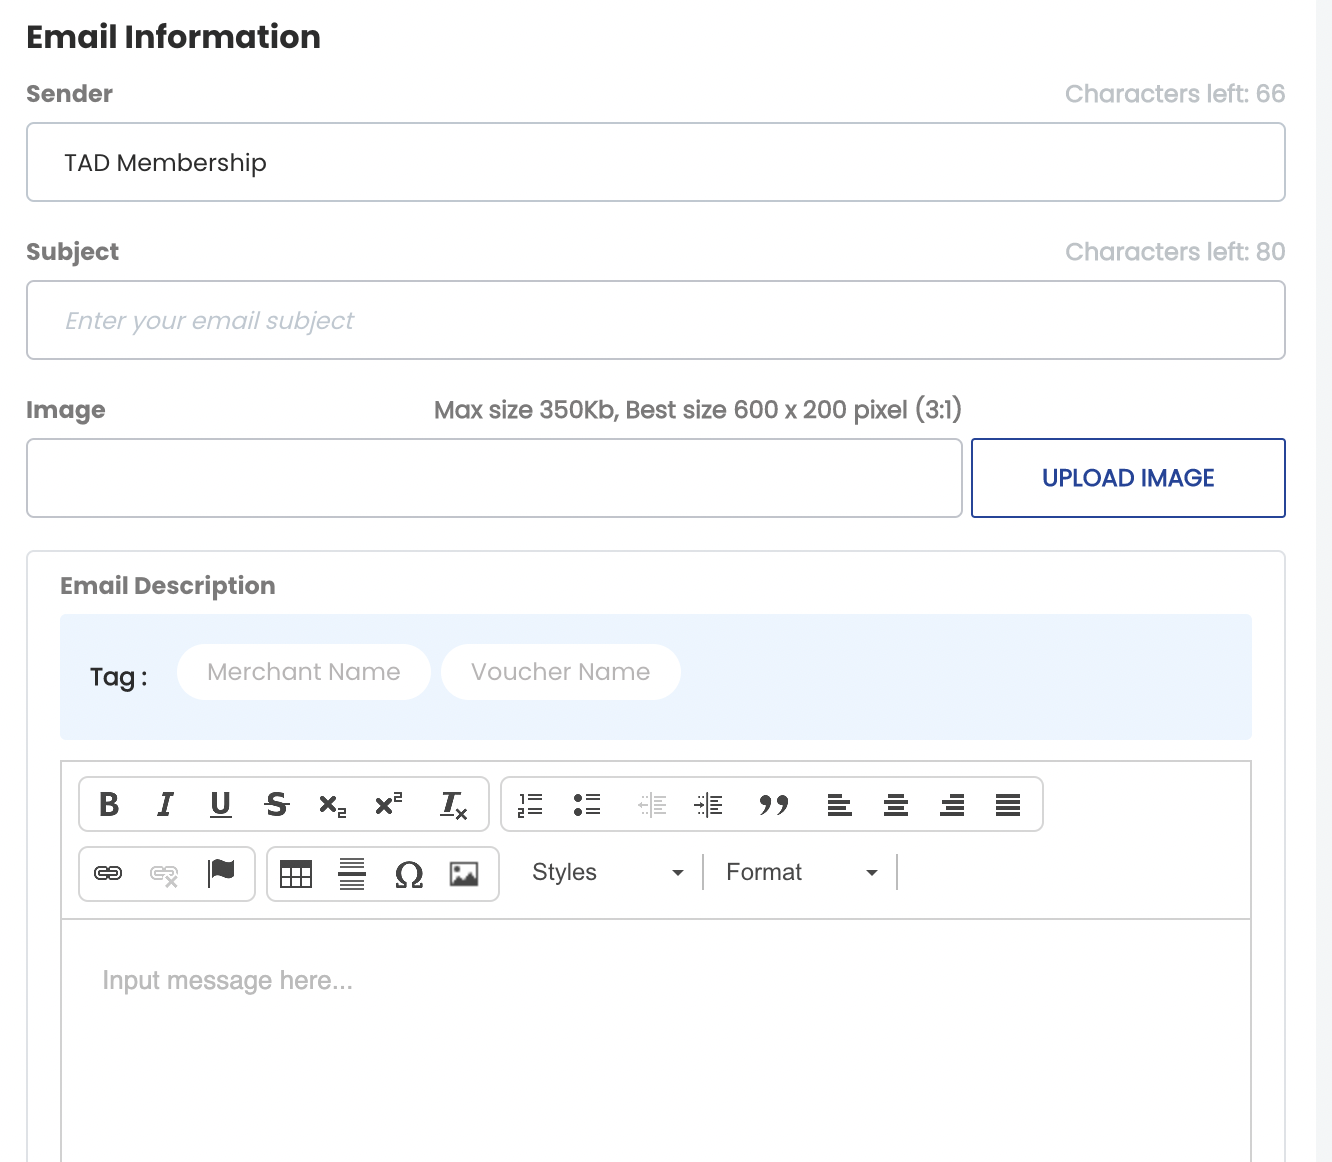
- Email: Use available tags such as Merchant Name and Voucher Name. Brands can define the sender, subject, and image for each email. Email content supports formatting such as bold, italic, underline, and more.
- Whatsapp: When using WhatsApp delivery, users do not need to manually write the content because the message content follows the selected WhatsApp template.
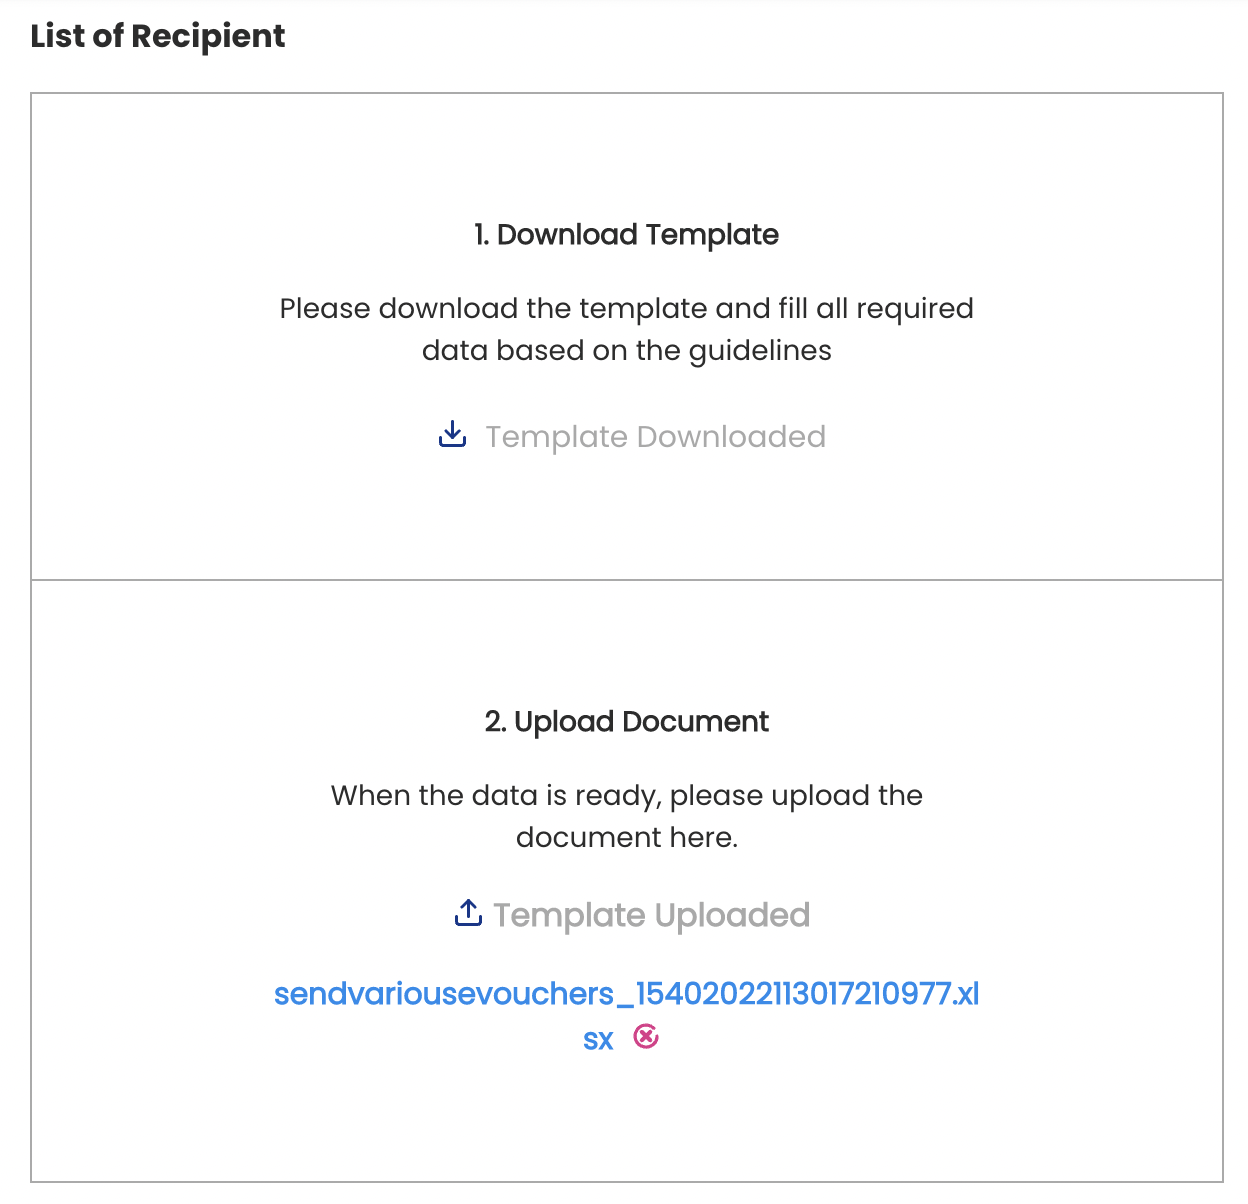
5. Specify recipients by downloading the template, completing it, and uploading the document under “List of Recipient”.
 6. Click “Continue” to send the vouchers.
How to Suspend an e-Voucher
1. Open the “E-Voucher” menu and select “Info”.
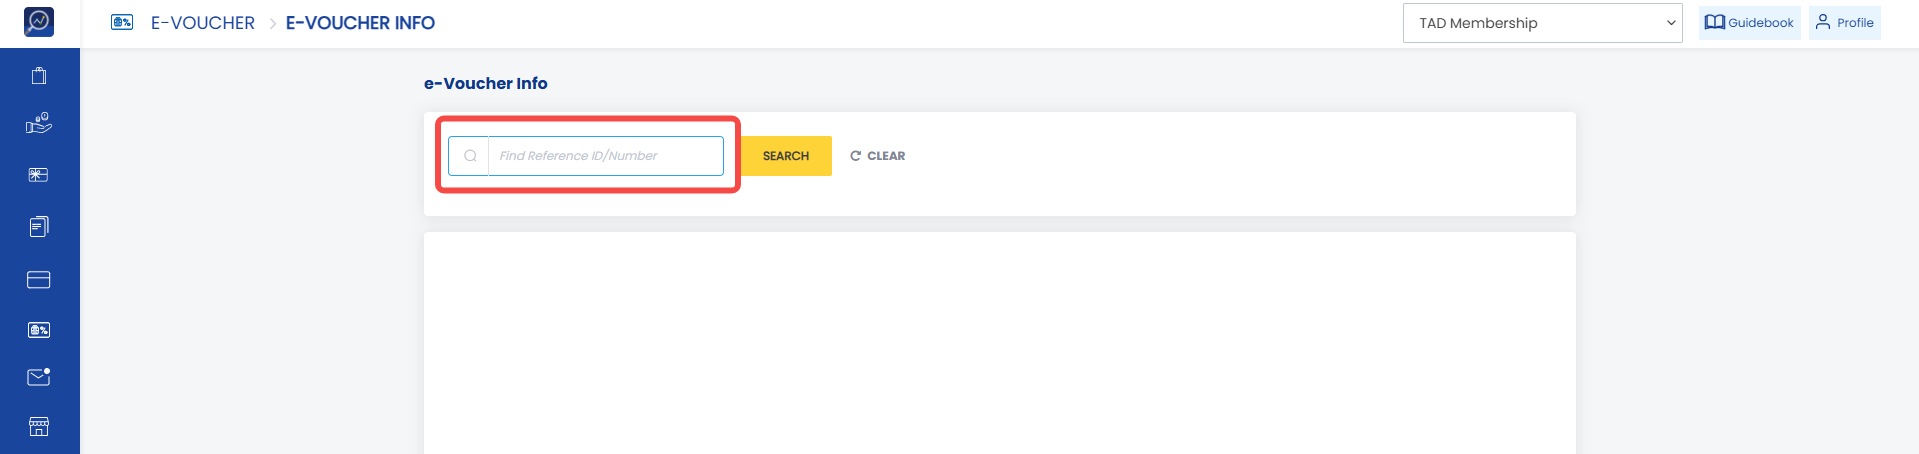
2. Enter the Reference ID and click “Search”.
 3. If the voucher status is still “Activated”, the voucher can be suspended by clicking “Suspend”.
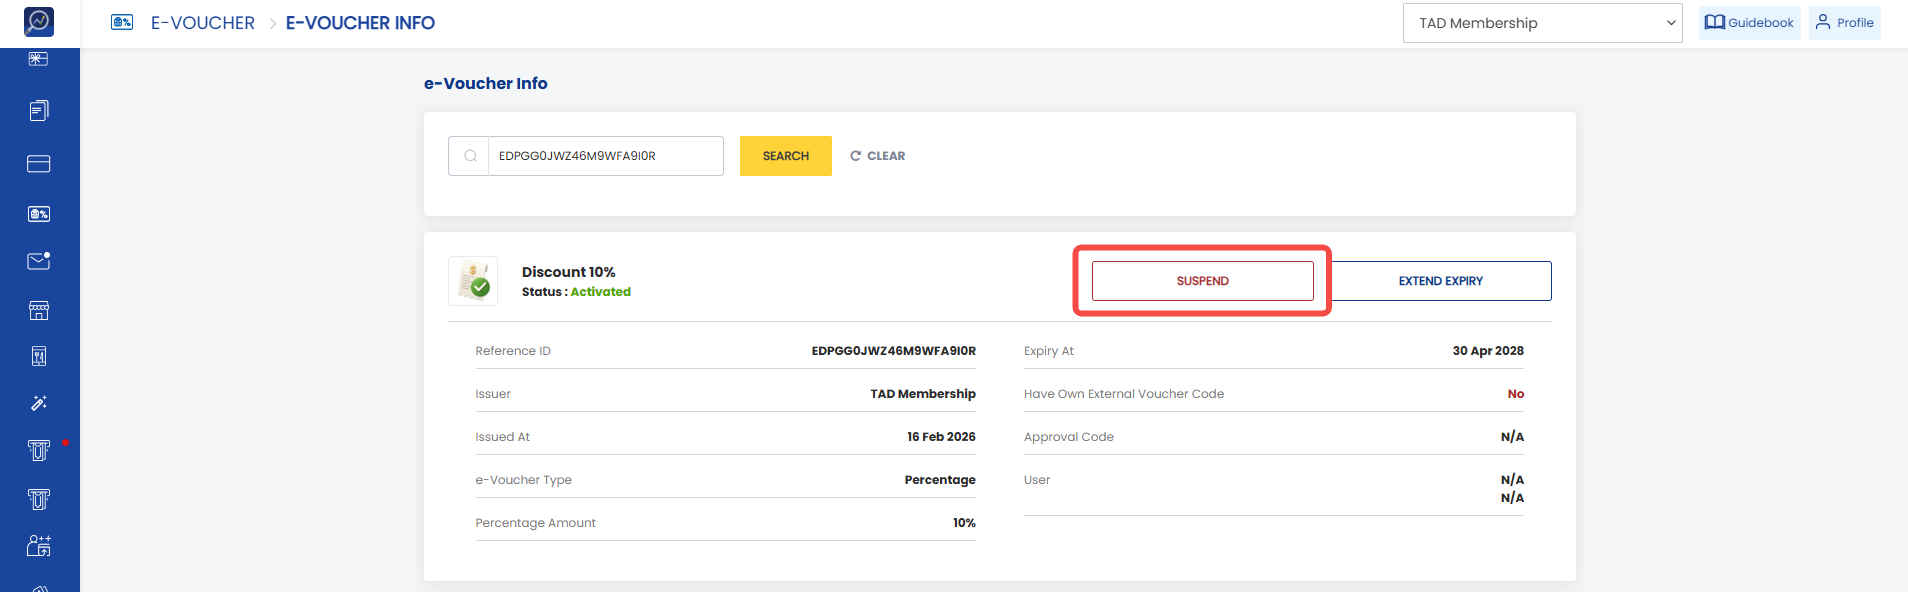 4. Enter a reason in the provided field and click “Suspend”.
How to Extend e-Voucher Expiry
1. Open the “E-Voucher” menu and select “Info”.
2. Enter the Reference ID and click “Search”.
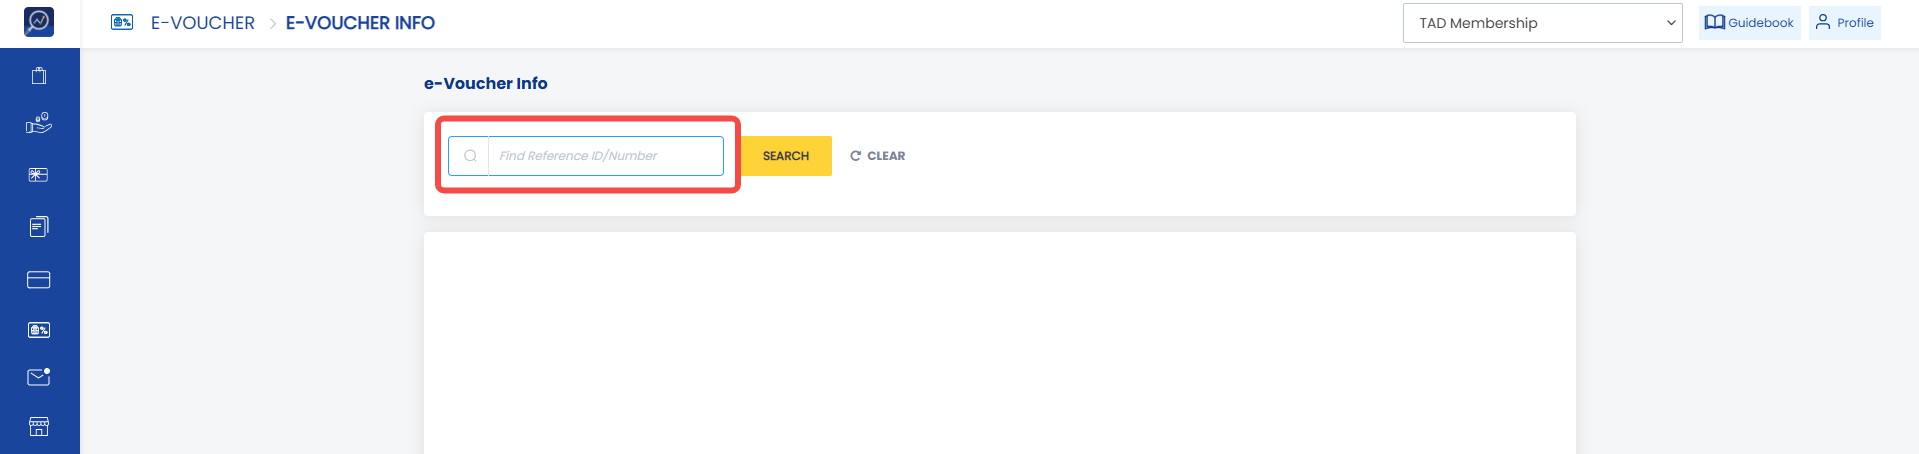 3. If the voucher status is “Activated” or “Expired”, the voucher expiry can still be extended by clicking “Extend Expiry”.
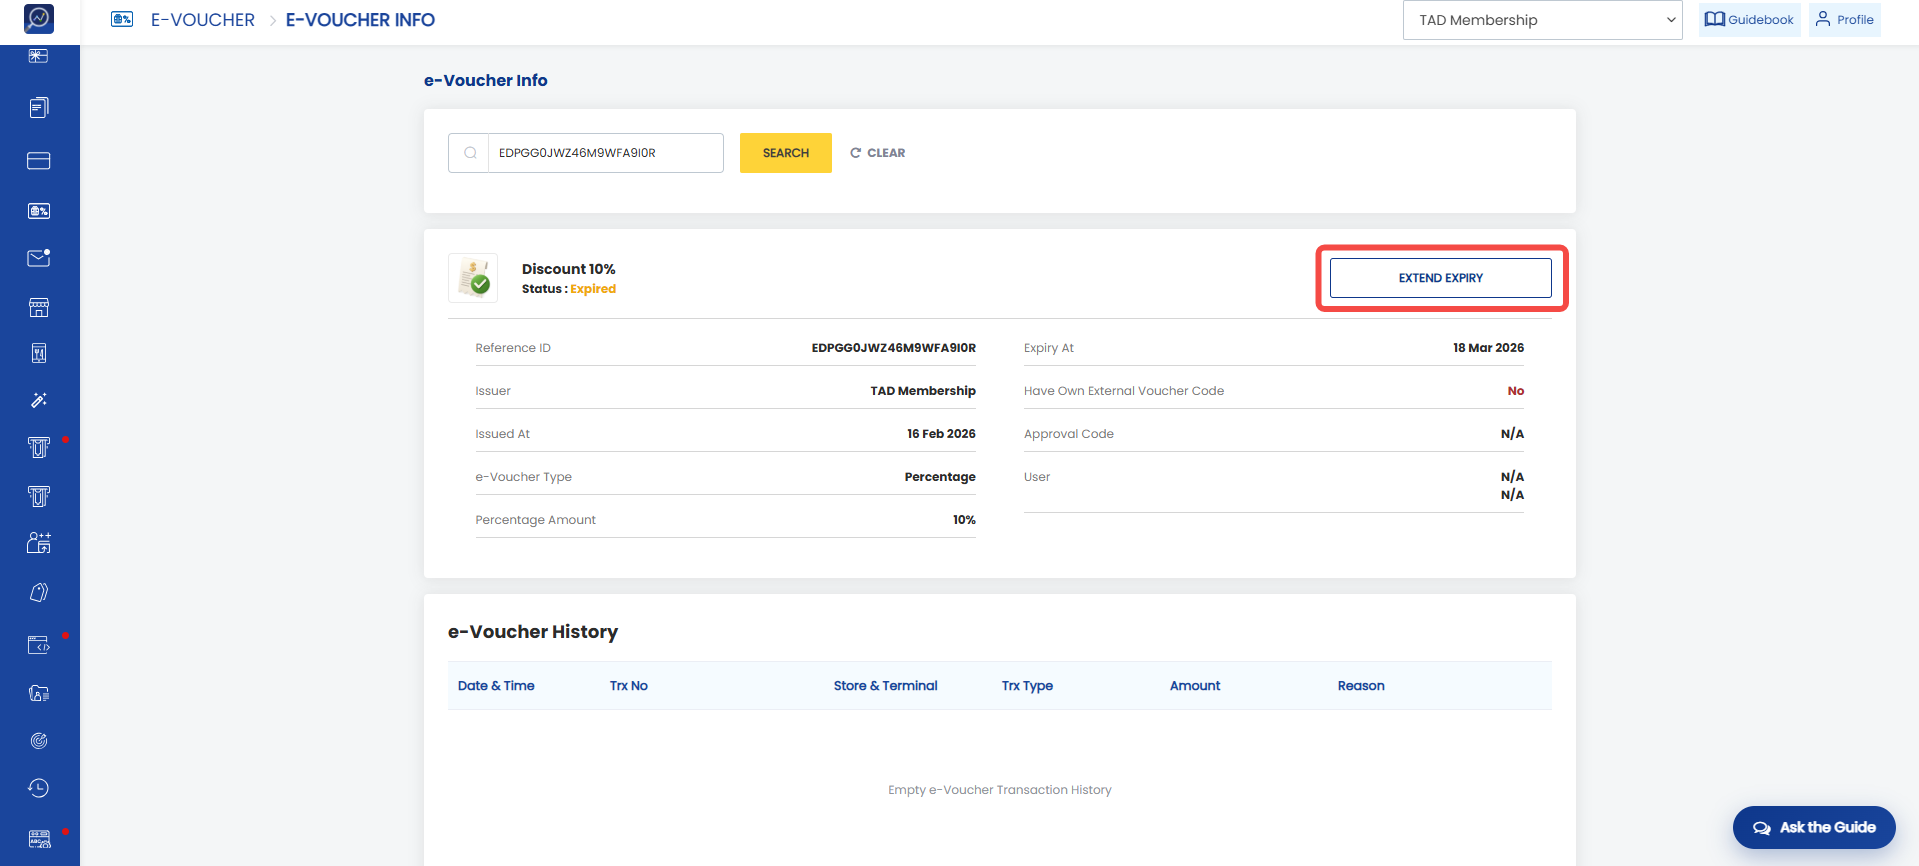 4. Enter the new expiry date in the “Expiry Date” field and provide a reason in the “Reason” field.
5. Click “Extend” to complete the expiry extension process.
How to Unsuspend an e-Voucher
1. Open the “E-Voucher” menu and select “Info”.
2. Enter the Reference ID and click “Search”.
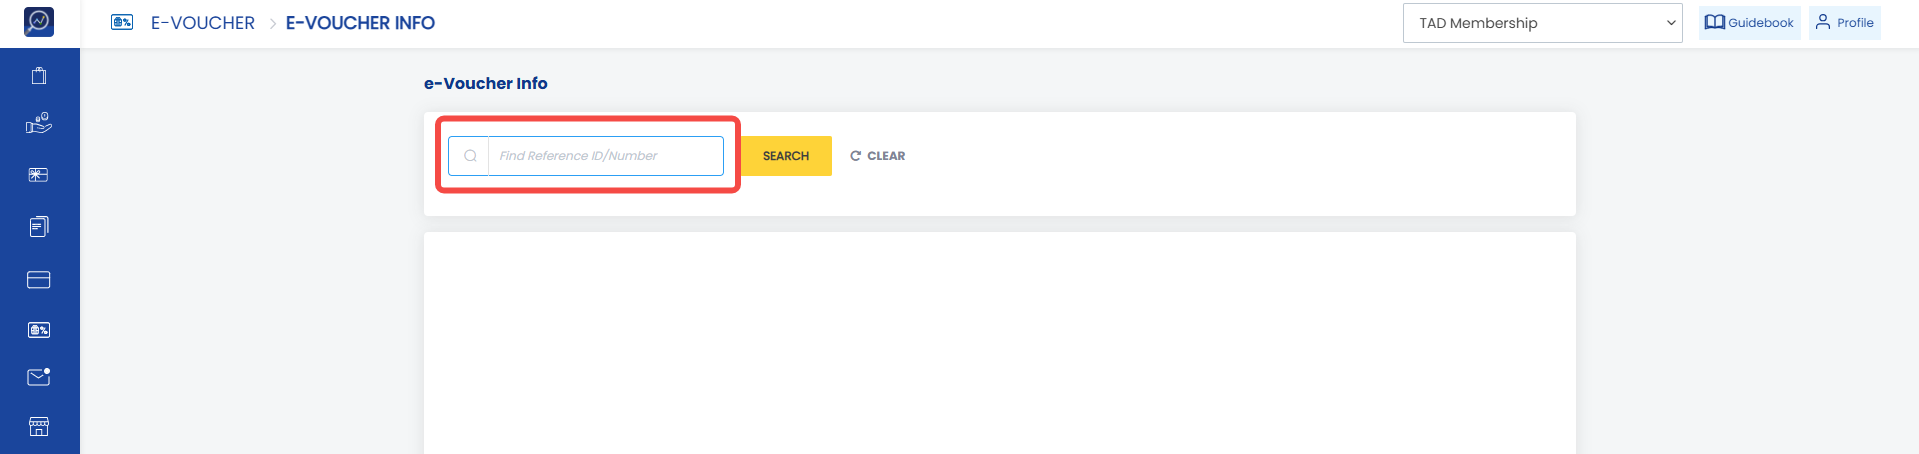 3. If the voucher status is “Suspend”, click “Unsuspend”.
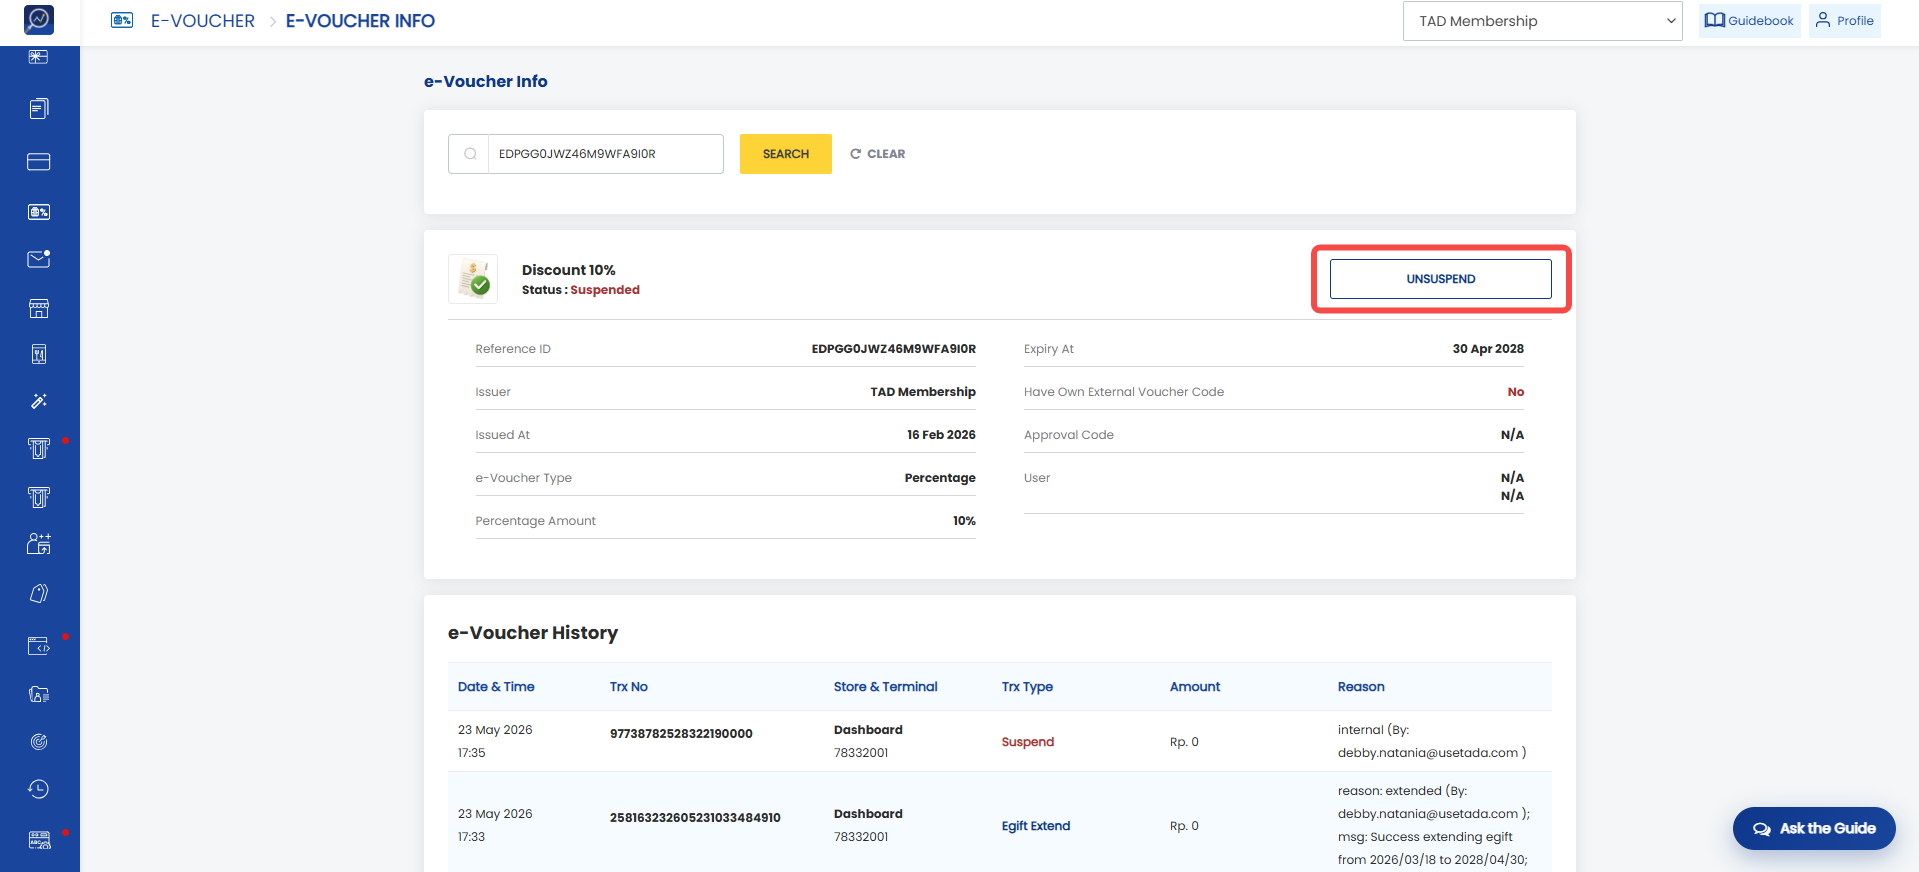 4. Enter the reason in the provided field and click “Unsuspend”.
How to Void an e-Voucher
1. Open the “E-Voucher” menu and select “Info”.
2. Enter the Reference ID and click “Search”.
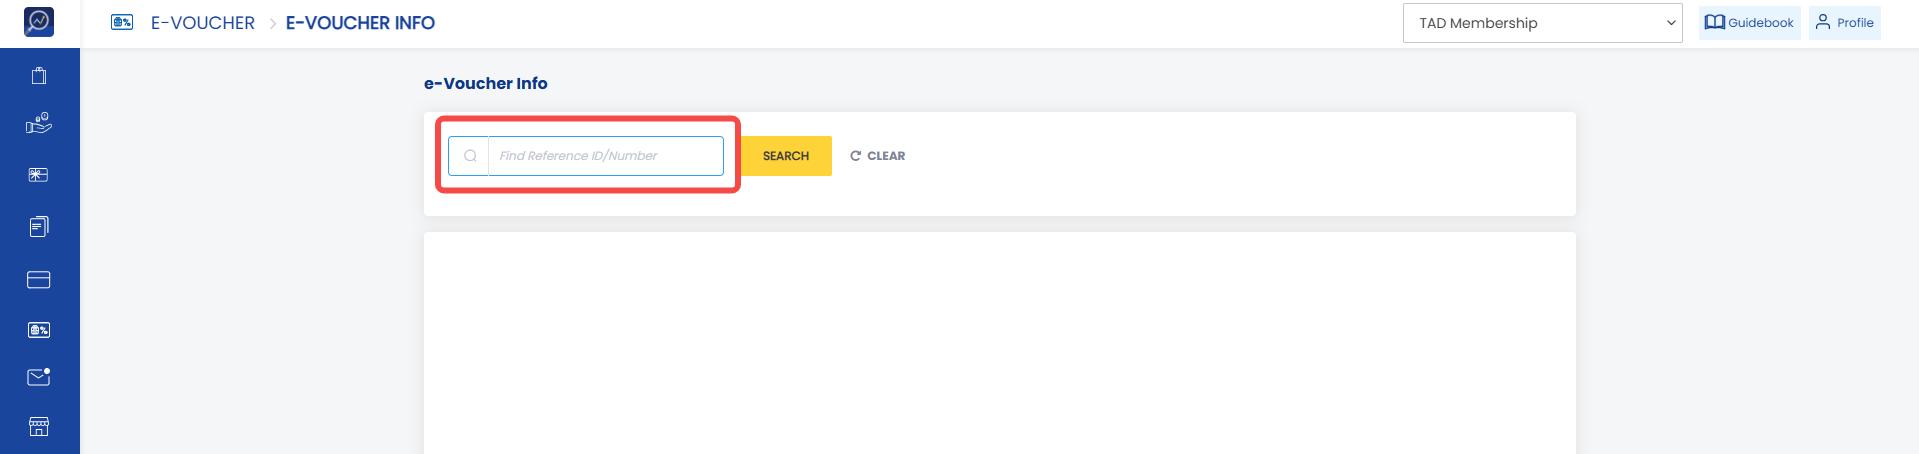 3. If the voucher status is “Used”, click “Void”.
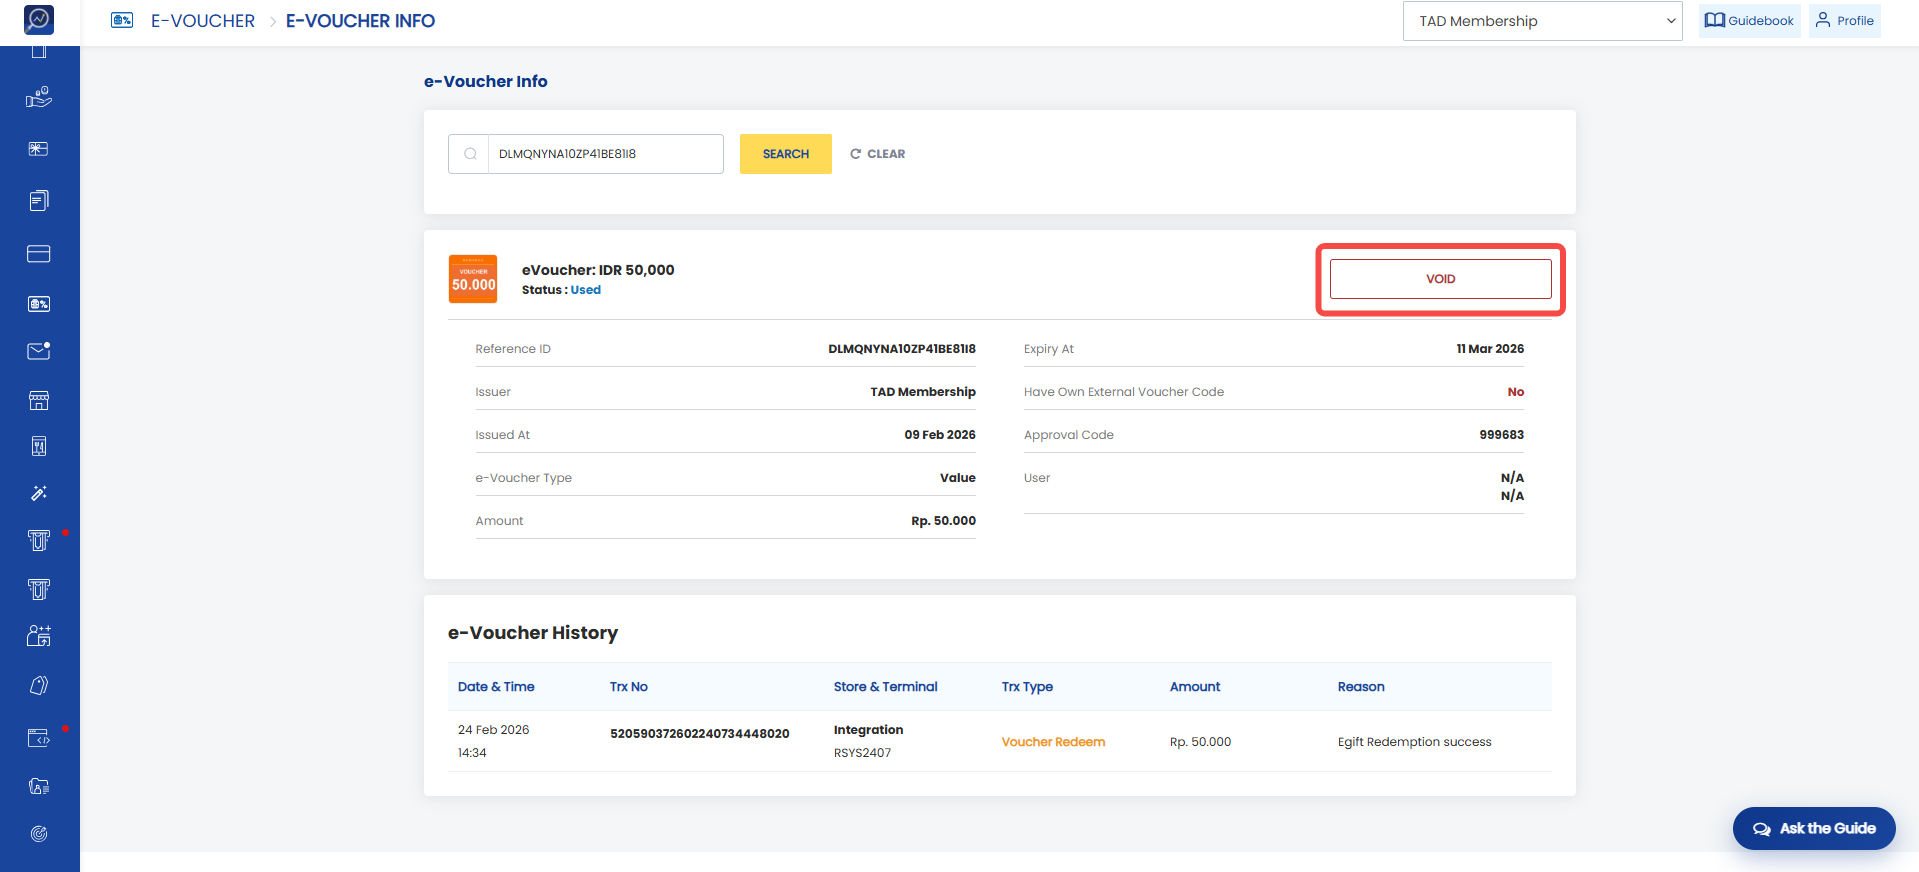 4. Enter the reason in the provided field and click “Void”.
How to Create an e-Voucher
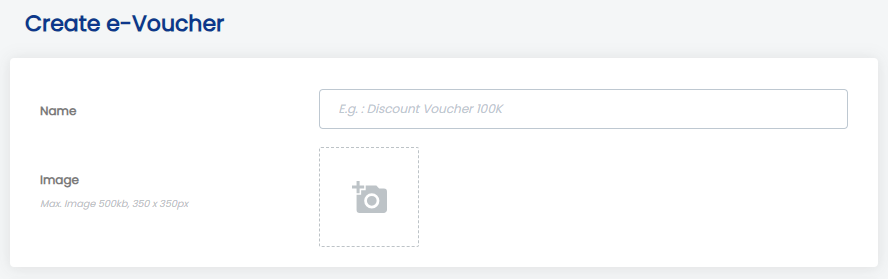
1. Open the “E-Voucher” menu and select “Create e-Voucher”.
2. Enter the Name and upload a voucher image. Recommended image size: 350 x 350 px with a maximum file size of 500 KB.
 3. Specify whether the e-voucher will use a PIN. If the toggle is enabled, the e-voucher will require a PIN.
- The e-Voucher PIN serves as an additional security layer when members access their e-vouchers. This feature should only be disabled if there is a clear business requirement to remove the security layer.
- If the client changes the setting from Yes → No, only newly created e-vouchers will follow the new PIN configuration. Existing e-vouchers will retain their original PIN settings.
 4. Complete e-voucher details
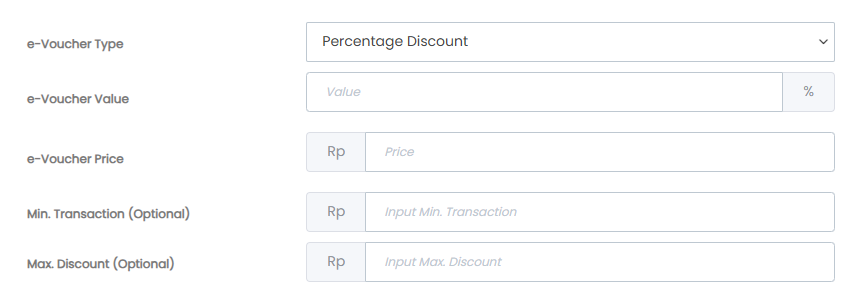 Available settings include:
- Voucher Type: Determines whether the voucher is a Nominal Value, Free Item, or Percentage Discount voucher.
- E-Voucher Value: Available when Nominal Value is selected. Defines the transaction deduction amount.
- Minimum Transaction: Available for Nominal Value and Percentage Discount vouchers. Defines the minimum transaction amount required to redeem the voucher.
- Value: Available when Percentage Discount is selected. Defines the discount percentage.
- Maximum Discount: Available when Percentage Discount is selected. Defines the maximum discount amount.
- SKU: Available when Free Item is selected. Enter the SKU of the free item.
- Item Value: Available when Free Item is selected. Defines the value of the free item SKU.
5. If the voucher being created will be displayed in the catalog, enable the following toggle.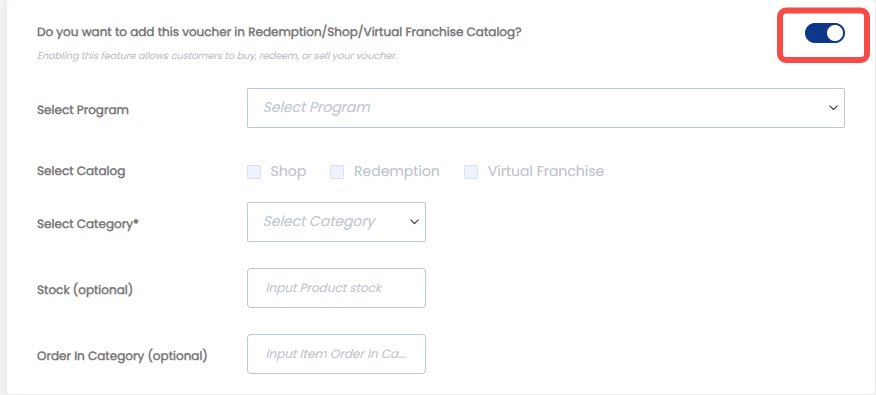 By enabling this parameter, the created voucher will appear in the selected catalog. When this parameter is enabled, users need to complete the following additional parameters:
- Program: Determine in which program the created voucher will appear. The available options will display all owned programs.
- Catalog: Determine in which catalog the voucher will appear. There are three catalog options: shop, redemption, and virtual franchise.
- Category: Determine the category for the voucher being created. If users want to create a new category, click “Add new category” and enter the category name in the provided field. If users want to use an existing category, click one of the available category names.
- Stock: Enter the voucher stock quantity.
- Order in category: Enter the voucher order within the selected category.
6. Enter the terms and conditions in the “Terms & conditions” field and the e-voucher description. Users can use text formatting such as bold, italic, underline, and others.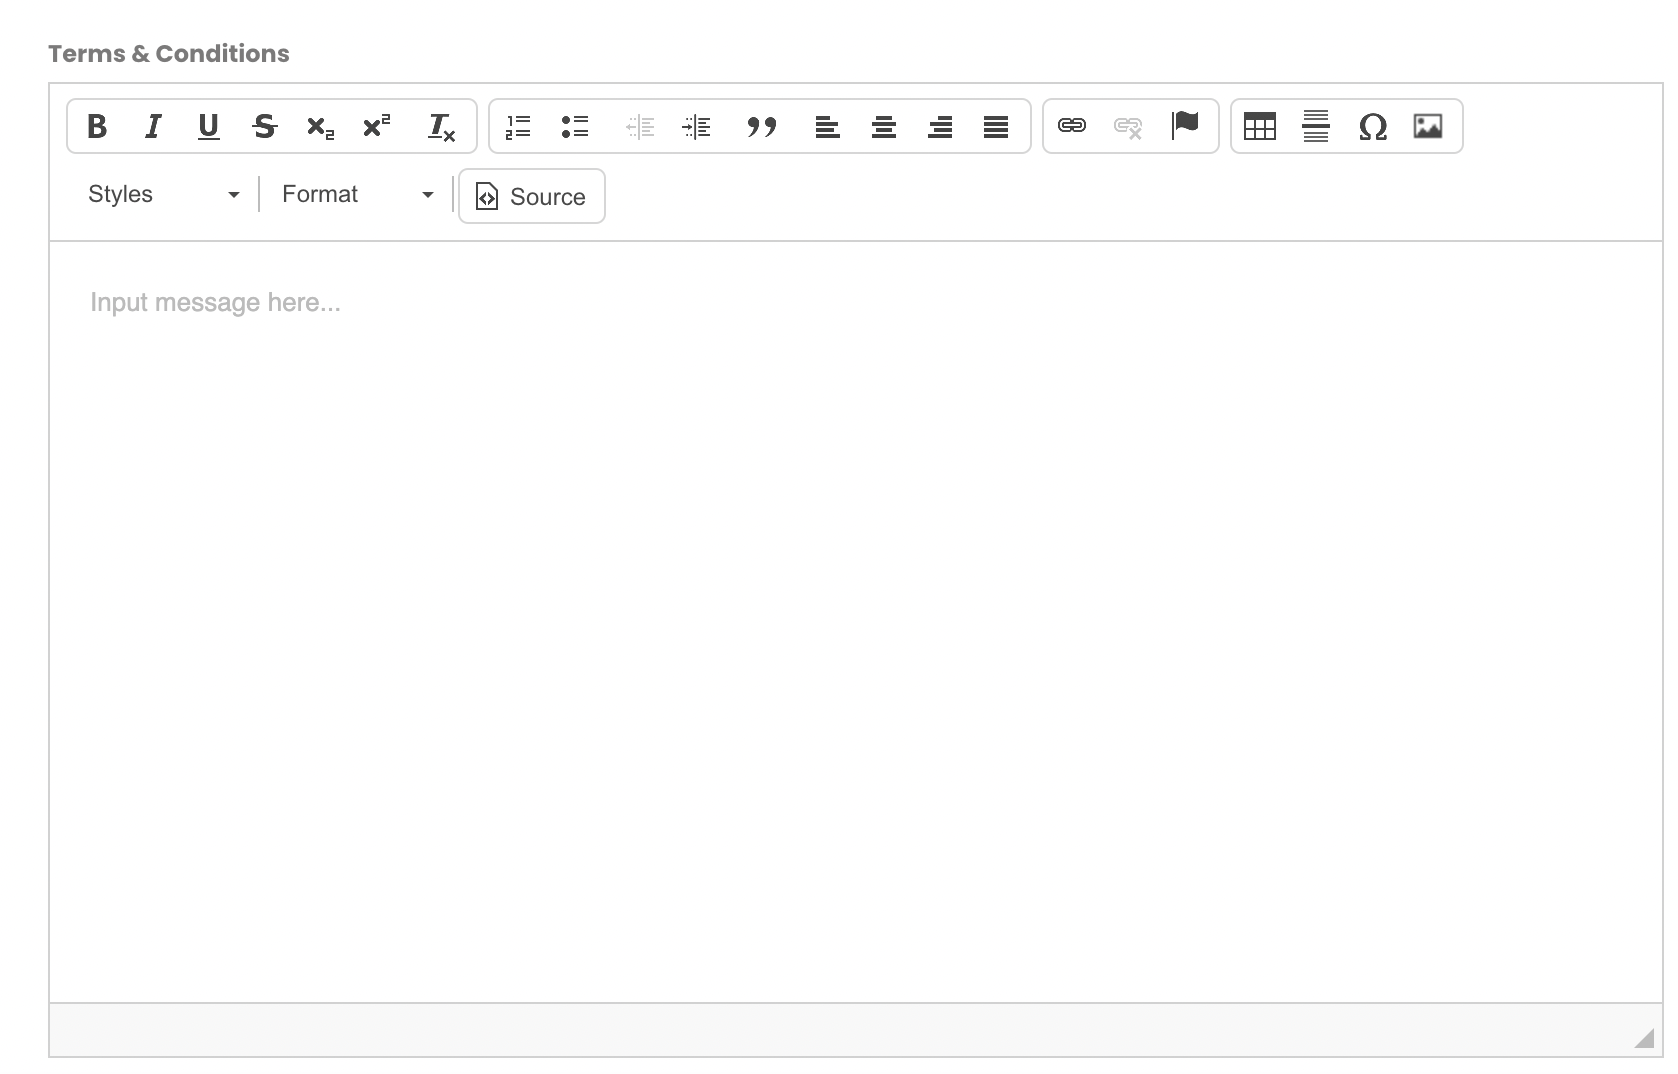 7. Next is determining the e-voucher expiry. There are three options available:
- No expiry: The e-voucher has no expiry date.
- Days: The e-voucher will expire after a specified number of days from generation.
- Specific date: The e-voucher will expire on a specific date that has been determined.
 8. Determine the e-voucher redemption method by selecting the following two options:
- In-Store Redemption: Redemption is done at a store and requires a cashier/terminal code.
- Delivery: Dedicated to clients using the Delivery Order menu.
 9. Determine in which stores the e-voucher can be used. This can be configured in the make e-voucher available in specific store parameter. If users want the e-voucher to be redeemable only at specific stores, enable the toggle and select the desired stores.
 10. If the user has their own voucher codes, they can use them by turning the "Do you want to use your own voucher code?" parameter ON. The user must download the template, enter the voucher codes into it, and then upload the completed template.
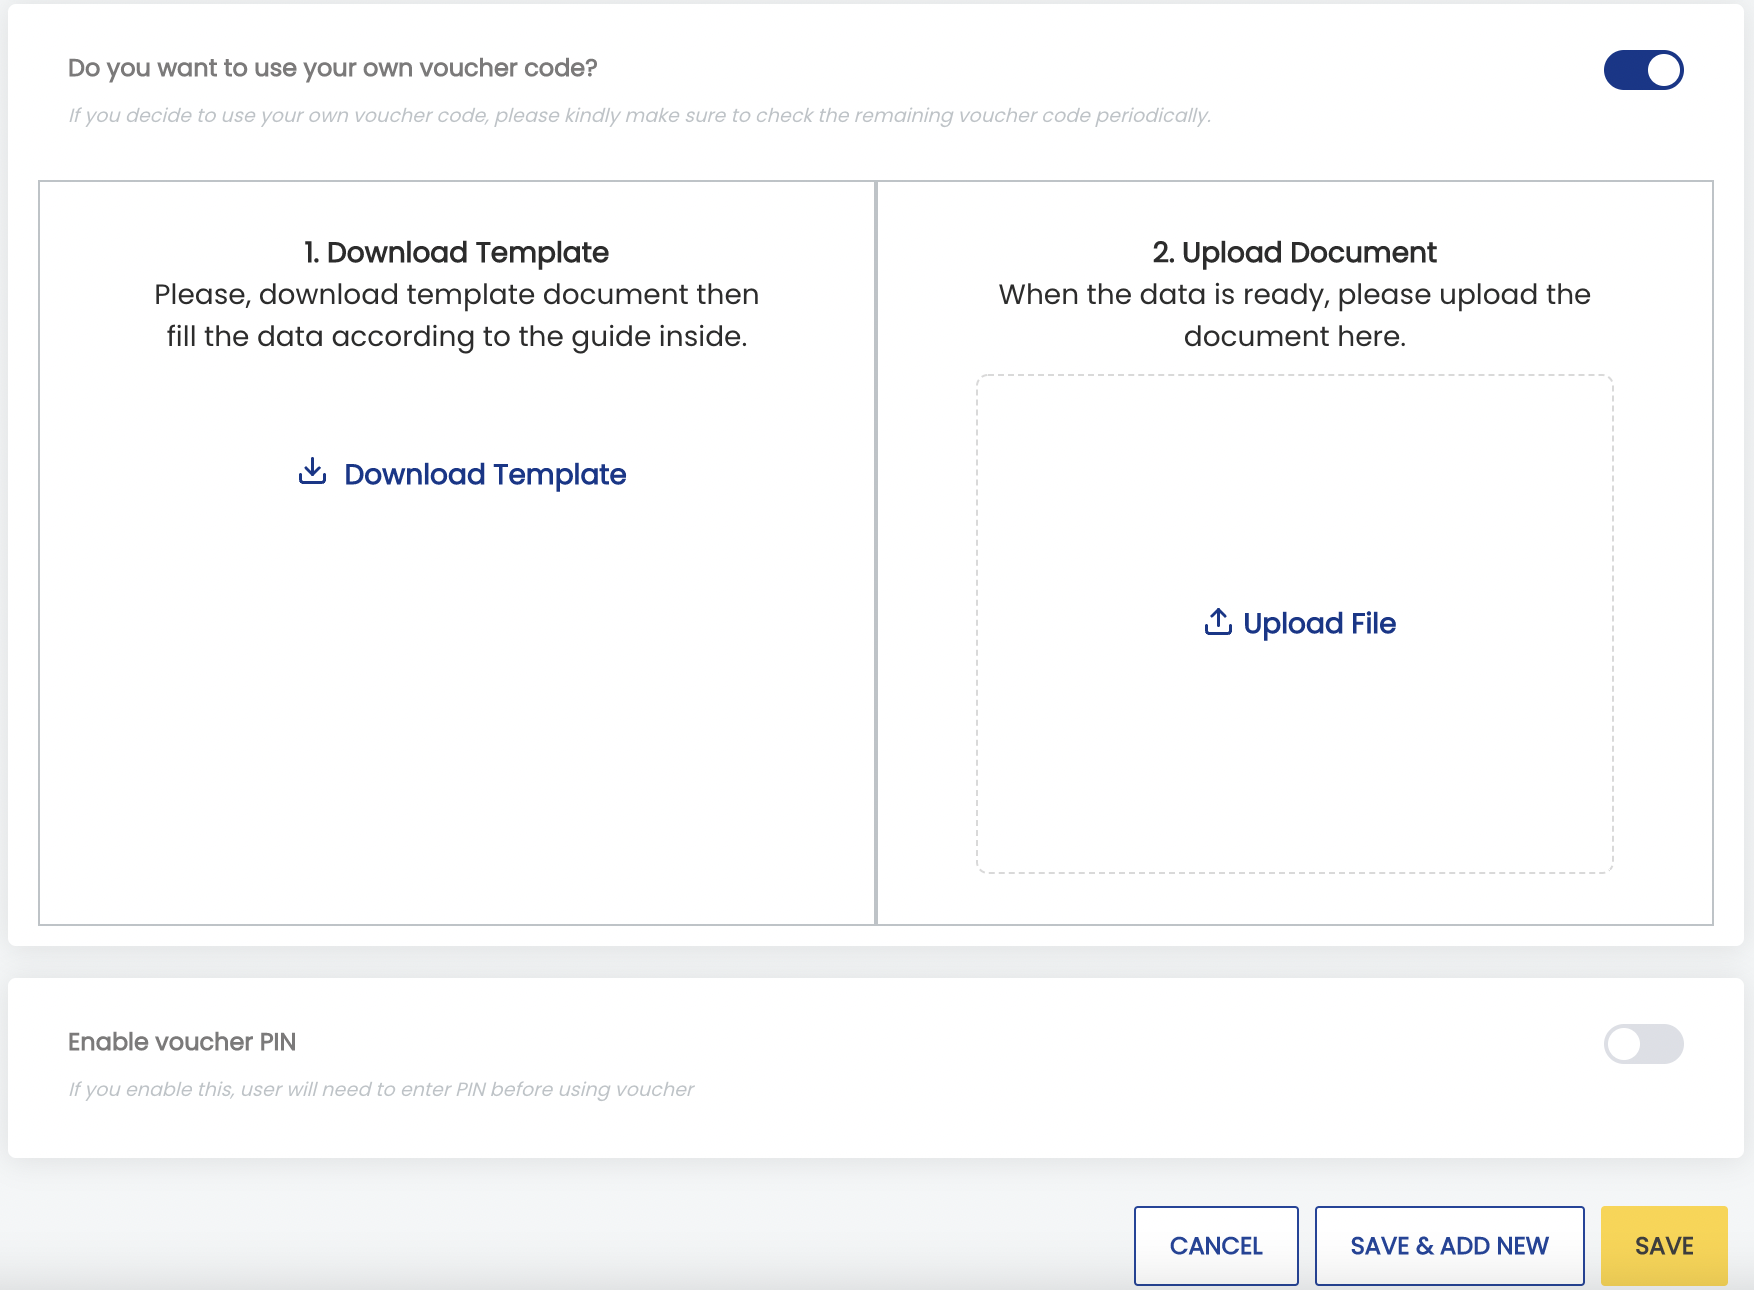 11. Click “Save & Add New” to complete the e-voucher creation process. To view the created e-voucher, go to the e-Voucher List submenu.
How to View the e-Voucher Delivery List
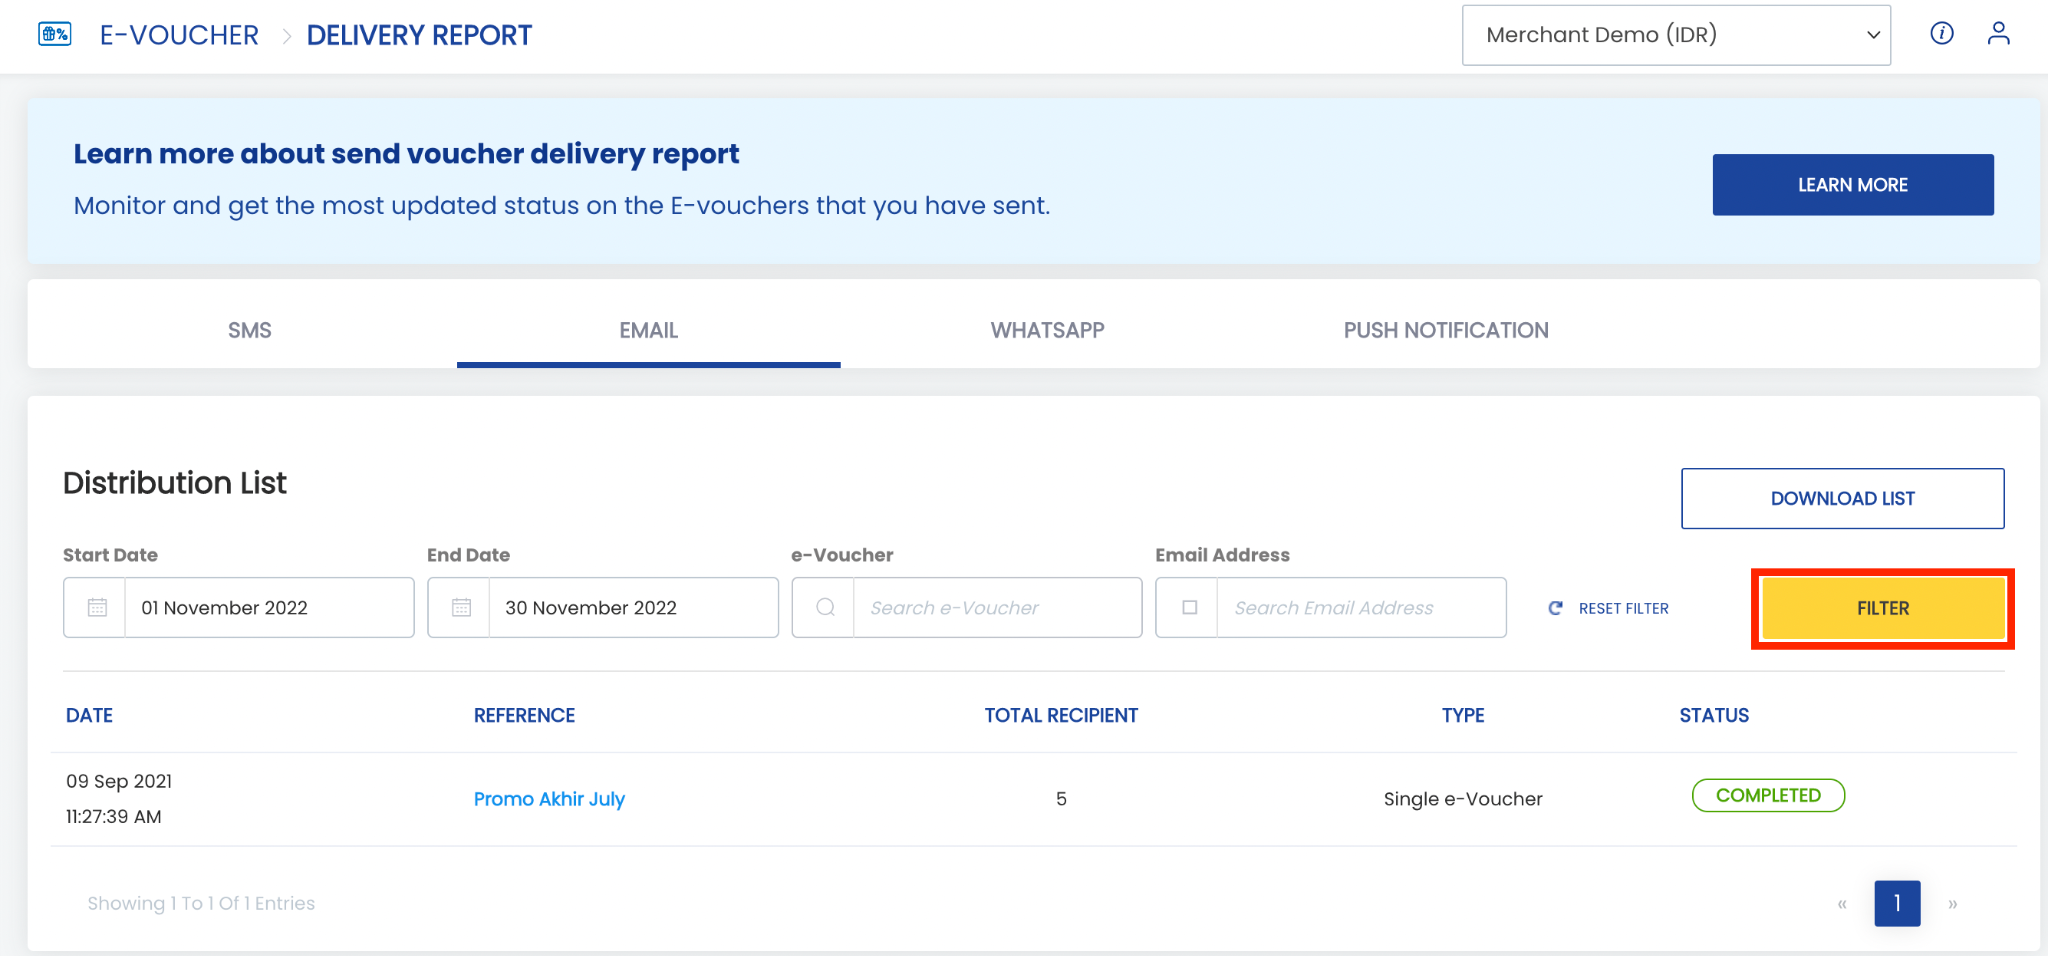
1. Open the “E-voucher” menu, then select the “Delivery report” submenu.
2. Click one of the channels to view the voucher delivery list.
 3. To simplify voucher searches, the following filters are available:
- Date: Enter the date range when a voucher was sent.
- E-voucher: Enter the voucher number or Reference ID.
- Phone number/email: Enter the phone number/email of the voucher recipient
4. Finally, click “Filter”.
Steps to Download the Delivery Report
1. Open the “E-voucher” menu, then select the “Delivery report” submenu.
2. Click one of the channels to view the voucher delivery list.3. Click “Download list”, then enter the destination email for the report.4. Click “Send to email” How to Resend an e-Voucher Delivery
1. Open the “E-voucher” menu, then select the “Delivery report” submenu.
2. Click one of the channels to view the voucher delivery list that will be resent. 3. Click one of the references to enter the e-Voucher Sent page.
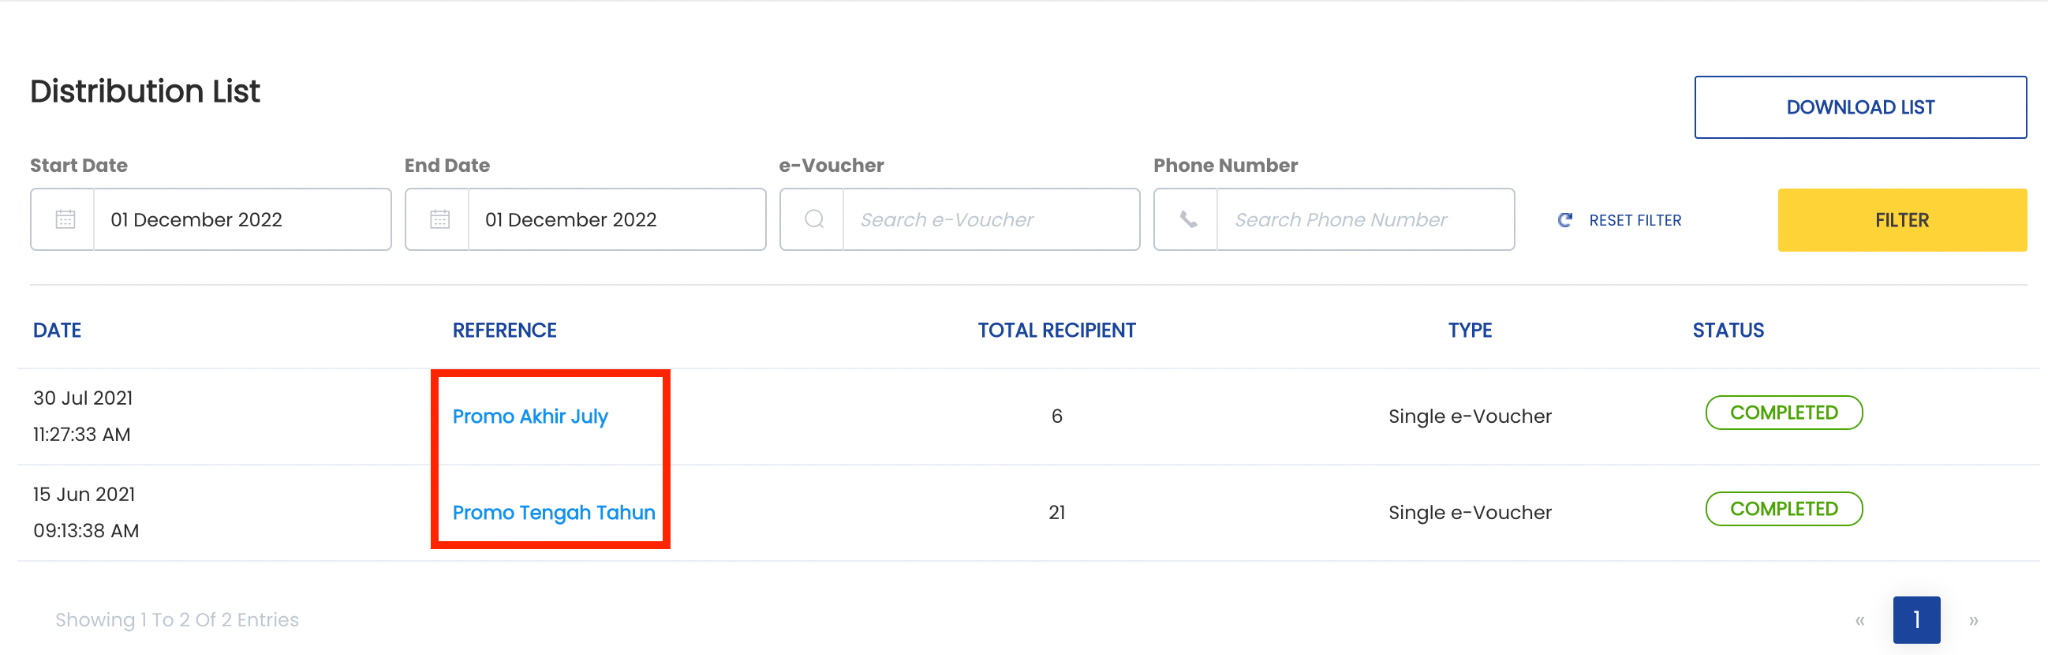 4. Click “Resend” on one of the recipients to resend the e-voucher. Brands can also resend to multiple recipients at once by selecting the recipient checkboxes and then clicking “Resend”.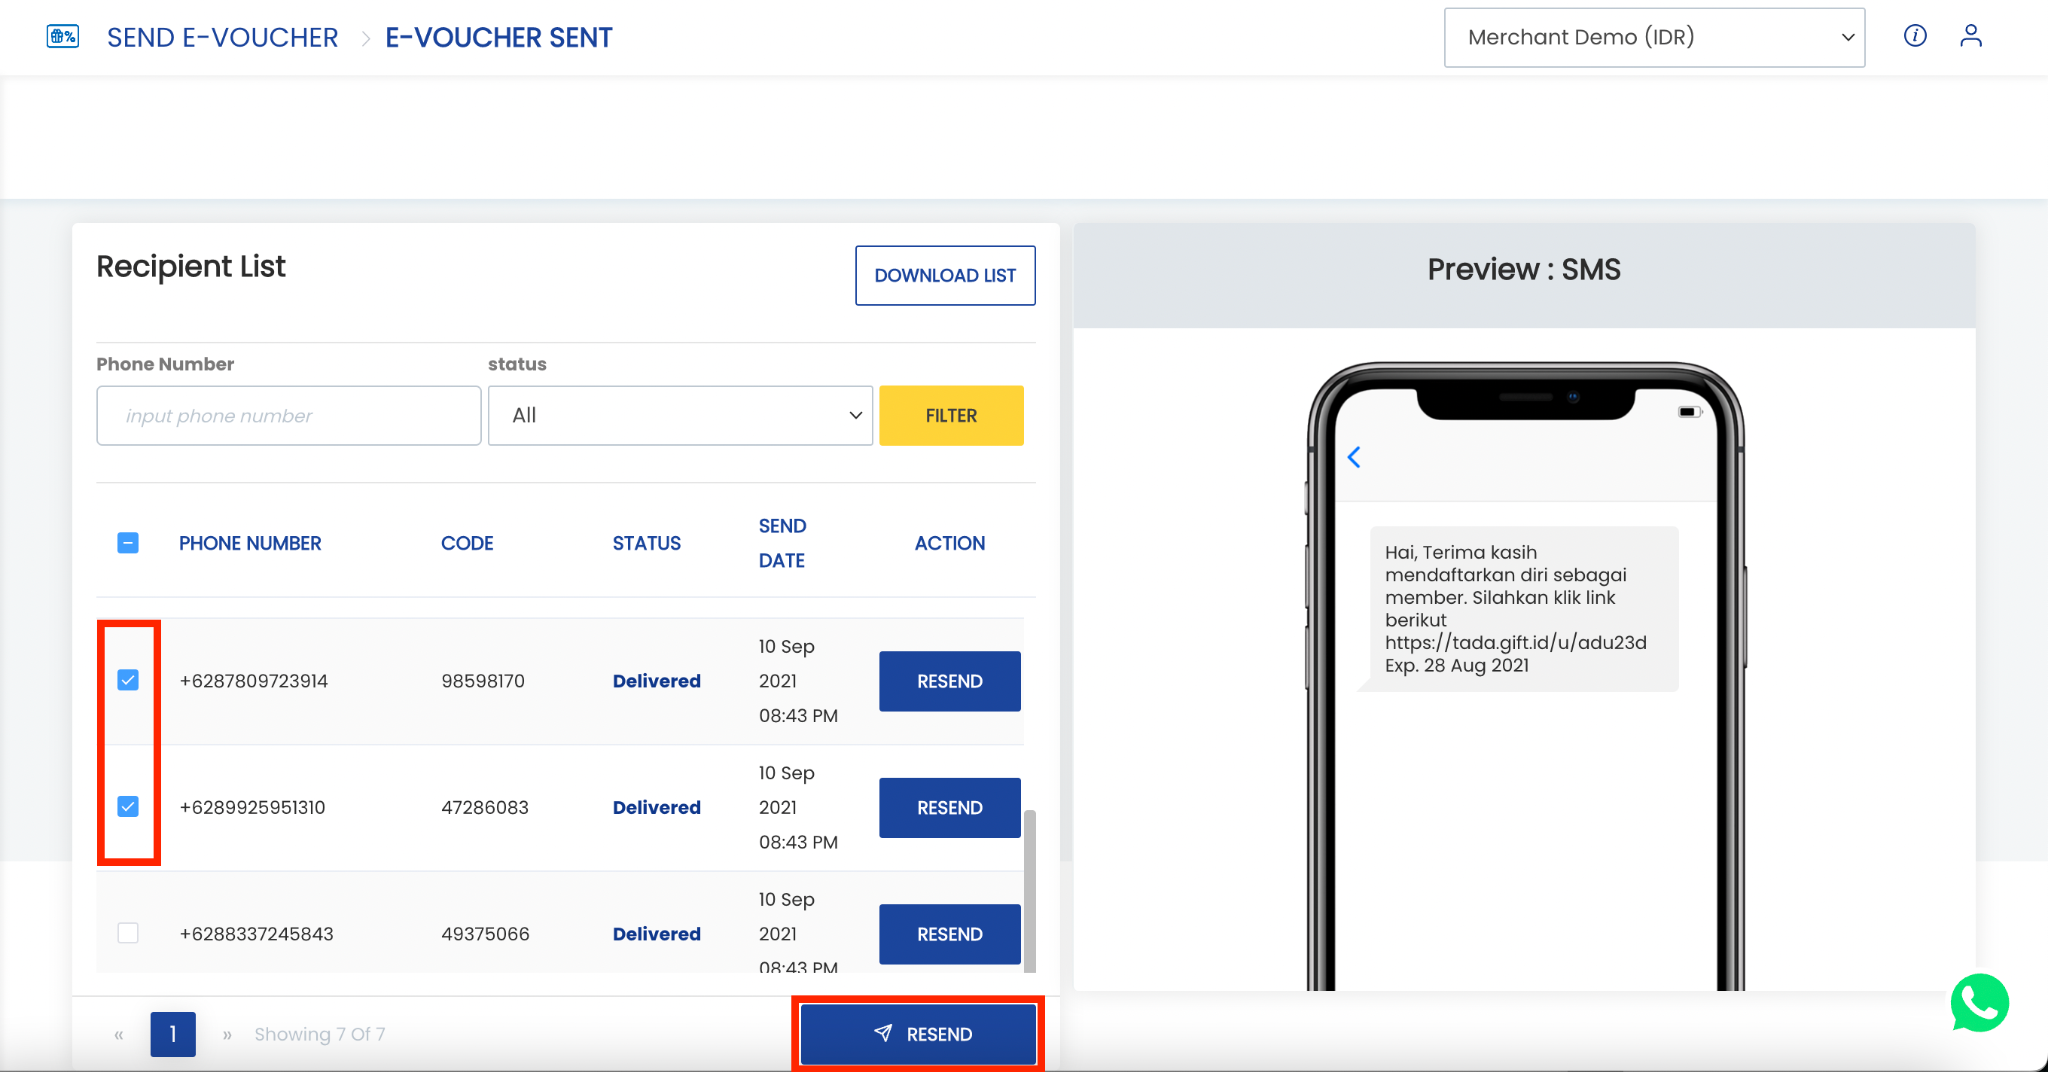
How to View e-Voucher Details in the Delivery Report
1. Open the “E-voucher” menu, then select the “Delivery report” submenu.
2. Click “Reference” to view the details of the delivered e-voucher.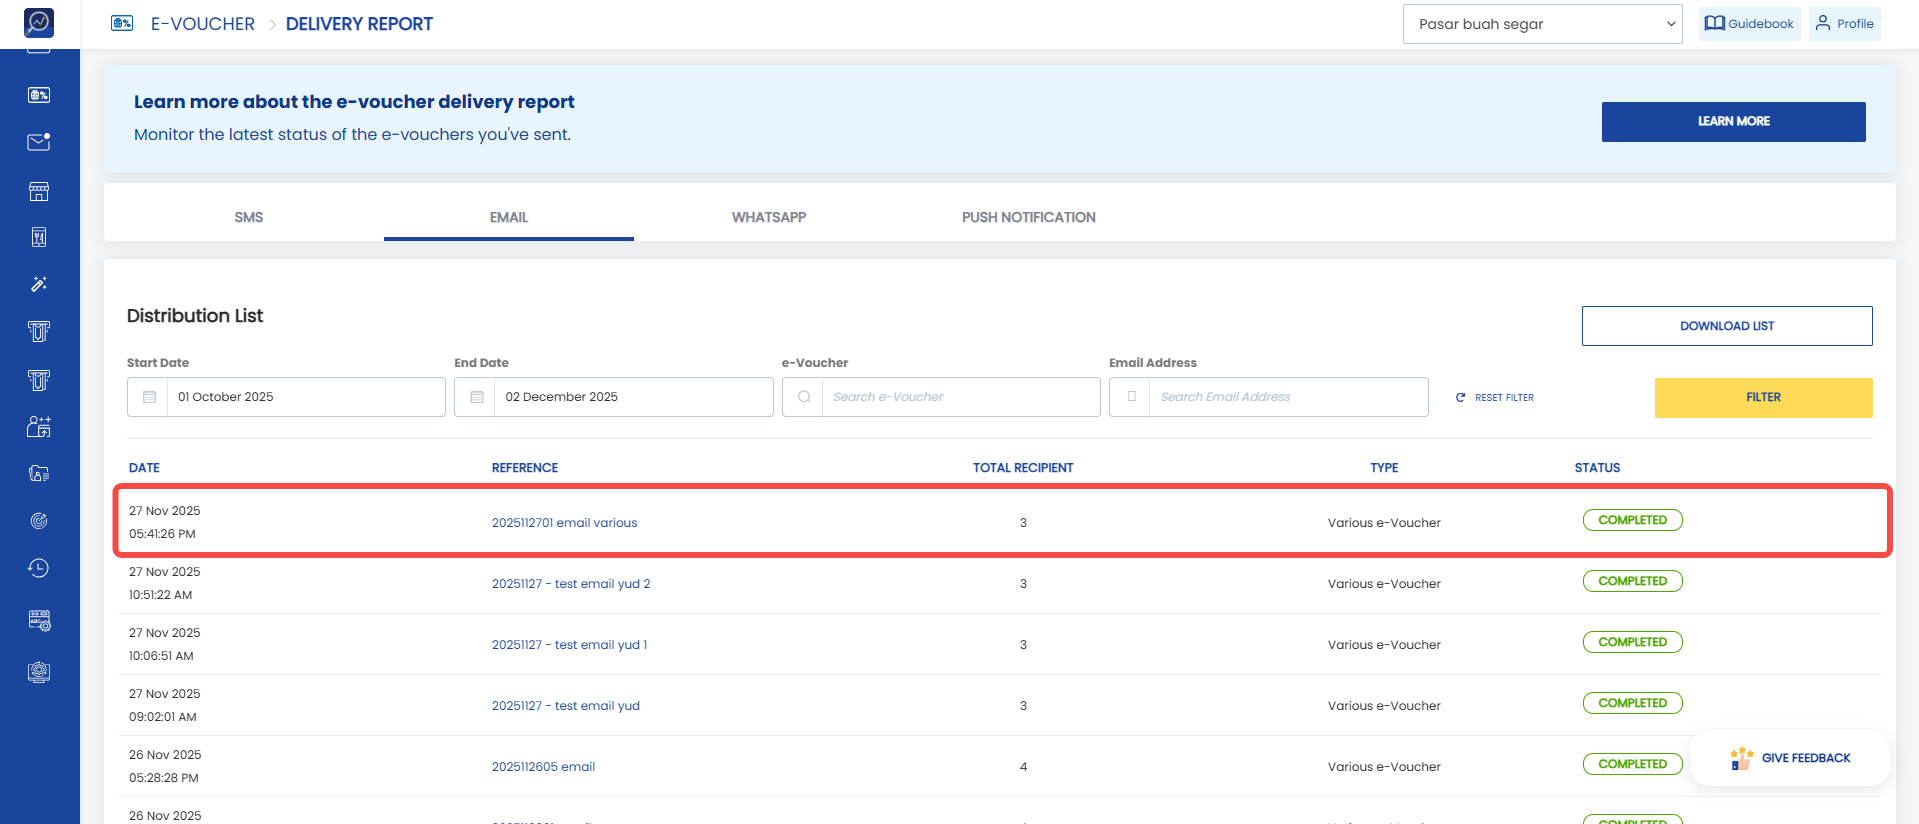 3. Click “E-Voucher Details”
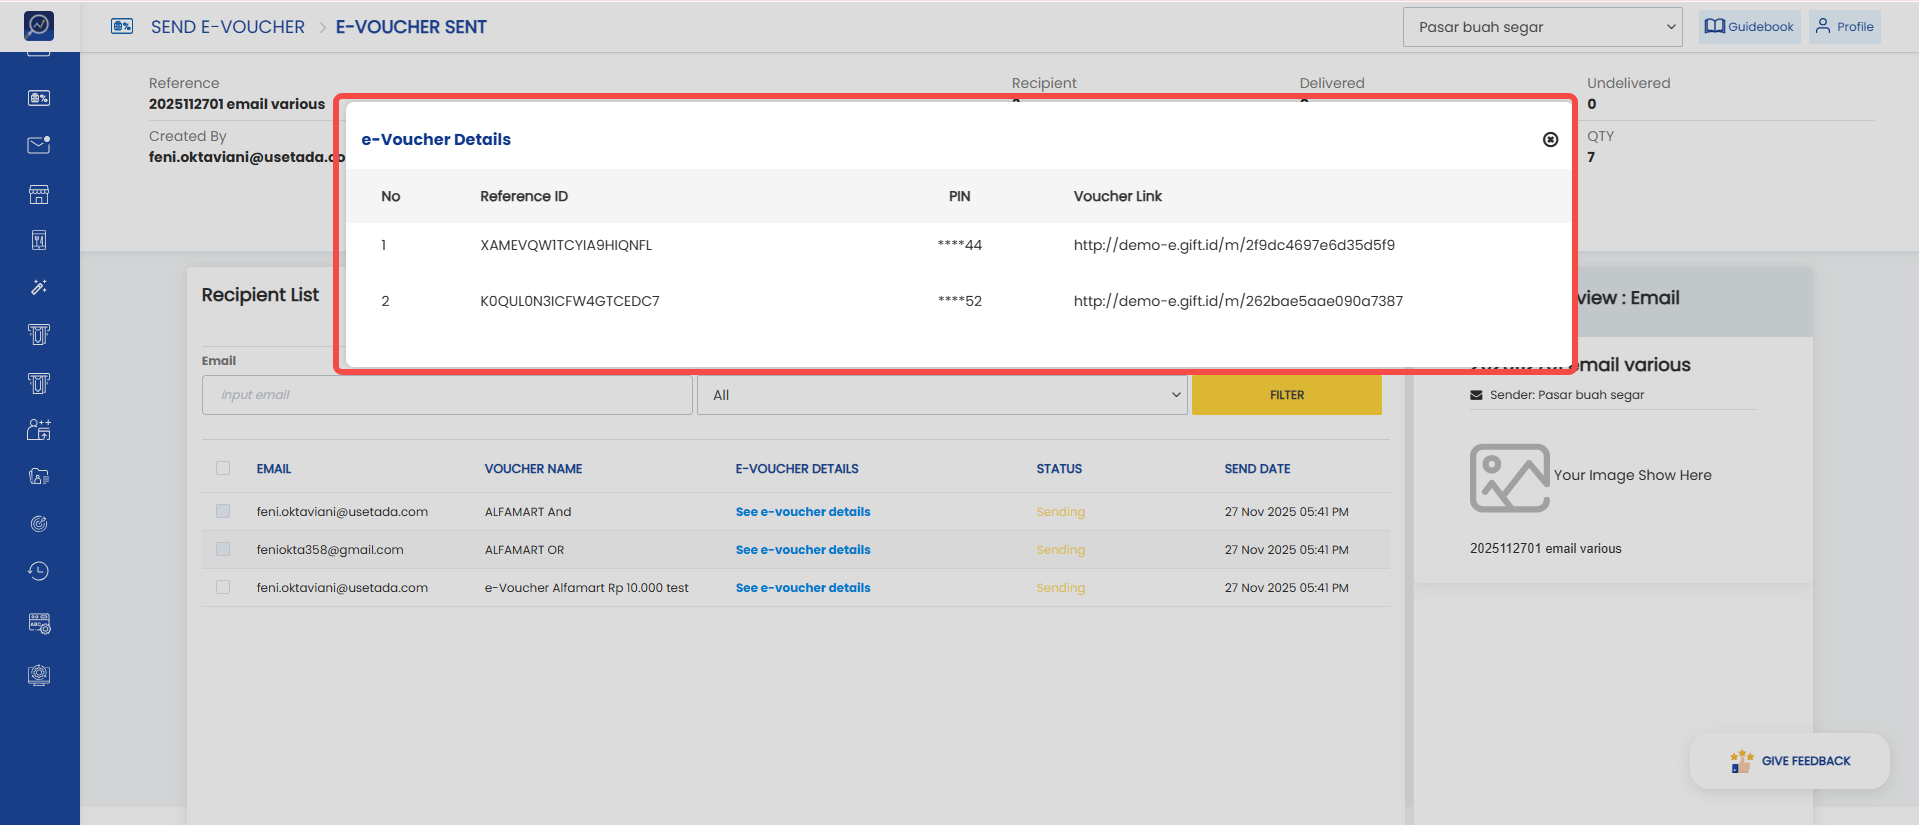
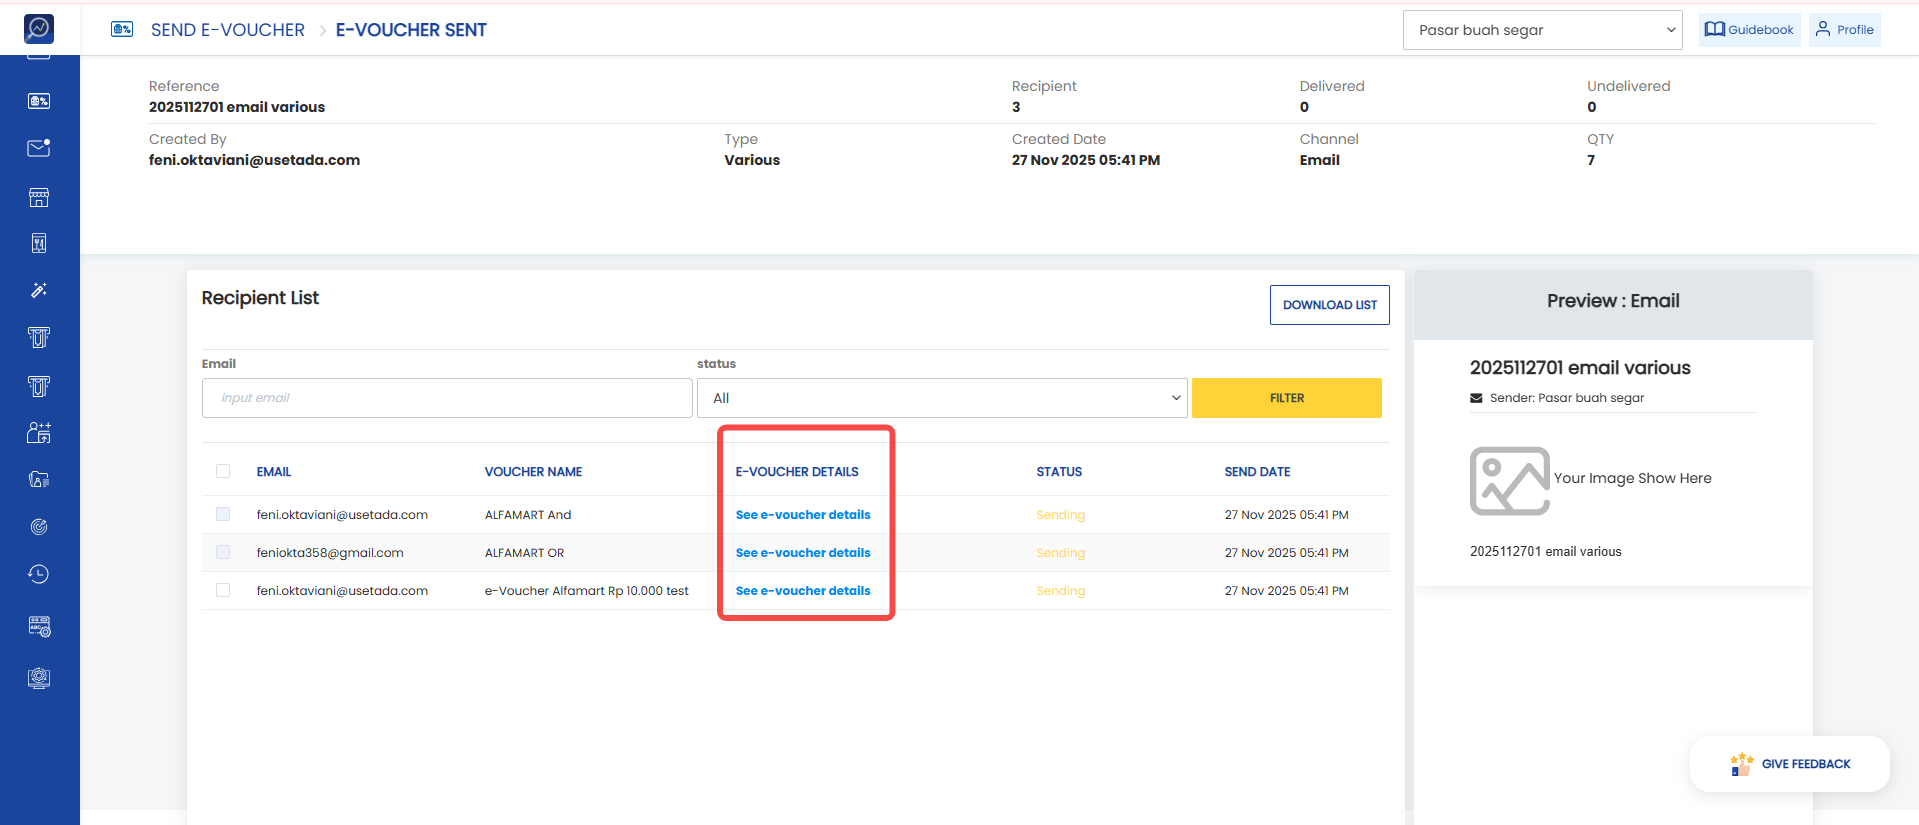 4. A popup will appear displaying the following information:
- Reference ID: e-voucher identifier
- PIN: Code used to open the e-voucher
- Voucher Link: Link used to access the e-voucher
How to View the e-Voucher List in e-Voucher Summary
1. Open the “E-voucher” menu, then select the “Summary” submenu.
2. Scroll to the “e-Voucher Generated List” section.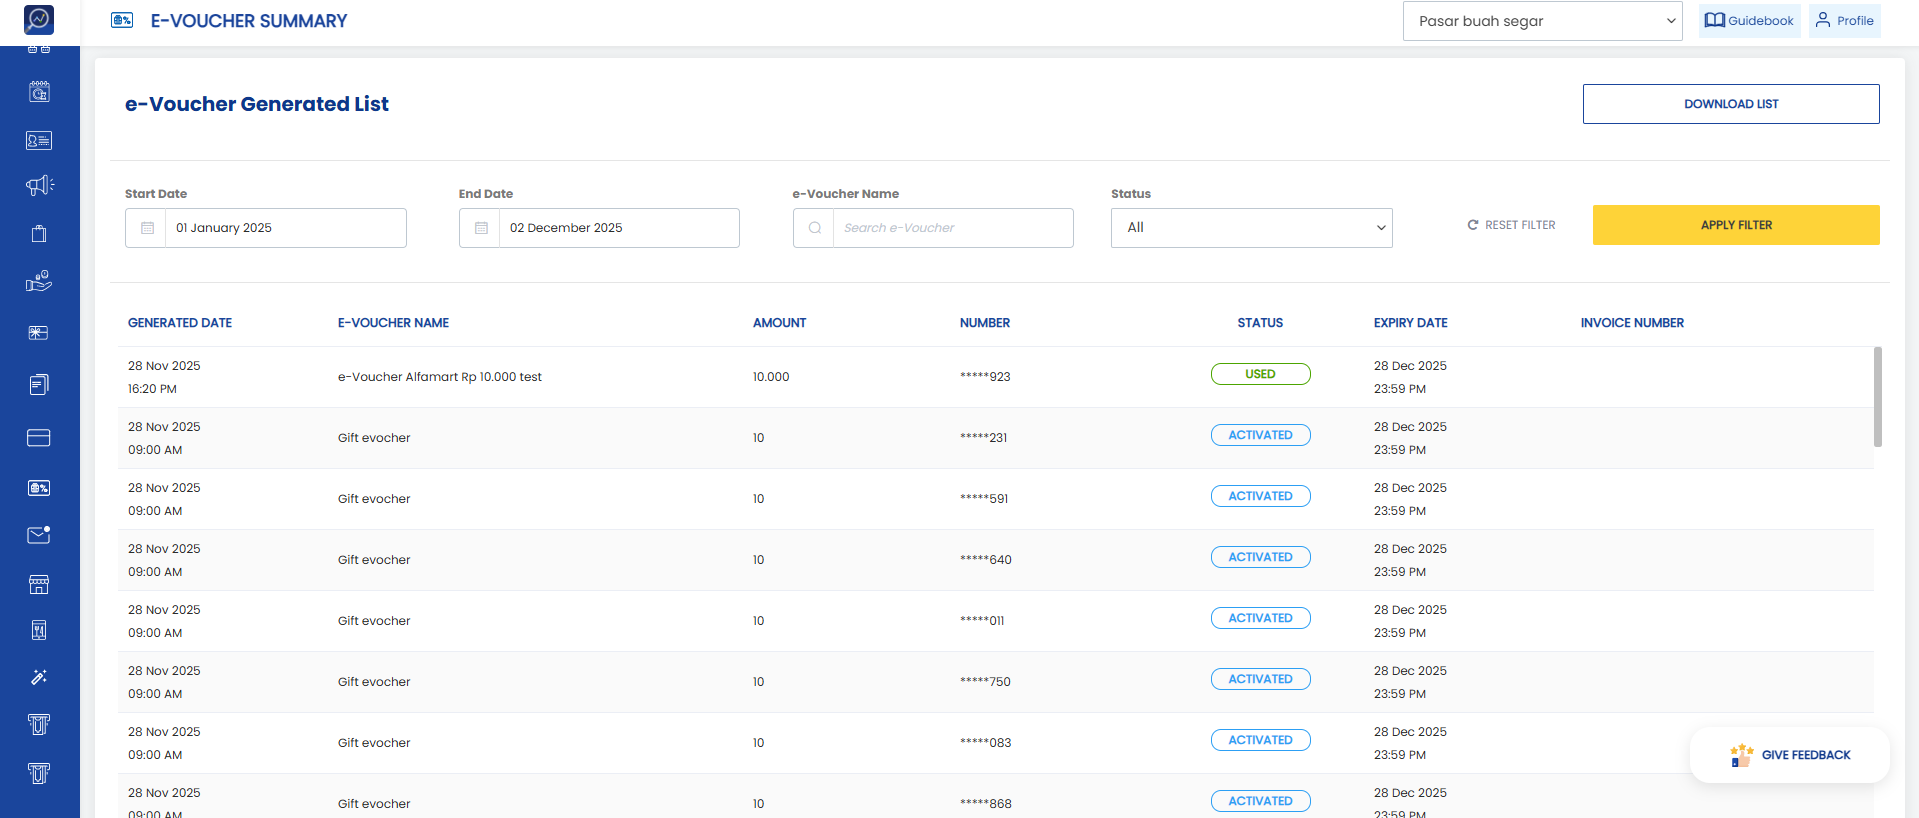 The e-voucher list data will be displayed with the following information:
- Generated date
- e-Voucher name
- Amount
- Number
- Reference ID
- Status
- Expiry date
- Invoice number
Use filters to simplify searches. Available filters:
- Start date
- End date
- e-Voucher name
- Status
How to View e-Voucher Details in e-Voucher Info
1. Open the “E-voucher” menu, then select the “Info” submenu.
2. Enter the e-Voucher Reference ID or e-Voucher code, then click the “Search” button.
3. Detailed e-Voucher information will appear:
- Reference ID
- Issuer
- e-Voucher Type
- Amount
- Issued at
- Expiry at
- External Code
- Approval Code
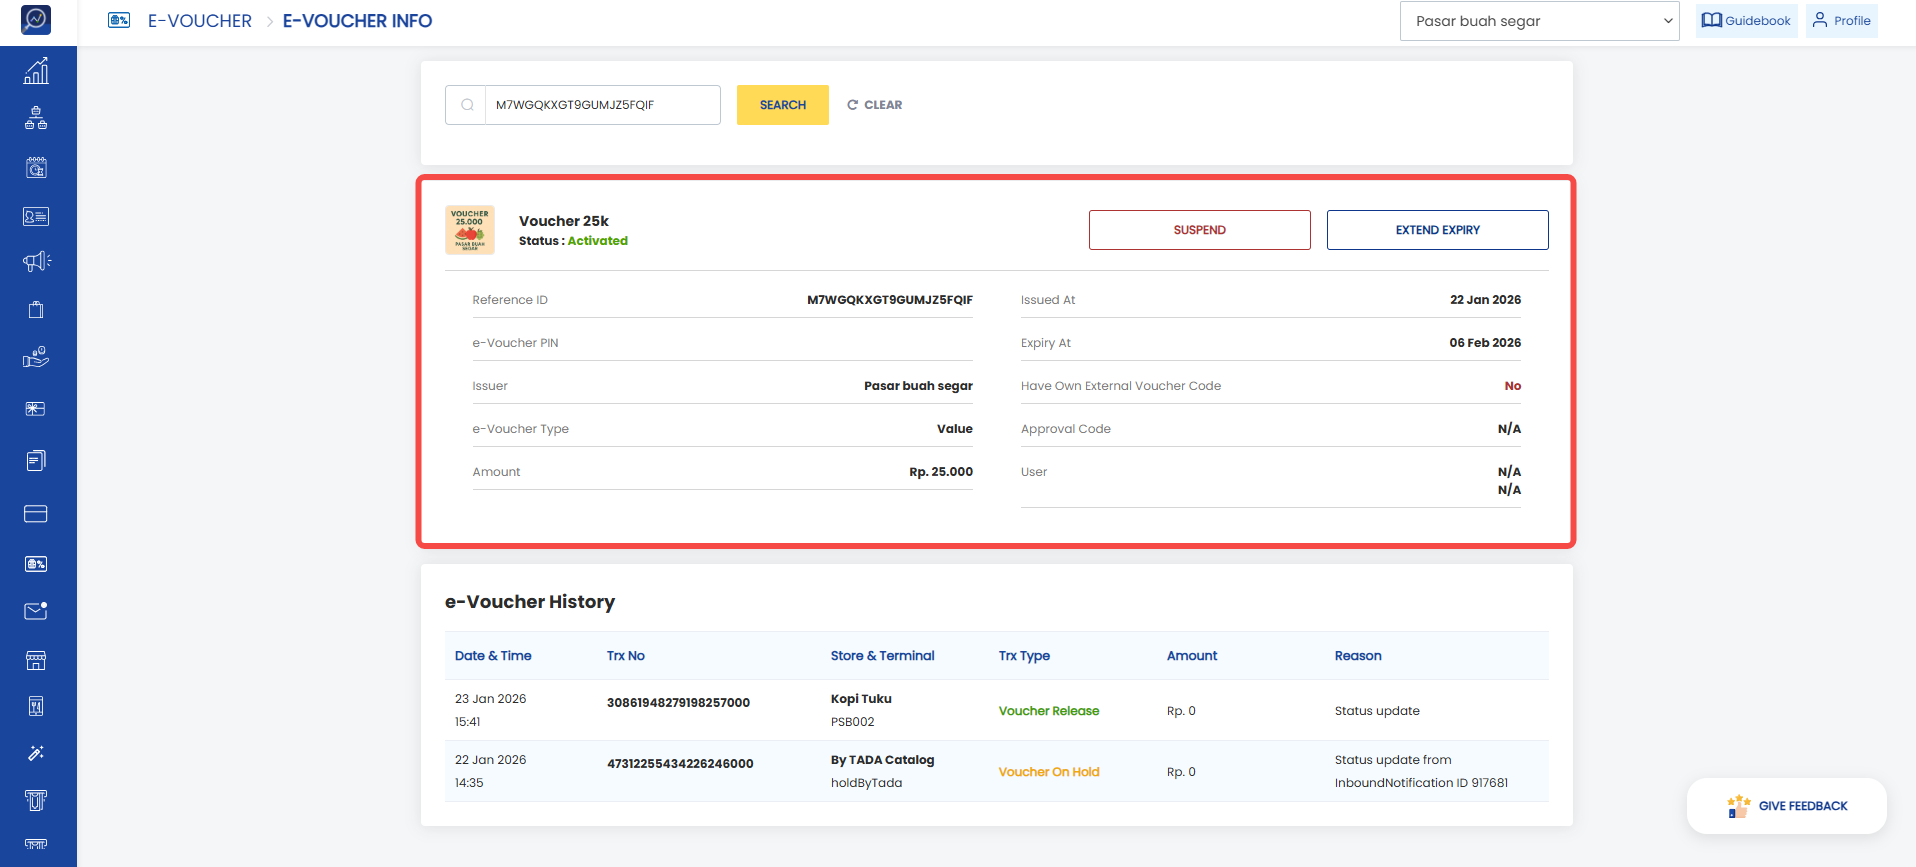 e-Voucher transactions that have occurred will appear in the e-Voucher History section with the following data:
- Date & Time: When the transaction occurred
- Transaction Number
- Store & Terminal: Store and terminal where the transaction occurred
- Transaction Type: Type of transaction performed
- Amount: Transaction amount
- Reason